
Send Data to External Services with Custom Webhook
Enrollio's Custom Webhook automation action lets you send real-time enrollment and family data to external services using GET, POST, PUT, and DELETE requests. Connect your accounting software, parent communication apps, or custom APIs—no coding required.
This article walks you through setup, best practices, and troubleshooting so you can ship reliable integrations fast.
What is Custom Webhook?
Custom Webhook is an outbound automation action that makes an HTTP request to any URL you specify. When an automation reaches this step, Enrollio assembles your headers, parameters, and payload (including dynamic family or enrollment data) and sends the request to the external system.
Use it to push new enrollments to your accounting system, sync tour bookings to your calendar app, or trigger notifications in your staff management platform.
Key Benefits
Understanding where Custom Webhook shines helps you pick the right automation tool and structure requests correctly for your provider.
- Flexible methods: Use GET, POST, PUT, DELETE to match any API operation.
- Authentication options: Bearer token, API key, Basic Auth, OAuth2, or no auth with custom headers.
- Precise data mapping: Dynamic values (e.g., {{contact.email}}) populate headers, params, or body so every call includes the right family details.
- Reusable patterns: Build once, reuse across automations with consistent headers, content types, and payload shapes.
- Faster troubleshooting: Optional response capture and automation execution logs streamline testing and issue resolution.
Authentication Options
External APIs often require credentials. Choose the option your provider supports and place secrets in headers—not URLs—for better security.
Bearer Token
Use header Authorization: Bearer <token>.
Example header: Authorization: Bearer {{location.api_token}}
API Key
Most services expect a custom header (e.g., X-API-Key: <key>). Only use query-string keys if the provider requires it.
Header example: X-API-Key: {{location.external_api_key}}
Query example (only if required): ?api_key={{location.external_api_key}}
Basic Auth
Provide Username and Password in the action's Authorization fields. Enrollio sends the proper Authorization: Basic ... header.
OAuth2
If your provider uses OAuth2, first configure the token in Global Automation Settings → OAuth2 / Manage Tokens, then select it in the action. OAuth2 is recommended for providers that rotate or refresh tokens automatically.
No Auth + Custom Header
If your provider asks for a custom header (e.g., X-Signature: <secret>), choose No auth, then add the header under Headers.
HTTP Methods & Request Components
Matching the correct method and placing data in the right part of the request prevents 400/401/422 errors and speeds up integrations.
-
URL & Path Parameters: You can include variables in the path, e.g.,
https://api.example.com/families/{{contact.id}}. -
GET: Retrieve data. Bodies are typically ignored—use query parameters:
https://api.example.com/enrollments?email={{contact.email}}&status=active - POST: Create resources. Send a JSON body or form data (see Content-Type).
- PUT: Update resources. Usually requires an ID in the path and a JSON body.
- DELETE: Remove resources. Often includes the ID in the path.
-
Content-Type: Common values:
application/json(JSON body) orapplication/x-www-form-urlencoded(form fields). Match your provider's docs.
Event vs Method (UI Behavior)
The Custom Webhook action offers two configuration modes. CUSTOM exposes full control (method, content type, raw body). GET/POST offer simplified experiences.
Pick the mode that matches your provider's requirements.
- Event = CUSTOM (advanced): Shows Method (GET, POST, PUT, DELETE), Content-Type, and Raw Body editor for JSON or other formats. Best when you need JSON payloads, non-POST methods, or explicit headers/content types.
- Event = POST (simple): Shows Body (Key and Value) pairs for a form-style payload; no Raw Body editor. Use for simple key/value submissions. Switch to CUSTOM if your provider expects JSON.
- Event = GET (simple): No request body. Use Query Parameters for filters. Save response from this Webhook is available.
Headers & Query Parameters
APIs commonly require specific headers and query parameters for auth, content type, versioning, or filtering. Map dynamic values when needed.
Headers (examples):
Authorization: Bearer {{location.api_token}}
Content-Type: application/json
X-API-Key: {{location.external_api_key}}
X-App-Version: 2024-11-01
Query parameters (examples):
family_id={{contact.id}}
email={{contact.email}}
source=automation
Avoid putting secrets in query strings unless your provider requires it.
Payload & Field Mapping
Dynamic values let you personalize each request with family, enrollment opportunity, or other automation data—shaped to match the external API.
Flat JSON payload (POST / create):
{
  "id": "{{contact.id}}",
  "first_name": "{{contact.first_name}}",
  "last_name": "{{contact.last_name}}",
  "email": "{{contact.email}}",
  "phone": "{{contact.phone}}"
}
Nested JSON:
{
  "family": {
    "id": "{{contact.id}}",
    "name": "{{contact.name}}",
    "phones": ["{{contact.phone}}"],
    "tags": ["{{contact.tag}}", "new-enrollment"]
  }
}
Form-encoded:
Set Content-Type to application/x-www-form-urlencoded and provide key/value pairs instead of JSON.
Testing & Troubleshooting
Validating requests before you go live prevents broken automations. Use both provider-side tools and automation logs.
- Use Test Automation (draft mode) with a sample family record to trigger the action.
- Send test calls to tools like Webhook.site or Postman collections to confirm headers, params, and payload shape.
- Verify basics first: correct URL, method, Content-Type, required headers, and valid credentials.
- Check Execution Logs / run history to confirm the action fired and review status codes.
- If you don't see Content-Type or a Raw Body editor, verify the Event selection. Choose CUSTOM for JSON payloads or PUT/DELETE requests.
Common HTTP responses:
- 400/422 Invalid payload → match the provider's required fields and types.
- 401/403 Unauthorized/Forbidden → fix token, key, scope, or account permissions.
- 404 Wrong path/ID → confirm endpoint and path variables.
- 409 Conflict/idempotency → ensure unique IDs or follow provider's upsert rules.
- 429 Rate limited → slow down or add delays/retries per provider limits.
- 5xx Provider error → retry later and contact provider support.
How To Set Up Custom Webhook
A clear, repeatable setup reduces errors and ensures your requests match the provider's expectations. Follow these steps to configure the URL, event/method, authorization, headers/params, and payload correctly before testing.
1. Open your automation
Navigate to Automation → Automations and open the automation where you want to send data so the run reaches this action with the right family record context.
2. Add the action
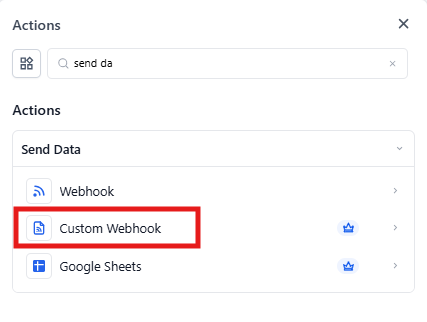
Click + Add action → Send Data → Custom Webhook to create the step that will make the outbound HTTP call.
3. Name the action
Give the action a clear name that describes what it does, like "Send enrollment to accounting system" or "Create family in parent portal."
4. Choose Event/Method
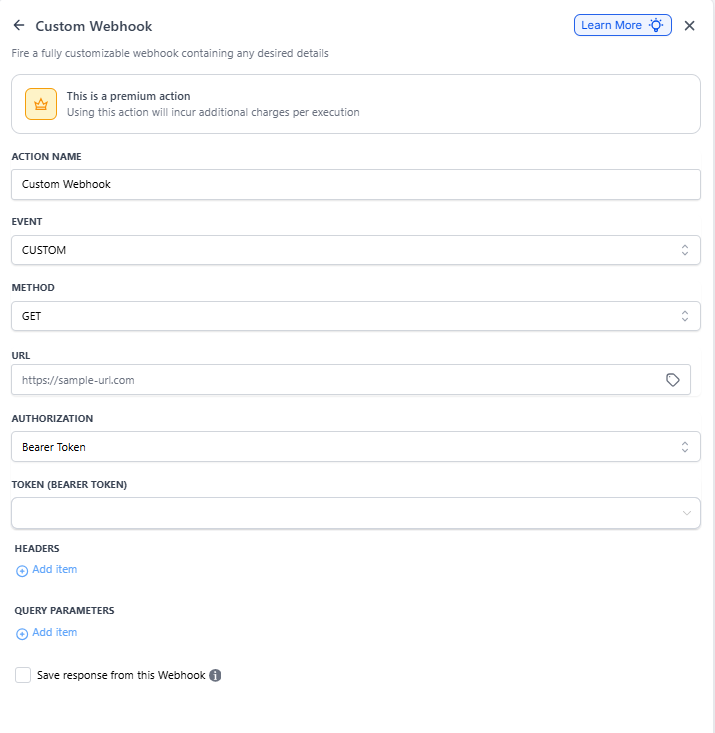
Select CUSTOM for full control (recommended for most integrations), or choose GET/POST for simplified forms.
5. Enter the webhook URL
Paste the endpoint URL provided by your external service. You can include dynamic values in the path if needed.
6. Configure authentication
Choose the authentication method your provider requires (Bearer Token, API Key, Basic Auth, OAuth2, or No Auth). Add credentials using dynamic values from your location settings when possible.
7. Add headers
Click + Add Header to include required headers like Content-Type, API keys, or custom headers. Use the tag icon to insert dynamic values.
8. Add query parameters (if needed)
Click + Add Query Parameter to include URL parameters like family IDs, email addresses, or filter values.
9. Build your payload
If using POST or PUT, construct your request body. For CUSTOM mode, write JSON in the Raw Body editor. Use dynamic values to pull in family data, enrollment details, or other automation context.

10. Test the webhook
Click Test Action or use Test Automation with a sample family record. Review the response and execution logs to confirm the request succeeded.
11. Save and activate
Save the action, then publish your automation. Monitor the first few runs to confirm data flows correctly.
Frequently Asked Questions
Can I use Custom Webhook to receive data in Enrollio?
No, Custom Webhook sends data out. To receive data from external systems, set up an incoming webhook trigger at the start of your automation.
How do I send enrollment data when a family books a tour?
Create an automation triggered by "Tour Booked," then add a Custom Webhook action that posts the family contact details and tour time to your external calendar or CRM.
What if my provider requires a specific date format?
Use Enrollio's date formatting options in the dynamic value picker, or add a Text Formatter action before the webhook to reformat dates.
Can I retry failed webhook calls?
Enrollio does not automatically retry failed webhooks. Build retry logic using automation delays and conditional branches, or handle retries on the receiving end.
How do I debug a 401 Unauthorized error?
Verify your token or API key is correct, check that it's placed in the right header or auth field, and confirm your account has permission to access the endpoint.
Can I send data to multiple endpoints in one automation?
Yes, add multiple Custom Webhook actions in sequence, or use parallel branches to send data to different systems simultaneously.