
Automation Trigger: Enrollment Status Changed
This article explains how to use the "Enrollment Status Changed" automation trigger to streamline your enrollment process. You'll learn what this trigger does, when to use it, and how to set it up step-by-step with real childcare examples.
What is the Enrollment Status Changed Trigger
The Enrollment Status Changed trigger activates whenever an enrollment opportunity moves from one status to another—like from "Tour Scheduled" to "Enrolled" or "Lost."
This trigger helps you automate follow-ups, notify your team, update records, and keep enrollment moving forward without manual work. When a family's status changes, Enrollio takes action automatically.
Key Benefits
- Automatic Team Notifications: Alert staff instantly when an enrollment moves forward or needs attention
- Less Manual Work: Automate routine tasks triggered by status changes so you can focus on families
- Accurate Records: Keep your enrollment pipeline current without manual updates
- Targeted Automations: Use filters to create specific automations for different enrollment scenarios
- Faster Enrollments: Move families through your process smoothly with timely follow-ups and handoffs
How to Set Up the Trigger
Step 1: Access Automation Settings
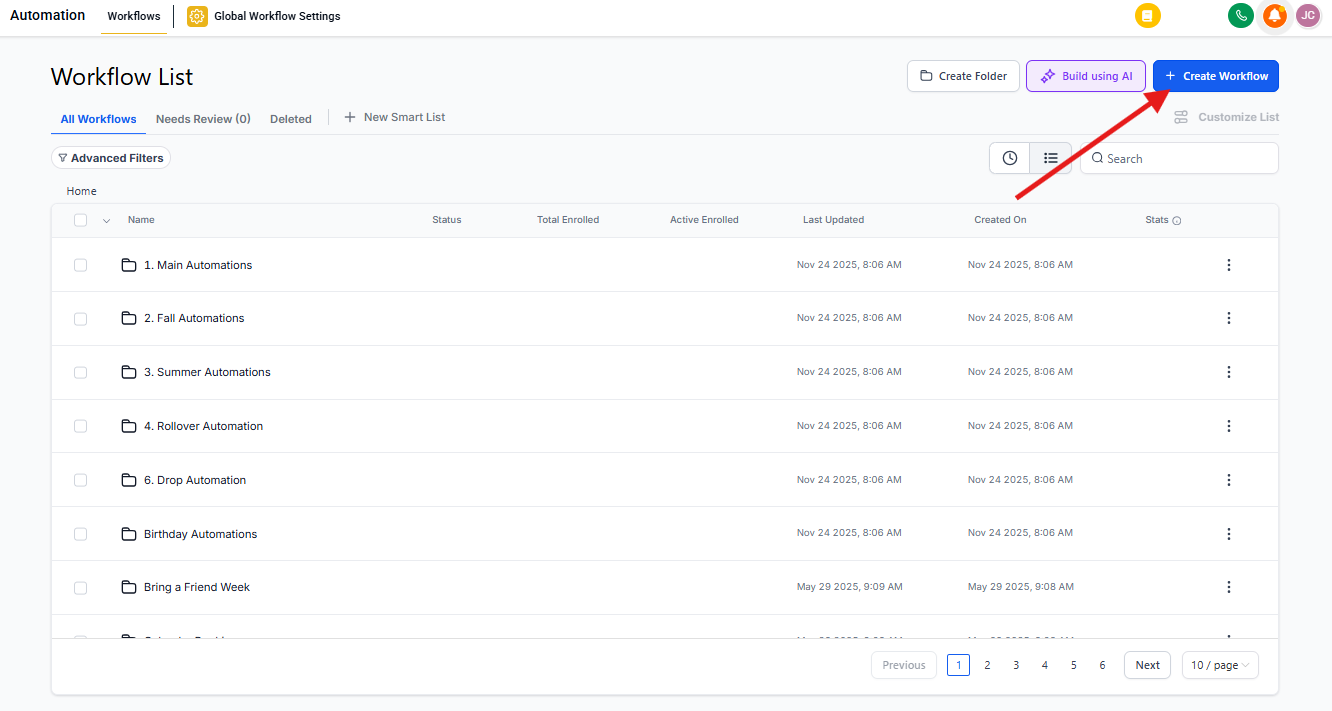
Navigate to Automations in your Enrollio dashboard. Click "Create Automation" or open an existing automation you want to edit.
Step 2: Add the Trigger
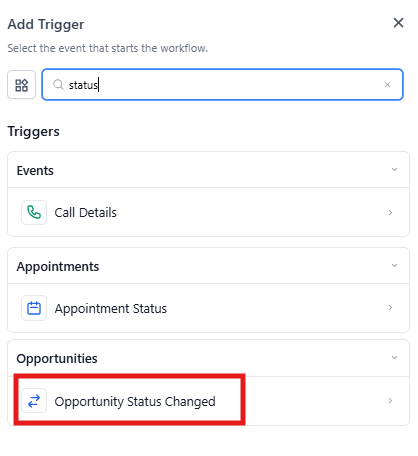
Click "+ Add New Trigger" and select "Enrollment Status Changed" from the dropdown menu.
Step 3: Name Your Trigger
Give it a clear, descriptive name like "New Enrollment Notification" or "Lost Enrollment Follow-Up."
Step 4: Configure Filters
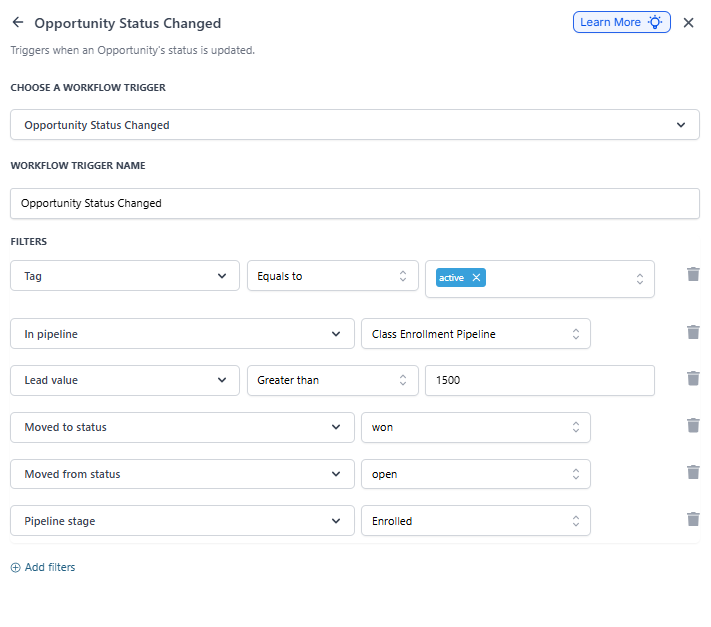
Set filters to control exactly when this automation runs:
- Assigned To: Target enrollments assigned to specific staff members
- Has Tag: Only trigger for enrollment opportunities with certain tags
- In Enrollment Pipeline: Limit to a specific pipeline (like "Infant Program" or "Preschool")
- Lead Value: Set minimum or maximum enrollment values
- Moved From Status: Specify the previous status before the change
- Moved To Status: Specify the new status that triggers the automation
- Pipeline Stage: Narrow down to specific stages within your pipeline
Step 5: Save and Test
Save your configuration and test it with sample data to make sure it works as expected.
Step 6: Publish
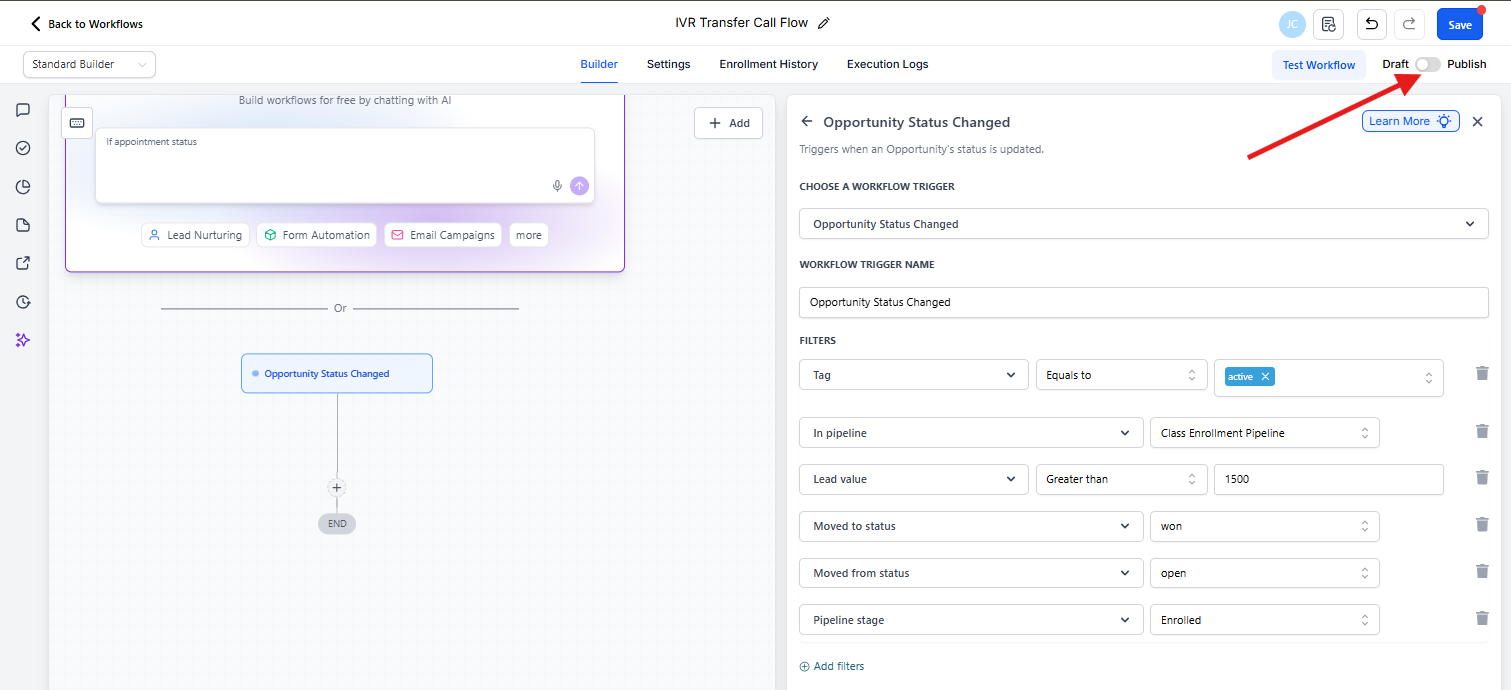
Toggle the "Publish" switch to activate your automation and start saving time.
Real Childcare Examples
New Enrollment Celebration
Scenario: A family moves from "Application Submitted" to "Enrolled."
Setup:
- Trigger: Enrollment Status Changed
- Filters:
- Moved From Status: Application Submitted
- Moved To Status: Enrolled
What Happens: Send a welcome email to the family, notify your enrollment coordinator to schedule orientation, and automatically create a task to prepare the child's classroom materials.
Lost Enrollment Follow-Up
Scenario: An enrollment opportunity moves to "Lost."
Setup:
- Trigger: Enrollment Status Changed
- Filters:
- Has Tag: "High Priority"
- Moved To Status: Lost
What Happens: Send a follow-up message asking for feedback about their decision, notify your director for review, and move the family to a re-engagement list for future openings.
Tour to Application Reminder
Scenario: A family moves from "Tour Completed" to "Application Pending."
Setup:
- Trigger: Enrollment Status Changed
- Filters:
- Moved From Status: Tour Completed
- Moved To Status: Application Pending
What Happens: Send an email with next steps and application instructions, create a follow-up task for 48 hours later, and notify the assigned enrollment specialist.
Waitlist to Active Enrollment
Scenario: An opportunity moves from "Waitlist" to "Tour Scheduled."
Setup:
- Trigger: Enrollment Status Changed
- Filters:
- Moved From Status: Waitlist
- Moved To Status: Tour Scheduled
What Happens: Send a tour confirmation and preparation email, assign the family to a tour guide, and update their priority status in your system.
Program-Specific Enrollment Tracking
Scenario: Families enrolling in your infant program move to "Enrolled."
Setup:
- Trigger: Enrollment Status Changed
- Filters:
- In Enrollment Pipeline: Infant Program
- Moved To Status: Enrolled
What Happens: Generate a program-specific enrollment report, notify the infant room lead teacher, and trigger your infant-specific onboarding sequence.
Frequently Asked Questions
Can I use multiple filters in one trigger?
Yes! Combine filters like "Has Tag" and "In Enrollment Pipeline" to create precise automations that only run under specific conditions. This helps you avoid unnecessary notifications.
What if an enrollment status changes multiple times quickly?
The trigger activates each time the status changes. If you're concerned about duplicate actions, add wait steps or conditions to your automation to prevent redundant notifications or tasks.
Can I create automations for different programs or age groups?
Absolutely. Set up separate automations for different enrollment pipelines, or use filters to apply triggers to specific programs like "Toddler Program" or "After School Care."
How do I handle enrollment opportunities without tags?
Use the "Doesn't Have Tag" filter to target enrollment opportunities without specific tags. This ensures your automation only runs for untagged opportunities.
Can I track why families didn't enroll?
Yes! Use the "Lost Reason" filter to identify why an enrollment was lost, then trigger specific follow-ups like feedback surveys or adding them to a future waitlist campaign.
What's the difference between "Enrollment Status Changed" and "Pipeline Stage Changed" triggers?
"Enrollment Status Changed" tracks overall status (like Open, Won, Lost). "Pipeline Stage Changed" tracks movement between specific stages within your pipeline (like Tour Scheduled → Tour Completed → Application Submitted). Use whichever matches your process best.