
Automation Action - Webhook (Outbound)
Learn how to use the outbound webhook action in the Automation Builder. You'll discover how to automatically send parent and enrollment data from Enrollio to external applications or services in real-time, enabling powerful custom integrations and extending your automation capabilities.
Table of Contents
- What is an Automation Action Webhook?
- Key Benefits of Using Outbound Webhooks
- How to Set Up and Configure a Webhook Action
- Configuring the Webhook Details
- Adding Custom Data
- Understanding the Webhook Data (Payload)
- Testing Your Webhook and Going Live
- Frequently Asked Questions
What is an Automation Action Webhook?
A webhook action is a powerful messaging tool that automatically sends information from Enrollio to other software applications. Think of it as a real-time data courier that connects Enrollio with virtually any external system that can receive web requests.
When a parent or family reaches the webhook step in your automation, Enrollio gathers relevant data about that family and the triggering event, packages it into a "payload," and sends it to the URL you specified. This allows you to trigger actions, sync data, or start processes in other applications outside of Enrollio.
Key Benefits of Using Outbound Webhooks
Webhooks solve complex integration challenges and unlock advanced automation strategies that aren't possible with standard integrations alone.
- Unlimited Integrations: Connect to thousands of third-party apps and services or custom-built tools to trigger actions outside of Enrollio.
- Real-Time Data Sync: Instantly send enrollment data to external databases, spreadsheets, or analytics platforms as events happen in your automations.
- Customized Actions: Trigger unique processes in other systems, such as updating your state licensing software, syncing with accounting platforms, or notifying staff through custom channels.
- Enhanced Reporting: Push automation and family data to business intelligence tools for advanced, customized reporting and dashboards.
- Ultimate Flexibility: Extend the power of Enrollio's automation by creating solutions tailored to your specific childcare business needs.
How to Set Up and Configure a Webhook Action
Follow these steps to set up your webhook correctly and send data to your desired destination.
- Navigate to the Automation Builder by clicking Automations in your main menu.
- Either create a new automation or select an existing one to edit.
- Ensure your automation has at least one trigger configured (e.g., "Family Tag Added" or "Tour Scheduled").
- Click the plus icon (+) on the automation canvas where you want to add the action.
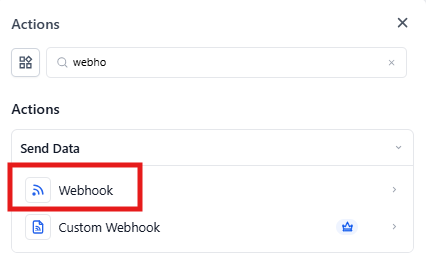
- In the Actions panel search bar, type
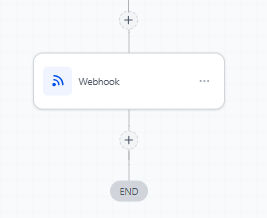
webhook. - Select Webhook from the list. This adds the step to your automation and opens the Webhook configuration panel.
Configuring the Webhook Details
Properly configuring your webhook is crucial for it to function correctly. Here's what each field means and how to fill it out.
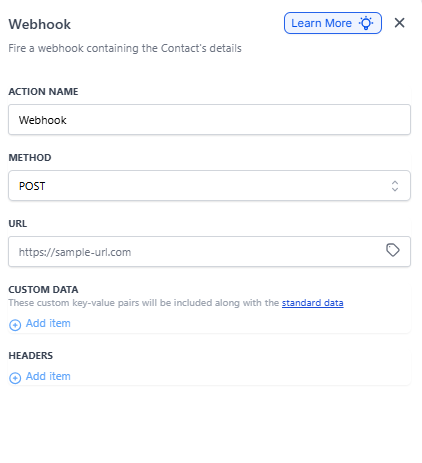
Action Name: Give your webhook a descriptive name that explains its purpose (e.g., "Send New Enrollment to Accounting System" or "Notify Staff of Tour Request"). This helps you easily identify the step in your automation later.
Method: Select the HTTP method for the request. POST is the most common method for sending data and is selected by default. Leave this as POST unless your external service specifically requires a different method.
URL: Enter the unique URL of the external service that will receive the data. This is the most critical field—copy and paste it carefully from the destination service to avoid errors.
Adding Custom Data
You can include additional custom information in your webhook payload beyond the standard parent and family data.
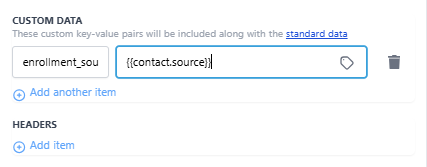
- Under the CUSTOM DATA section, click the + Add item button.
- A new row with a Key and a Value field will appear.
-
Key: This is the label for the data field you're sending (e.g.,
enrollment_sourceorprogram_interest). Use simple text strings without spaces. -
Value: This is the data you want to send. You can use plain text or insert dynamic data using custom values (e.g.,
{{contact.source}}or{{custom_fields.preferred_program}}). - After filling in all the details, click the blue Save Action button at the bottom of the panel.
Understanding the Webhook Data (Payload)
The data sent by the webhook, known as the "payload," contains valuable information. Understanding what's included is essential for correctly processing the data in your external system.
Standard Data
By default, every webhook sends a standard set of information about the parent or family involved in the automation. This includes:
- Full Name, First Name, Last Name
- Email and Phone Number
- Address
- Tags
- All standard and custom fields associated with the family
For a complete list of all standard fields included, click the standard data link in the configuration panel to view the documentation.
Trigger-Dependent Data
The webhook payload can include additional data related to the specific trigger that initiated the automation. This is a critical concept to understand.
Example: If your automation trigger is "Tour Scheduled," the webhook payload will also contain details about that specific tour (e.g., date, time, tour type, assigned staff member).
Testing Your Webhook and Going Live
Before activating your automation, test the webhook to confirm it's sending data correctly.
Testing Your Webhook
You can use free services like webhook.site to test your webhook, or search for "free webhook test" to find alternatives.
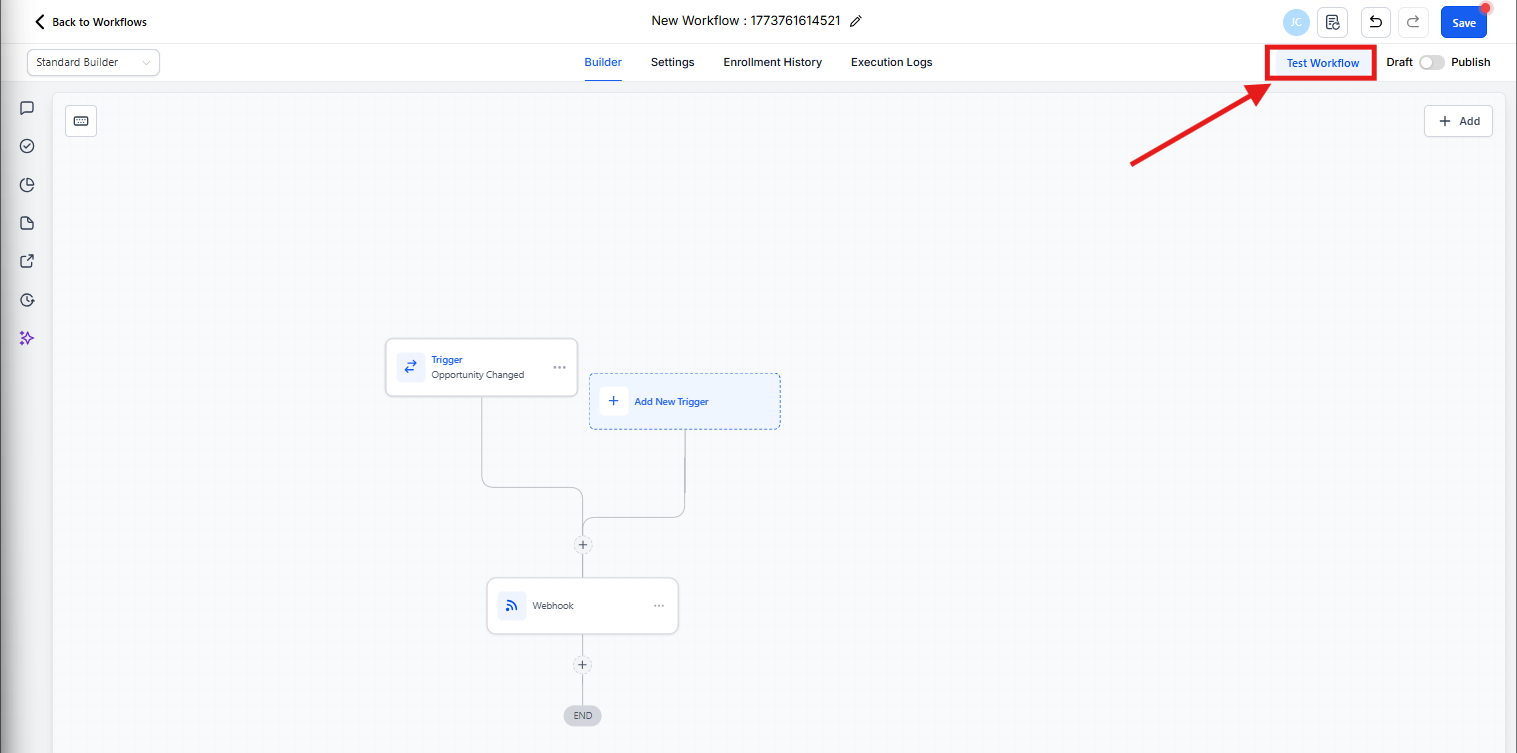
- After saving your webhook action, click the Test Automation button in the top-right corner of the builder.
- The "Run A Test For Parent/Family" panel will open. Use the dropdown to choose a test family from your system.
- Click the blue Run Test button. This executes the entire automation for that family, including firing the webhook action.
- To verify the test was successful, click on the Execution Logs tab.
- Find the log entry for your test family. You should see the Webhook action with a status of Executed. This confirms that Enrollio successfully sent the data to the URL you provided.
- Once you've confirmed the webhook works as expected, click the Publish toggle in the top-right corner to set your automation live.
Data Format Details
While data for parents and families, as well as your Client Account information, is available by default, other related objects such as tours, tasks, or enrollment opportunities will ONLY be included if the corresponding trigger is applied in your automation.
For example, to receive tour details in your webhook, your automation must use a tour-related trigger like "Tour Scheduled" or "Tour Completed."
Frequently Asked Questions
What external services can I connect with webhooks?
You can connect to any service that accepts webhook data via a URL endpoint. This includes custom-built applications, integration platforms, databases, and many third-party childcare management tools.
How do I find the webhook URL for my external service?
Most services provide webhook URLs in their integration or API settings. Look for sections labeled "Webhooks," "API," or "Integrations" in your external service's documentation or settings.
Can I send data to multiple webhooks from one automation?
Yes! You can add multiple webhook actions to a single automation. Each webhook can send data to a different URL or service.
What happens if the webhook fails?
Check your Execution Logs to see error details. Common issues include incorrect URLs, the external service being down, or authentication problems. The logs will help you troubleshoot the specific issue.
Can I include information about enrolled children in the webhook?
Yes, if you've stored child information in custom fields associated with the parent or family record, you can include that data in your webhook payload using custom data fields.