
Automation AI Builder
Automation AI Builder lets you create complete automations by describing your goal in plain language. Instead of configuring triggers and actions manually, you can generate an automation, review it, and refine it using AI. This guide explains access points, building steps, editing options, and best practices.
Table of Contents
- What is Automation AI Builder?
- Key Benefits
- Entry Points
- How to Build Your First AI Automation
- Point and Edit for Precise Control
- Chat Mode
- Best Practices for Effective Prompts
- Providing Feedback
- Beta Limitations
- Troubleshooting Quick Tips
- Frequently Asked Questions
What is Automation AI Builder?
Automation AI Builder converts natural-language prompts into end-to-end automations. It accelerates setup and reduces manual configuration by generating triggers, actions, and structure you can immediately review and customize.
Describe what you want in plain language, and Enrollio AI generates a complete automation. You can start from multiple entry points, then adjust the result using conversational edits, point-and-edit selection, or chat-only brainstorming.
Key Benefits of Automation AI Builder
Understanding the value helps you decide when to use AI versus manual building and how to combine both for speed and control.
- Speed: Generate an entire automation from a single prompt in seconds.
- Simplicity: Use everyday language—no need to remember specific triggers and actions.
- Consistency: Start with a structured draft, then iterate for accuracy.
- Flexibility: Edit with natural language or target specific steps visually.
- Scalability: Reuse prompt templates and best practices across your team.
Entry Points
Knowing all the ways to open Automation AI Builder saves clicks and helps you pick the fastest route based on your context.
There are three ways to access the Automation AI Builder:
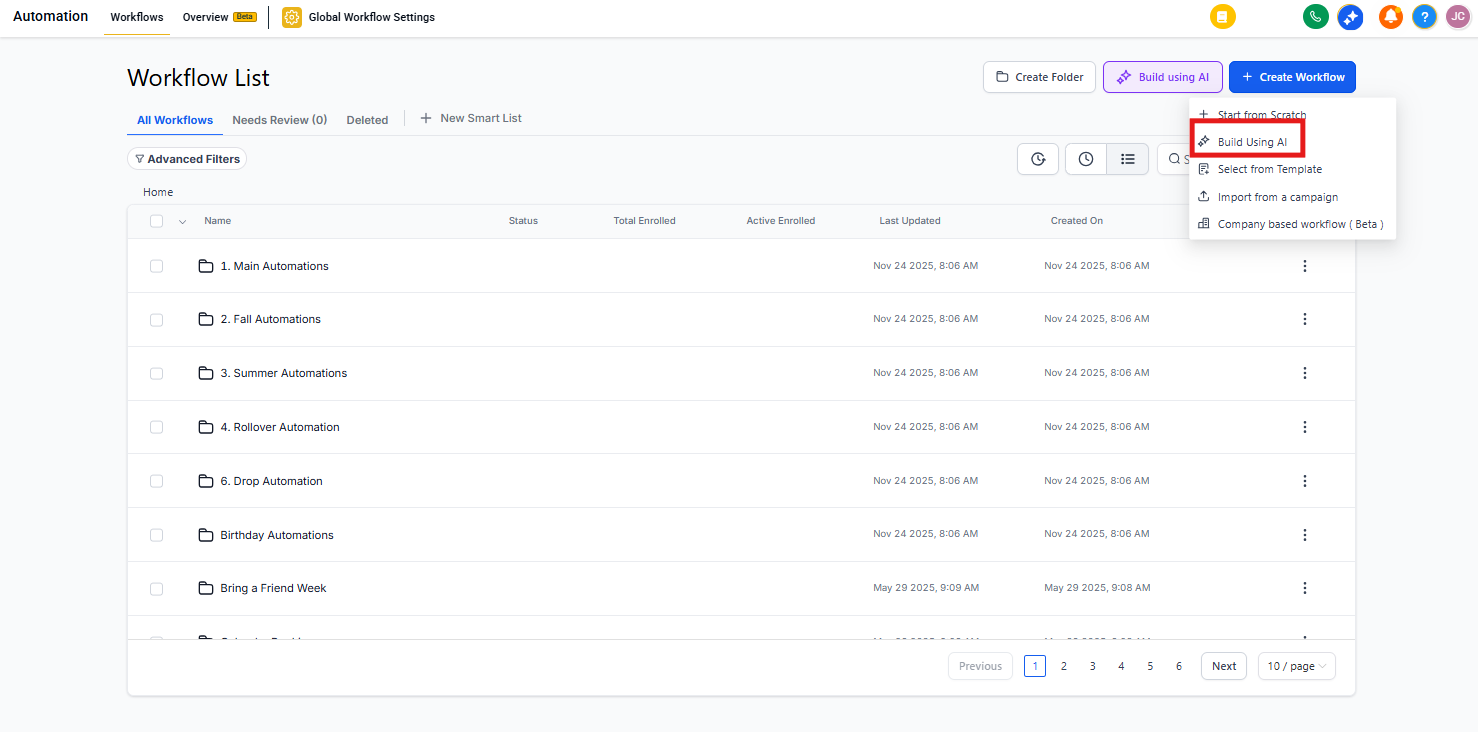
1. From the Automation List Page
Navigate to Automation → Automations and click the Build using AI button. This opens a modal where you can enter your prompt.
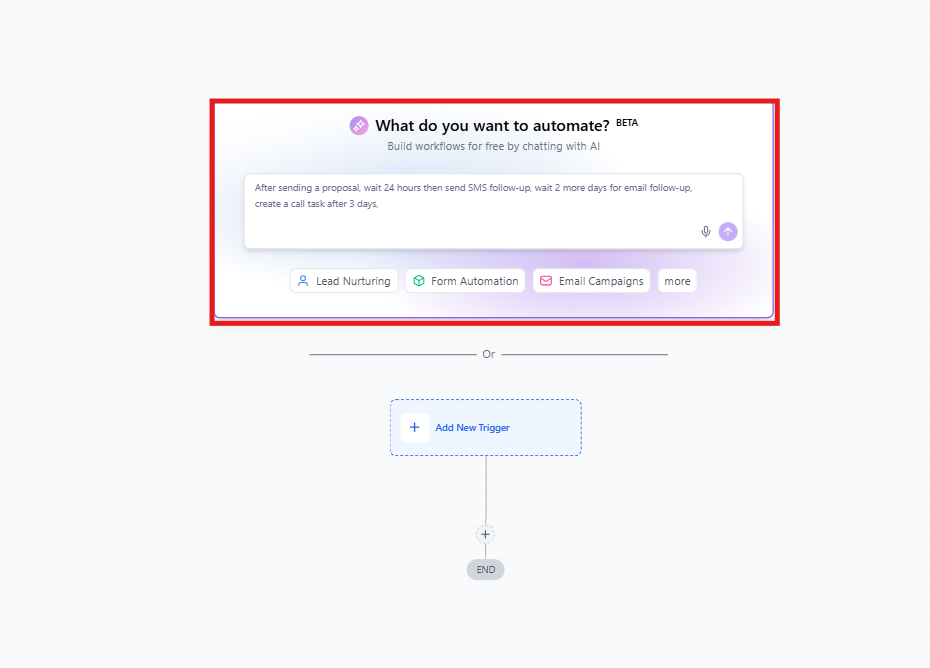
2. From the Prompt Box Inside Automation Builder
When creating a new automation from scratch, you'll find an AI prompt box directly above the Add Trigger button in the automation builder. Simply type your automation requirements here.
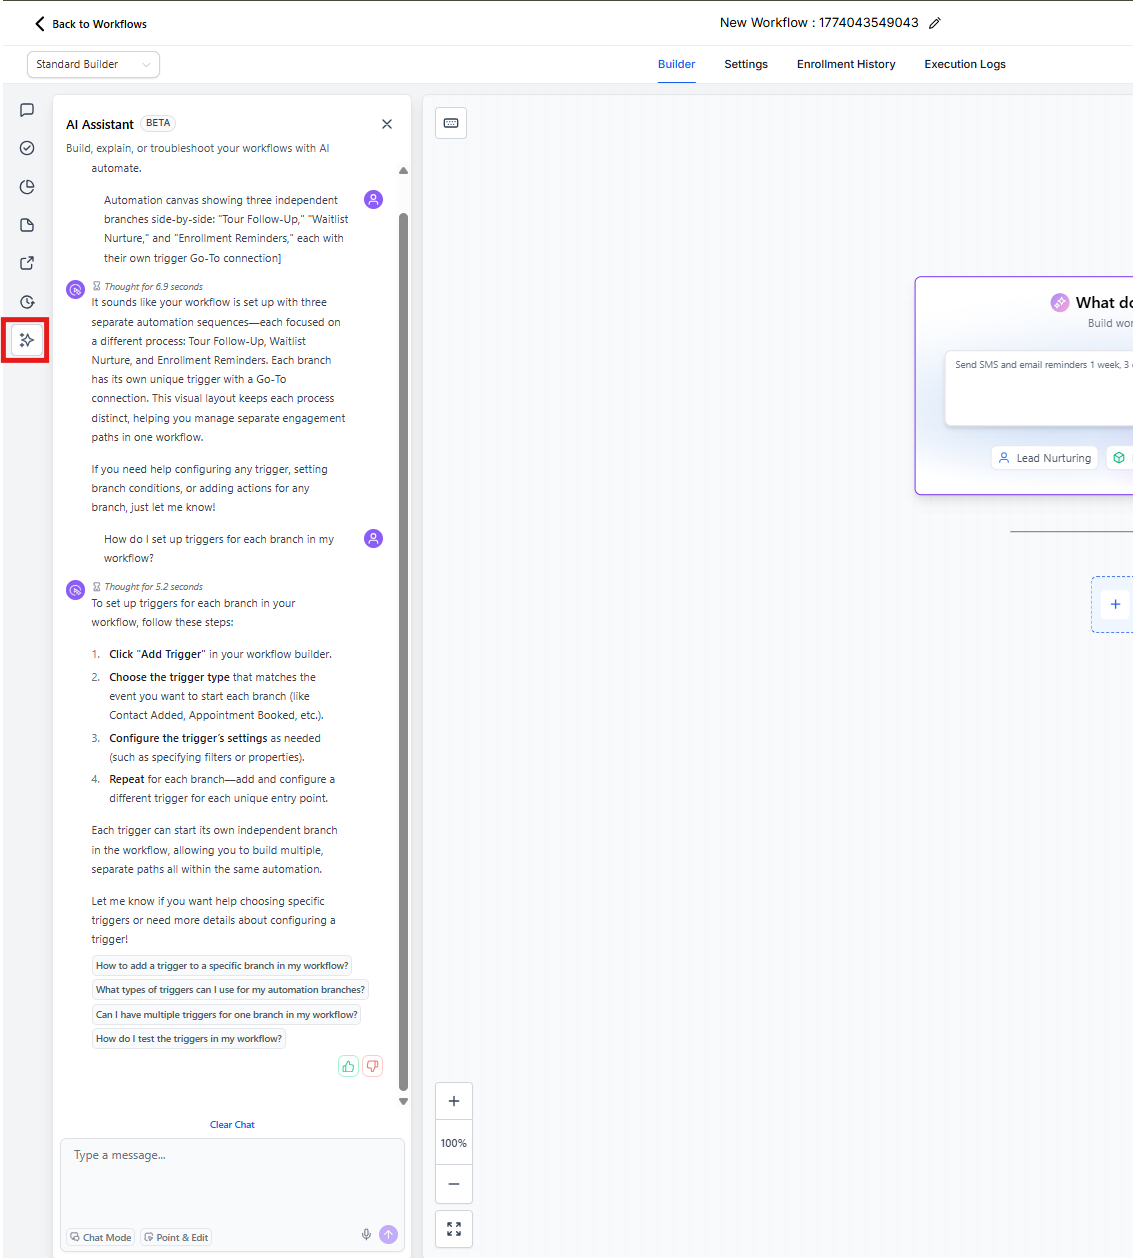
3. Using the AI Chatbot Assistant
Inside the automation builder, you can use the AI chatbot assistant to help build your automation. Click the chat icon to open the assistant panel.
How to Build Your First AI Automation
A structured path—prompt, generate, review, and refine—ensures the AI output aligns with your automation goals.
Step 1: Enter Your Prompt
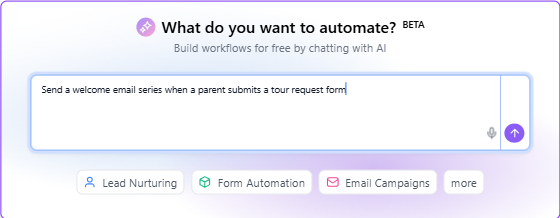
Enter your prompt in any of the entry points mentioned above, or ask the chatbot to help build an automation. You have two options to get started:
- Write your own custom prompt - Describe your automation needs in your own words
- Use the provided templates - Select from pre-written prompt templates available in the interface
Here are some example prompts you can use:
- "Send a welcome email series when a parent submits a tour request form"
- "Create a birthday reminder automation that sends text messages to families"
- "Notify my team on Slack when a high-value enrollment opportunity is created"
- "Follow up with tour attendees 24 hours after their visit"
Step 2: Generate the Automation
Click Build Automation button or hit Send (depending on your entry point). You'll see a loader while AI processes your request and builds the automation.
Step 3: Review and Customize
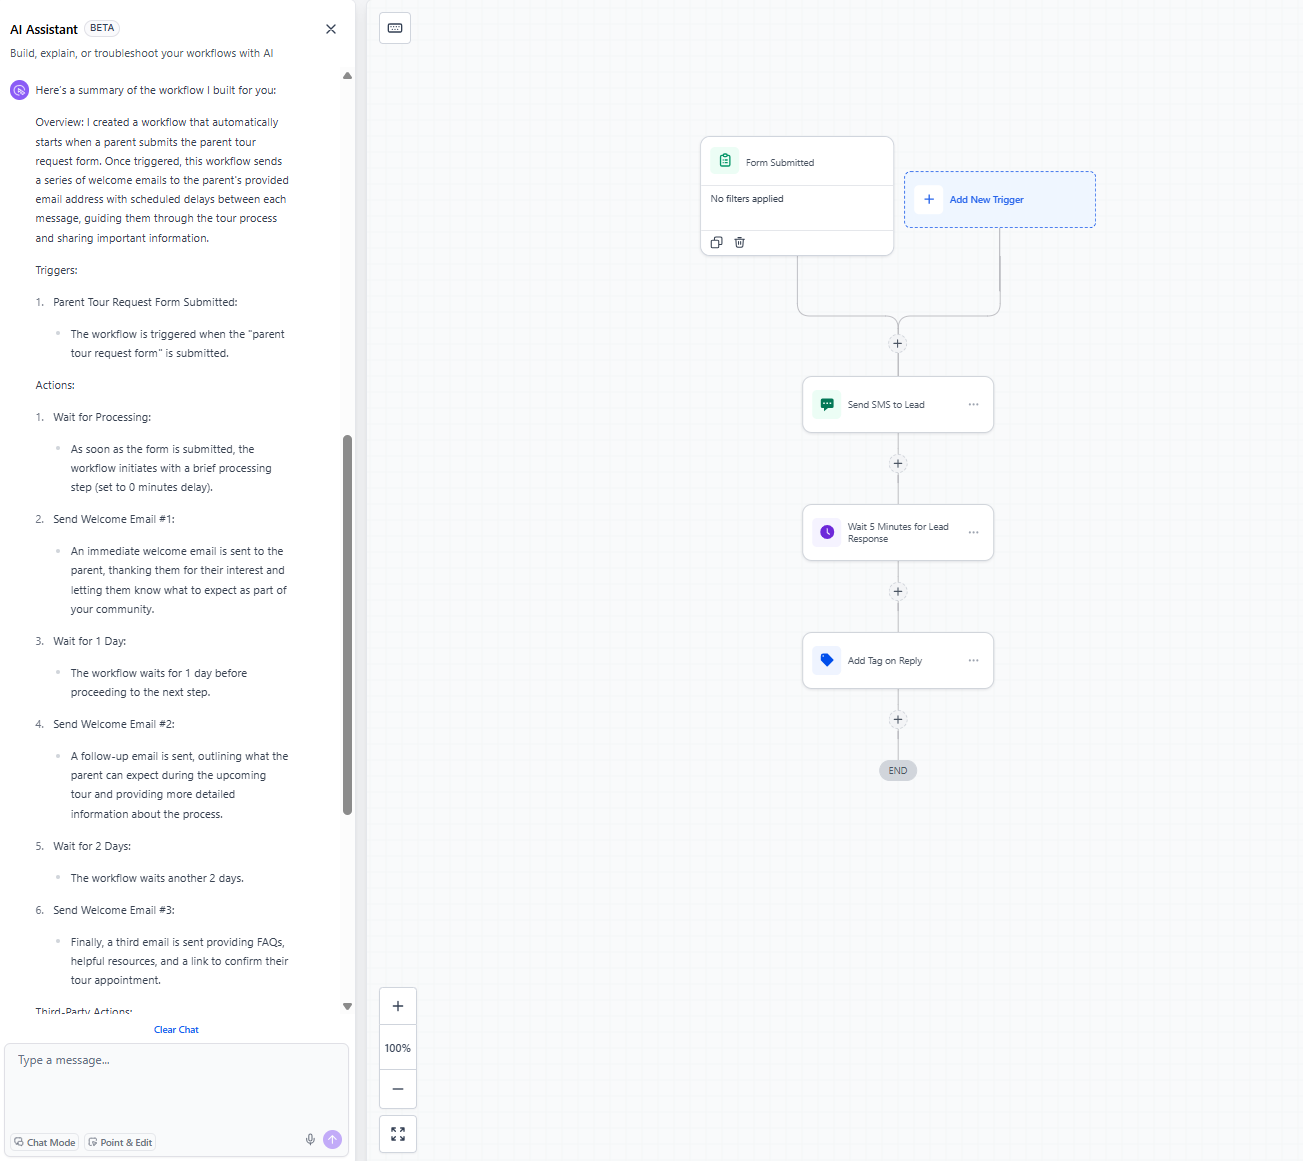
Once the AI completes building your automation, you'll get a summary of the automation created, along with the automation itself:
- If you used entry point 1, you'll be taken to the automation builder
- If you used entry points 2 or 3, the automation will be generated directly in your current builder view
You can then:
- Review the overall automation structure
- Check individual trigger configurations
- Verify action settings and parameters
Step 4: Edit Using AI
After reviewing your automation, you can make changes using natural language through the AI chatbot. Simply describe what you want to change, and the AI will update your automation accordingly.
What You Can Edit
The conversational editing feature currently supports:
Actions:
- Add new actions anywhere in your automation
- Remove unwanted actions (both single and multi-path)
- Replace existing actions with different ones
- Modify action configurations and settings
- Move actions to different positions in the automation
Triggers:
- Add additional triggers
- Remove existing triggers
- Replace triggers with different types
- Modify trigger configurations
Complex Edits:
- Combine multiple changes in a single prompt
Example Edit Prompts
- "Add a 3-day wait between the welcome email and the follow-up"
- "Replace the text message action with a Slack notification"
- "Remove the last email in the sequence"
- "Move the tag action to happen before sending the first email"
- "Change the trigger from form submission to family created"
- "Add an if/else condition to check if the parent has completed enrollment"
Point and Edit for Precise Control
For larger automations where identifying specific actions becomes challenging, use the Point and Edit feature for precise control over your edits.
How it works:
- Click Point and Edit in the AI chatbot interface to activate selection mode
- Select actions to edit: click to select one, click multiple, or hold Shift and drag to select a range
- Selected actions are highlighted
- Describe your change in the chat; AI applies it only to the selected steps
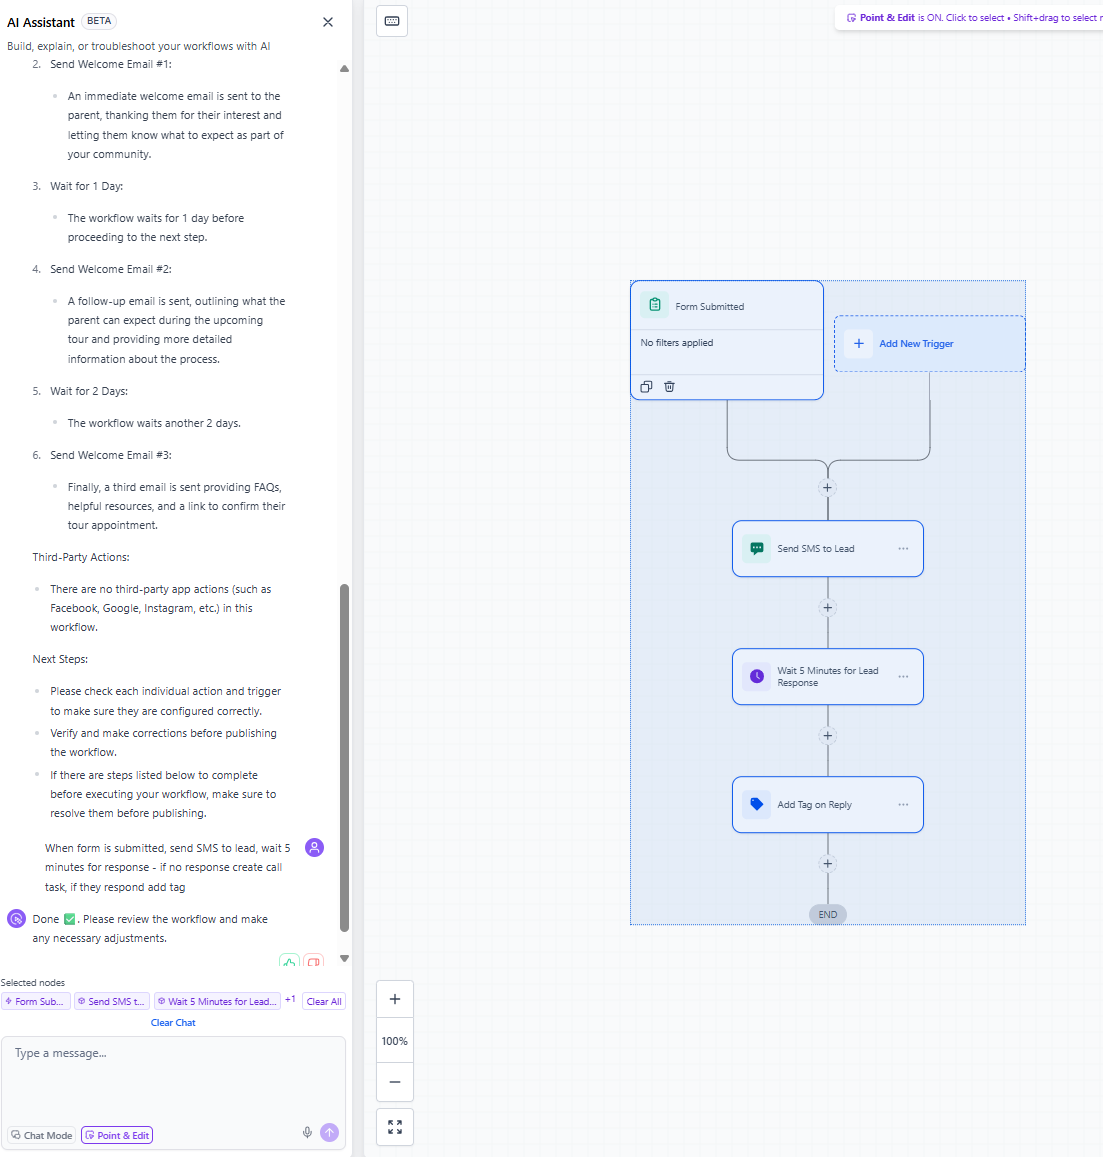
Example Point and Edit Scenarios:
- Select 3 email actions in a sequence and say "Change all these to text messages"
- Select a specific task action and say "Change the text to be more urgent"
- Select multiple actions in a branch and say "Move all of these after the tag action"
- Select a group of actions and say "Delete these selected actions"
Benefits of Point and Edit:
- Precision: Edit exactly what you want without affecting other parts
- Visual Clarity: See what you're editing before making changes
- Efficiency: Make bulk changes to multiple selected actions at once
- Reduced Errors: Eliminates confusion in complex automations with similar actions
Chat Mode
Chat Mode enables planning without building, so you can co-design requirements with AI before committing changes.
How to use Chat Mode:
- Click Chat Mode in the AI panel to enable brainstorming mode
- Brainstorm with AI to plan triggers, actions, branches, and timing
- When ready, disable Chat Mode and ask AI to build the automation
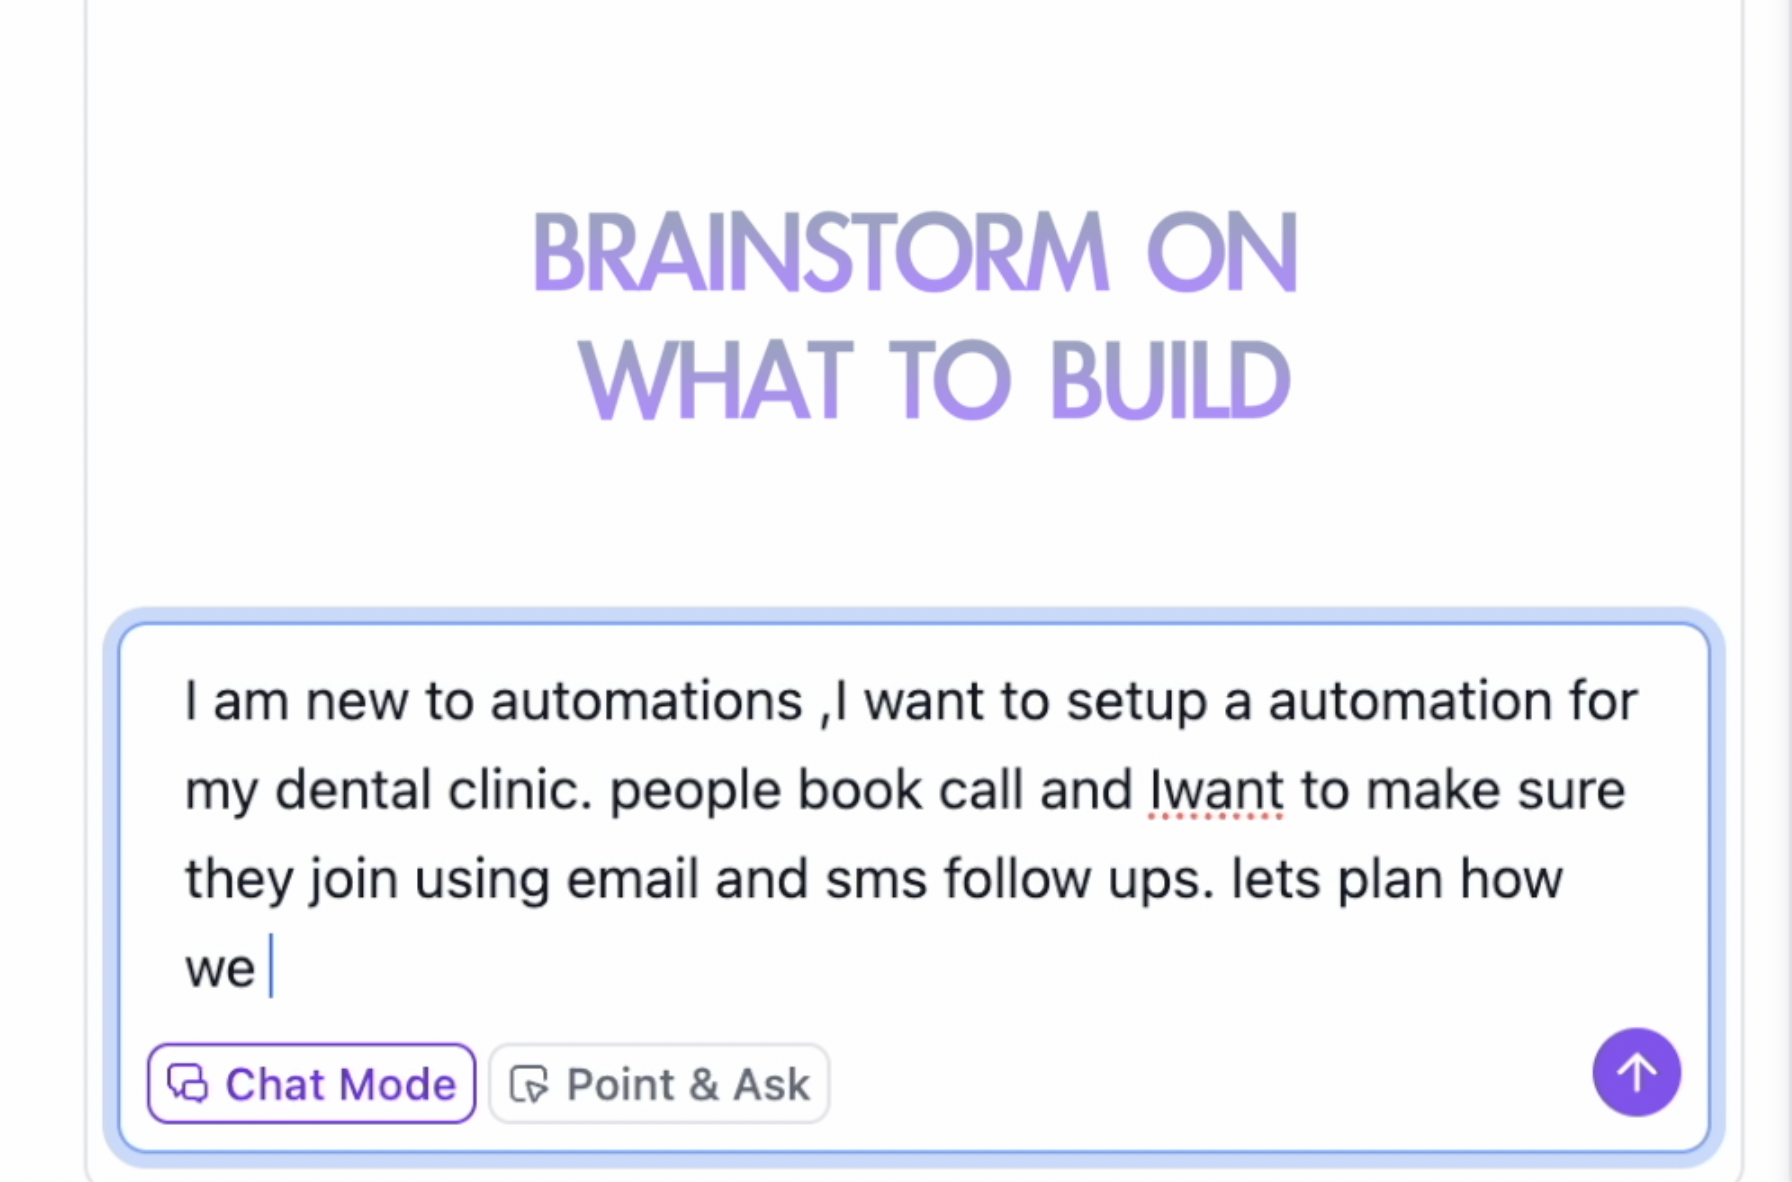
Brainstorm with AI
- Brainstorm first: Decide what to build and make AI your brainstorming partner
- Create a plan: Go back and forth to create a plan for the actions and triggers
Ask AI to Build It
Once finalized, disable chat mode, then ask AI to create the automation based on your plan.
Best Practices for Effective Prompts
Clear prompts improve accuracy. Provide specifics on timing, channels, conditions, and content so the AI builds what you expect.
Be Specific and Clear
Example: "When a parent books a tour, wait 24 hours, then send a reminder text message with tour preparation tips"
Include these details in your prompts:
- Trigger: What starts the automation? (form submission, tag added, enrollment opportunity created)
- Timing: When should actions happen? (immediately, after 2 days, on a specific date)
- Actions: What should happen? (send email, send text, create task, add tag)
- Conditions: Are there any if/then scenarios? (if enrolled, if on waitlist, if no response)
- Content: What should the message say? (brief description helps)
Use Childcare-Specific Context
Reference your actual processes:
- "Send a welcome packet when a family moves from waitlist to enrolled"
- "Remind parents 3 days before their child's start date"
- "Follow up with tour no-shows after 2 hours"
- "Tag families who haven't submitted enrollment paperwork after 7 days"
Start Simple, Then Iterate
Build a basic version first, then use conversational editing to add complexity. This approach catches errors early and helps you refine gradually.
Providing Feedback
Your feedback helps improve Automation AI Builder. If the AI generates something unexpected or you have suggestions, let us know.
You can provide feedback directly in the AI chatbot interface by describing what went wrong or what could be improved. Our team reviews this feedback to enhance the AI's understanding of childcare automation needs.
Beta Limitations
Automation AI Builder is actively being improved. Here are current limitations:
- Modifying configurations inside multi-path actions (if/else, wait with timeout) is not yet supported
- Complex conditional logic may require manual refinement
- Some advanced action configurations may need manual adjustment after generation
- Very complex automations (20+ steps with multiple branches) may be easier to build manually or in stages
We're continuously adding support for more advanced scenarios based on user feedback.
Troubleshooting Quick Tips
AI didn't generate what I expected
- Make your prompt more specific with timing, channels, and conditions
- Use Chat Mode to brainstorm and clarify requirements first
- Break complex automations into simpler prompts, then edit conversationally
Can't find the action I want to edit
- Use Point and Edit mode to visually select the action
- Be more specific in your edit prompt ("the second email" vs "the email")
Automation isn't saving
- Check that autosave is enabled (it should be by default)
- Ensure you have a stable internet connection
- Try manually clicking the Save button in the automation builder
AI asks too many clarifying questions
- This usually means your prompt is ambiguous—be more specific upfront
- Provide exact details about which actions, triggers, or steps you want to change
Frequently Asked Questions
Can I edit automations created with AI manually?
Yes. Once generated, AI automations work like any other automation. You can edit them manually in the automation builder or continue using AI for changes.
Does using AI count against any limits?
No. Automation AI Builder is included in your Enrollio plan with no additional usage limits.
Can I use AI to edit automations I built manually?
Yes. Open any existing automation, and the AI chatbot can help you edit it using natural language or Point and Edit.
What if I want to undo an AI edit?
Use the undo button in the automation builder, or simply tell the AI to revert your last change. You can also describe what the previous version looked like.
Can AI help me debug why an automation isn't working?
Not yet. AI Builder focuses on creation and editing. For troubleshooting live automations, check your automation logs and contact support if needed.
Should I use AI or build manually?
Use AI for:
- Getting started quickly
- Standard automation patterns (welcome series, reminders, follow-ups)
- When you're not sure which triggers/actions to use
Build manually for:
- Very complex conditional logic
- When you know exactly what you want and it's faster to click
- Highly customized advanced scenarios
Most effective: Use AI to generate the structure, then manually fine-tune specific settings.
Related Articles
- Getting Started with Automations
- Automation Triggers and Actions
- Building Parent Communication Automations
- Enrollment Pipeline Automations