
Automation Action - Wait
The "Wait" action lets you control the timing of your automations so you can reach parents at just the right moment. Instead of sending everything immediately, you can pause an automation until a specific time passes or a condition is met. This makes your follow-ups feel more natural and increases engagement.
This guide shows you how to set up Wait actions in your automations with practical examples for childcare enrollment.
Table of Contents
- What Is the Wait Action?
- Wait Action Settings
- When Should You Use the Wait Action?
- How to Configure the Wait Action
- Examples for Childcare Centers
- Frequently Asked Questions
What Is the Wait Action?
The Wait action pauses a family in your automation for:
- A specific amount of time (1 hour, 2 days, etc.)
- Until a condition is met (parent replies to your text, fills out a form, etc.)
- During certain hours or days (only resume between 9 AM - 5 PM on weekdays)
This ensures your messages arrive when parents are most likely to engage, not at midnight or on weekends.
Wait Action Settings
Here's what you can configure in the Wait action:
| Wait Type | Description | Settings Available |
|---|---|---|
| Time Delay | Wait for a set amount of time | Wait [number] [minutes/hours/days] Resume on [specific days] Resume between [time window] Resume at [exact time] |
| Event/Appointment Time | Wait until before or after a scheduled tour or event | Until [exact time] After [months + days + hours + minutes] Before [months + days + hours + minutes] If already in the past [next step/specific step/skip all] |
| Overdue | Wait until before or after an invoice due date | Until [exact time] After [months + days + hours + minutes] Before [months + days + hours + minutes] If already in the past [next step/specific step/skip all] |
| Condition | Wait until specific criteria are met | Multiple Segments (and/or) Multiple Conditions (and/or) [field] [is/is not/contains/etc.] Timeout option available |
| Parent Reply | Wait for a response to your email or text | Reply on channel (email, SMS, etc.) Requires previous message action Timeout option available |
| Trigger Link Clicked | Wait for someone to click a specific link | Select trigger link Timeout option available |
| Email Events | Wait for email activity | Select previous email action Event type: opened/clicked/unsubscribed/spam/bounced Timeout option available |
When Should You Use the Wait Action?
Use Wait actions when you need:
- Timely follow-ups: Send a tour reminder 24 hours before the scheduled visit
- Natural pacing: Wait 2 days after a tour before asking for feedback
- Conditional triggers: Pause until a parent completes your enrollment application
- Business hours only: Resume automations only during your center's operating hours
- Parent engagement: Wait for a reply before sending the next message in your sequence
How to Configure the Wait Action
Follow these steps to add a Wait action to your automation:
Step 1: Create or Open Your Automation
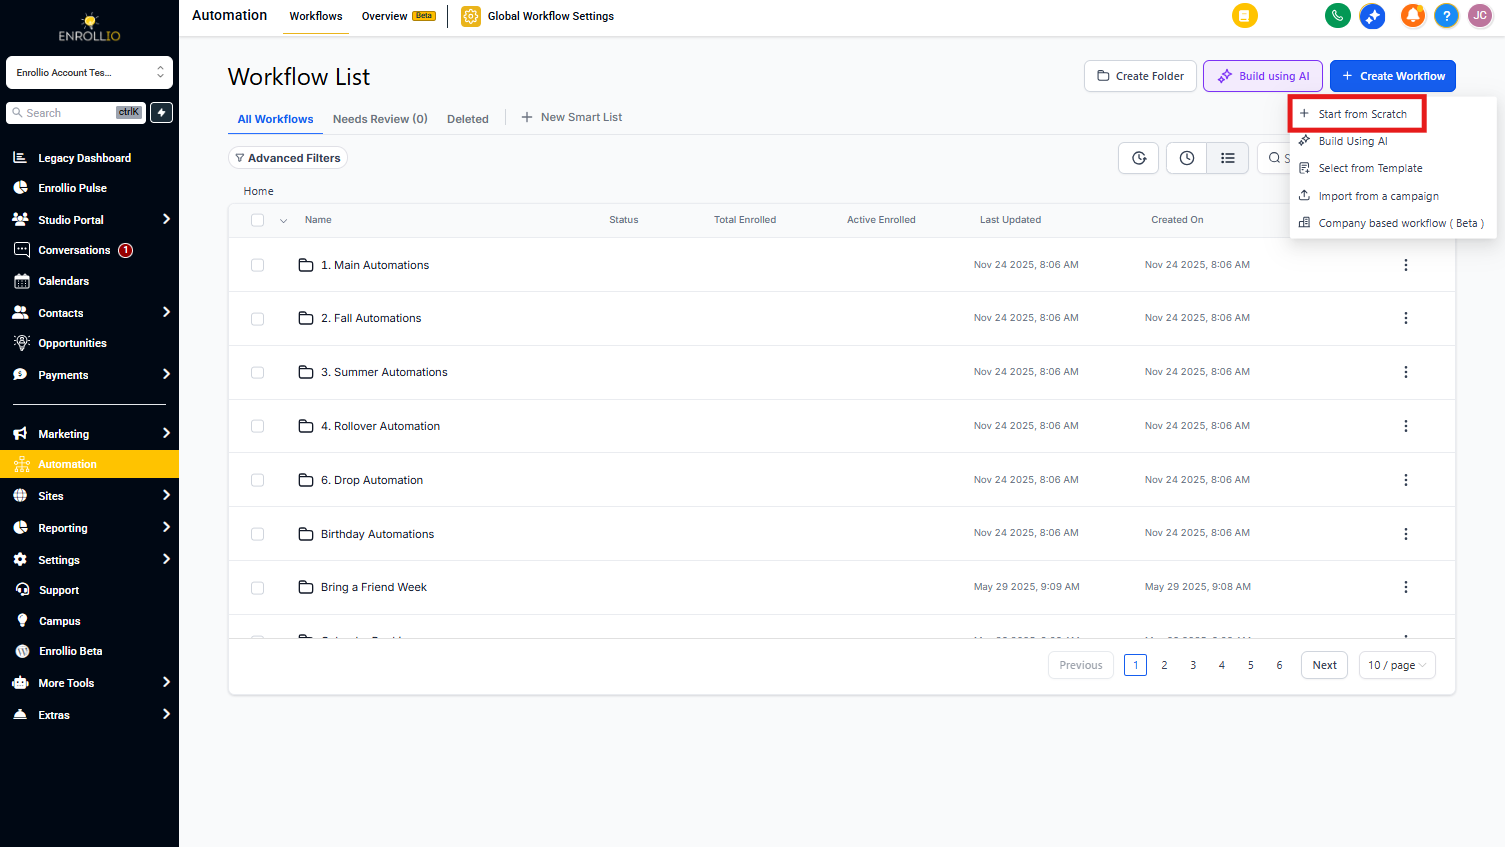
Go to Automation in your Enrollio dashboard. Click + Create Automation in the top right, then choose Start from scratch.
Step 2: Set Your Trigger
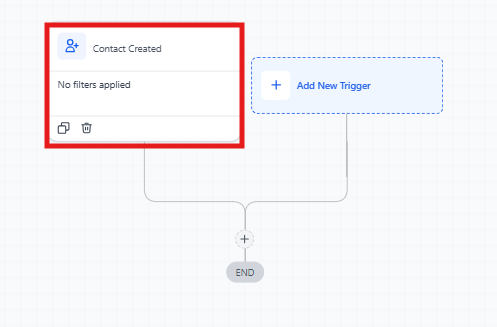
Choose what starts this automation. For example, "New family added" or "Tour scheduled."
Step 3: Add the Wait Action
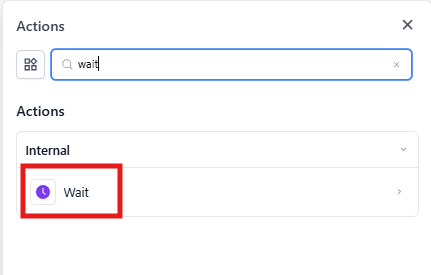
Click the + icon in your automation flow. Search for "Wait" or scroll to find it in the actions list. Click to add it.
Step 4: Name Your Wait Action
Give it a descriptive name like "Wait - 1 Day After Tour" or "Wait - Parent Reply." This helps you identify it when reviewing your automation later.
Step 5: Choose Your Wait Type
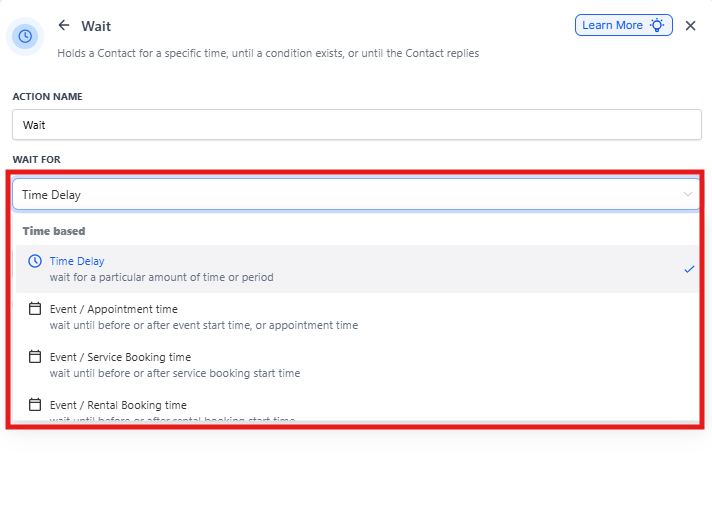
Click the dropdown to select how you want the Wait action to work:
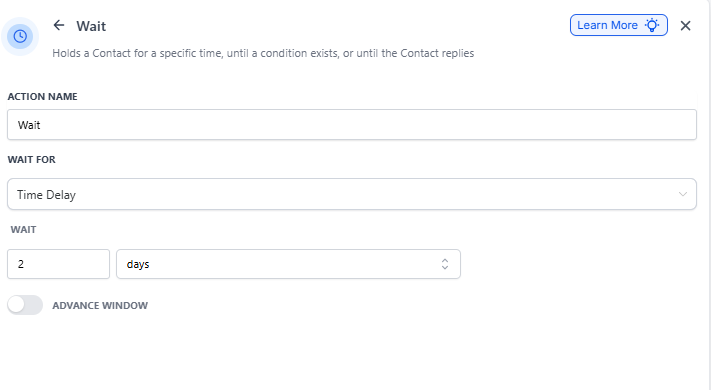
Step 6: Configure Time Delay (Most Common)
If you selected Time Delay, specify how long to wait. Enter the number and select minutes, hours, or days.
Example: Wait 2 days before sending a follow-up email.
Step 7: Set Advanced Options (Optional)
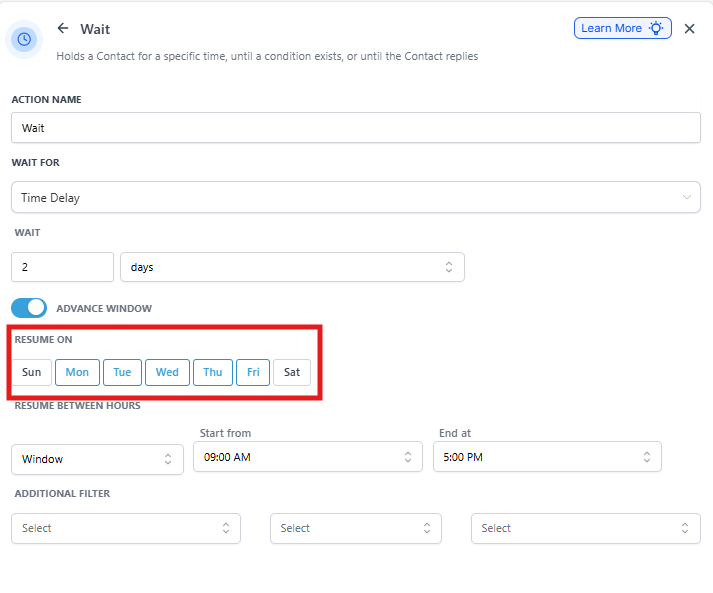
You can refine when the automation resumes:
Resume On: Select specific days (Monday-Friday only, for example)
Resume Between Hours: Set a time window like 9 AM to 5 PM
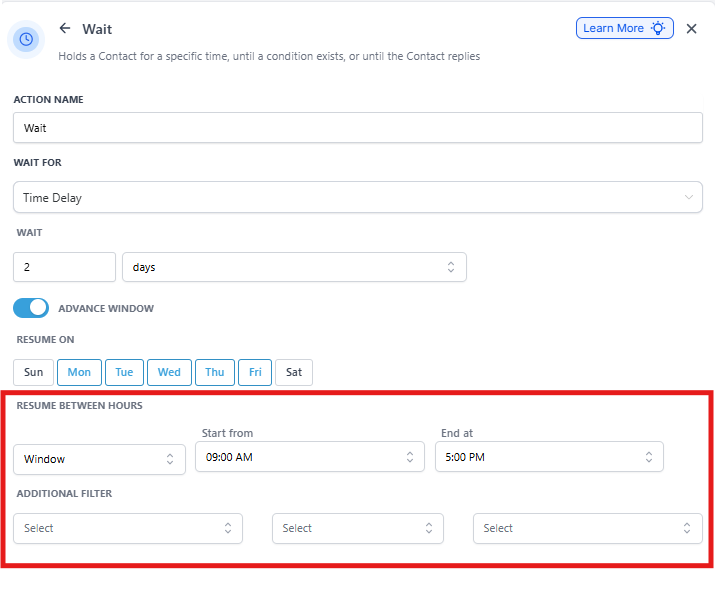
Resume At Exact Time: Specify a precise time to resume
Step 8: Configure Condition-Based Waits
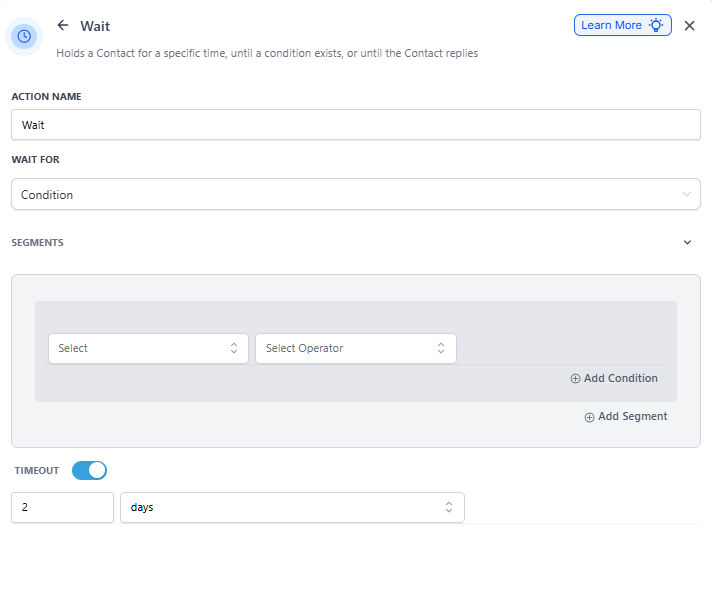
If you selected "Wait for Condition," you'll build rules that determine when to proceed.
Click Add Condition to create individual rules. Click Add Segment to group multiple conditions together.
Example condition: "Family status is Enrolled" or "Enrollment form is submitted"
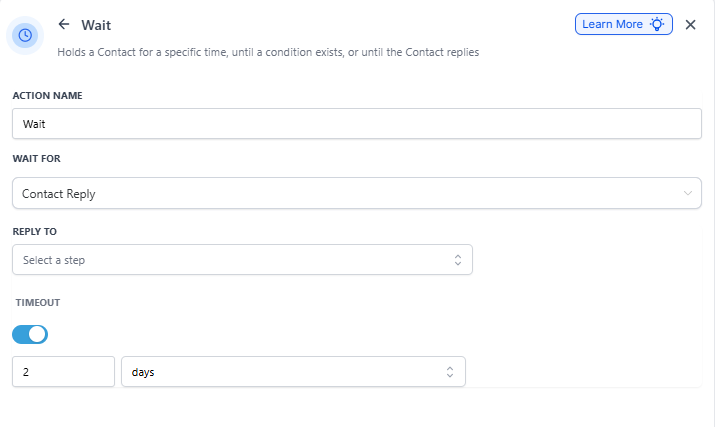
Step 9: Configure Parent Reply Wait
If you selected "Parent Reply," choose which channel to wait for (email or SMS). This only works if a previous action sent a message on that channel.
You can set a timeout (like 3 days) so the automation doesn't wait forever.
Step 10: Save and Test
Click Save to add the Wait action to your automation. Activate your automation and test it with a sample family to confirm the timing works as expected.
Examples for Childcare Centers
Example 1: Welcome Email After Inquiry
Scenario: A parent fills out your inquiry form on your enrollment site.
Trigger: Form submitted
Wait: 1 hour
Action: Send a personalized welcome email introducing your center
Why it works: The brief delay prevents the email from feeling automated while still responding quickly. Parents appreciate thoughtful timing over instant robotic replies.
Example 2: Tour Follow-Up
Scenario: A family completes a tour of your center.
Trigger: Tour appointment status changes to "Completed"
Wait: 2 days
Action: Send a follow-up text asking about their experience and next steps
Why it works: Giving parents time to process the visit makes your follow-up feel natural, not pushy. They're more likely to respond thoughtfully.
Example 3: Application Reminder
Scenario: A parent started your enrollment application but didn't finish.
Trigger: Application status is "In Progress"
Wait: 3 days
Action: Send a gentle reminder with a link to complete their application
Why it works: The strategic delay gives parents time to gather documents or discuss with their partner before you follow up.
Example 4: Birthday Message
Scenario: You want to send a birthday message to enrolled children.
Trigger: Daily automation that checks all families
Wait: Until specific date (child's birthday) at 9:00 AM
Action: Send a personalized birthday message to parents
Why it works: Using date-based Wait actions ensures messages arrive on the right day at an appropriate time.
Example 5: Waitlist Engagement
Scenario: A family joins your waitlist.
Trigger: Family added to waitlist
Wait: 30 days, resume weekdays only between 9 AM - 6 PM
Action: Send a check-in message about their waitlist status
Why it works: Regular touchpoints keep waitlist families engaged. The business hours restriction ensures you reach parents when they're available.
Frequently Asked Questions
What's the difference between Segments and Conditions?
Conditions are individual rules like "Family status is Enrolled" or "Tour scheduled is Yes."
Segments are groups of conditions evaluated together. A family exits the Wait step when ANY segment is satisfied.
Example: You might create Segment 1 that checks if a parent opened your email AND is tagged as "High Priority." Segment 2 might check if they attended a tour. If either segment is true, the Wait ends.
What happens if the timeout is reached?
If you set a timeout on a Wait action (like "Wait for parent reply with 3-day timeout"), the automation continues to the next step after the timeout period, even if the condition wasn't met.
Can I wait for multiple events?
Yes. Use the Condition wait type and create multiple segments. The Wait ends when any segment is satisfied.
What if my Wait time falls on a weekend but I set Resume On to weekdays?
The automation will resume on the next available weekday during your specified time window. For example, if the Wait would end Saturday at 2 PM but you set Resume On to Monday-Friday, it will resume Monday morning within your time window.
Can I use Wait actions with tours?
Absolutely. Use the Event/Appointment Time wait type to trigger actions before or after scheduled tours. For example, "Send reminder 24 hours before tour start time" or "Send thank you 2 hours after tour ends."
How do I test my Wait action without waiting the full time?
When testing, set shorter wait times (like 5 minutes instead of 2 days). Once you confirm the automation works correctly, update the Wait action to your desired duration.