
What Are Advanced Filters and Smart Lists?
Advanced Filters and Smart Lists help you organize and find your automations quickly. Whether you're managing tour reminder sequences, enrollment follow-ups, or waitlist campaigns, these tools make it easy to stay on top of your automated communications.
Advanced Filters let you narrow down your automations based on triggers, actions, tags, or status. Need to see all automations that send text messages to prospective families? Just apply a filter.
Smart Lists take it further by saving your filtered views for instant access. Instead of recreating the same filter each time, save it once and click to view it anytime.
Key Benefits of Advanced Filters & Smart Lists
Managing dozens of automations across tours, enrollments, waitlists, and parent communications can get overwhelming. Here's how these features help:
- Find automations instantly: Apply multiple filters based on triggers, actions, or tags to locate specific automations without scrolling through your entire list.
- Save time with Smart Lists: Save your most-used filter combinations for one-click access. Perfect for growing childcare businesses juggling multiple locations or programs.
- Better team collaboration: If you have staff helping manage communications, categorize automations by purpose (tours, enrollments, parent updates) so everyone knows where to look.
- Avoid duplicate automations: Quickly check if you already have an automation for a specific purpose before creating a new one.
Advanced Filters vs. Smart Lists: Which Should You Use?
Both features help you organize automations, but they serve different purposes:
Advanced Filters (One-Time Use)
Use Advanced Filters when you need to find something quickly without saving the view. For example, if you want to check which automations are currently paused, apply a Status = Paused filter, review the results, and move on.
This is perfect for occasional searches or one-off questions like "Which automations send enrollment forms?"
Smart Lists (Repeated Use)
Create a Smart List when you need to access the same filtered view regularly. For instance, if you frequently review all tour-related automations, save a Smart List for automations triggered by tour bookings.
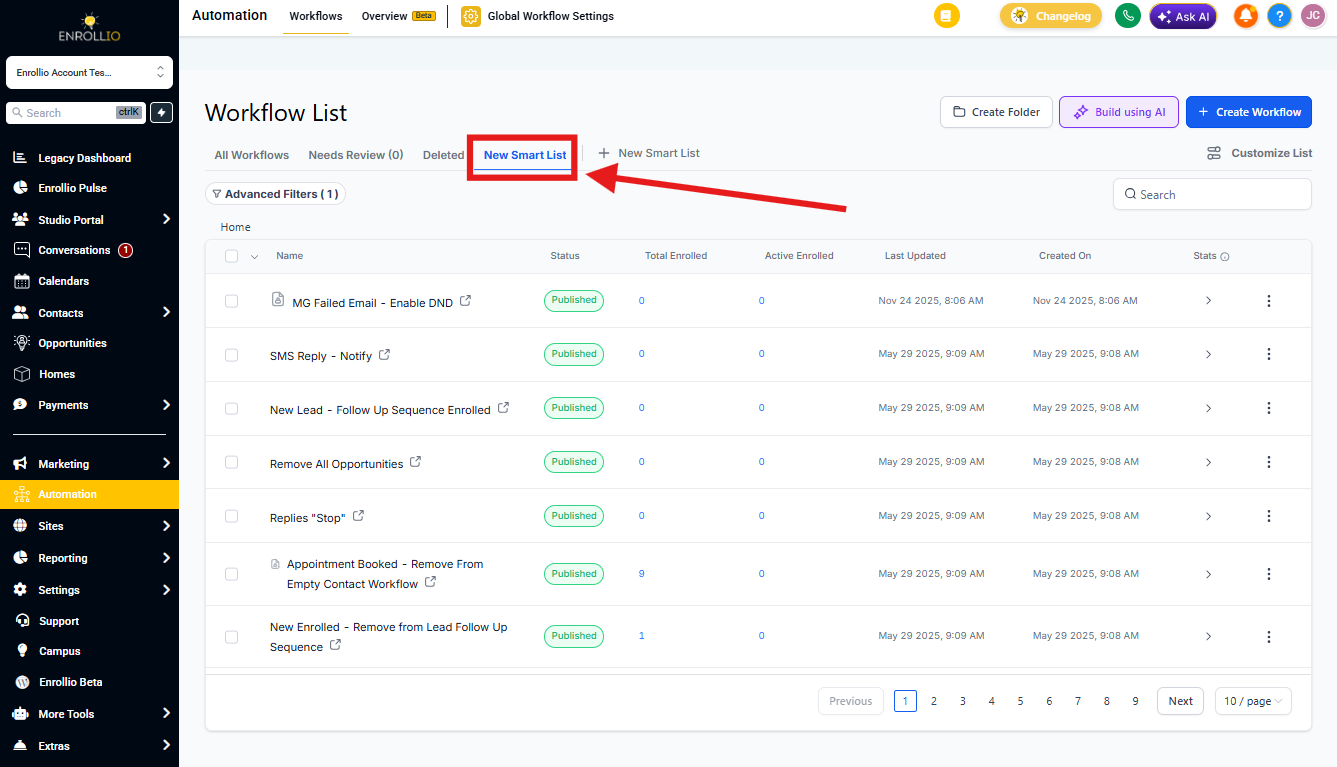
Smart Lists appear at the top of your Automations page for instant access anytime you need them.
How to Use Advanced Filters
Step 1: Access Your Automations
Click the Automations tab in your Enrollio dashboard to see all your automations.
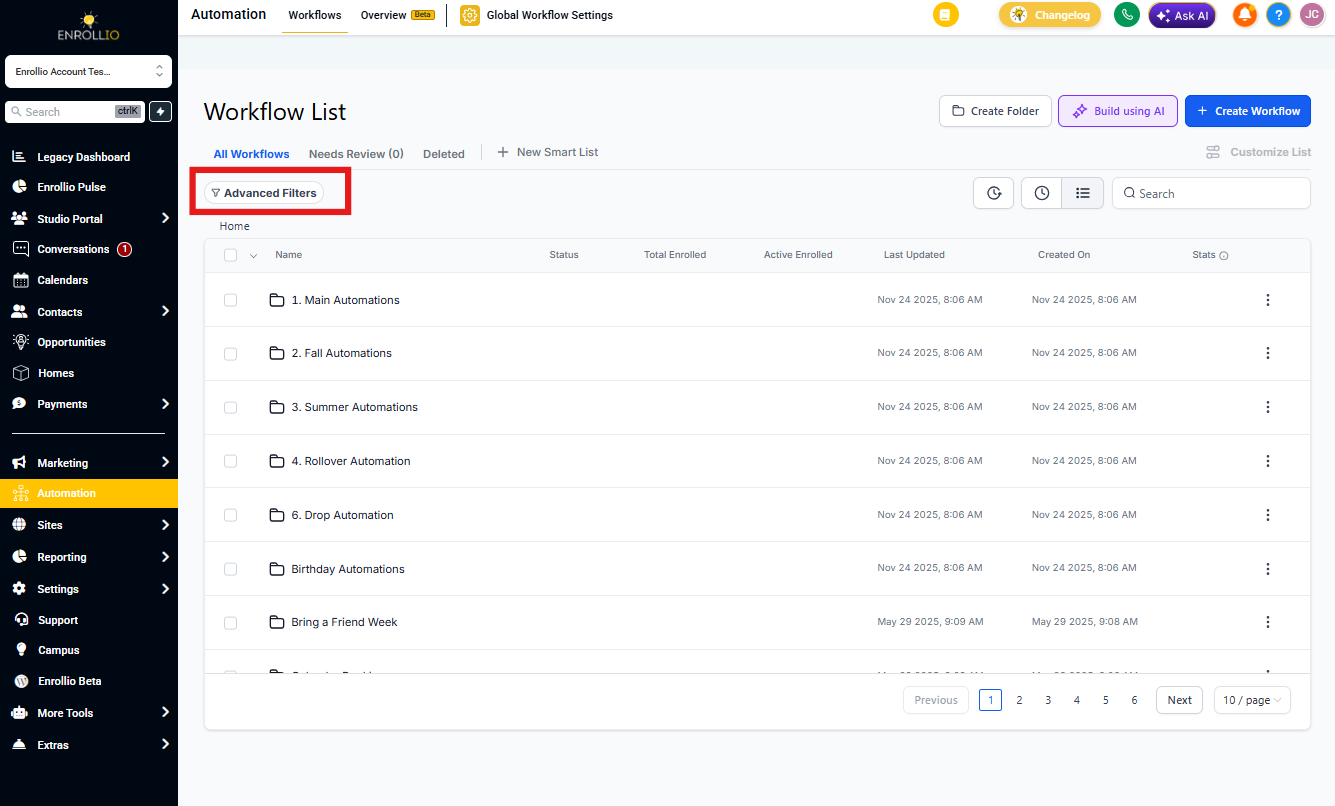
Step 2: Open Advanced Filters
Click the Advanced Filters button in the top-right corner. A panel will slide out from the right side of your screen.
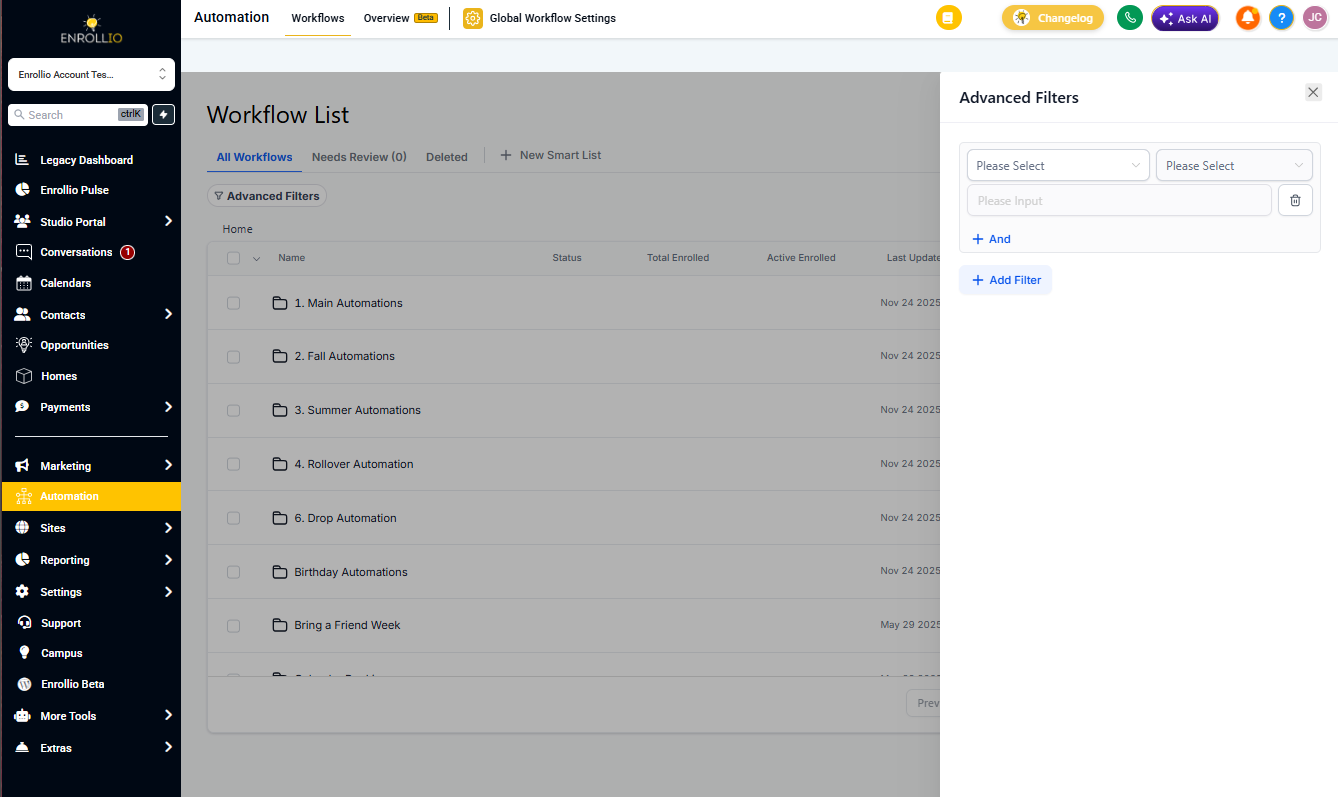
Step 3: Choose Your Filters
You can filter automations based on:
- Triggers: Find automations that start from specific events (e.g., "Tour Scheduled" or "Enrollment Form Submitted")
- Actions: Show automations that include specific actions like sending text messages or updating parent records
- Tags: Display only automations with certain tags (useful if you tag by location or program type)
- Status: Filter by Published, Draft, or Paused automations
- Last Updated: See recently modified automations
To set up a filter:
- Select a filter type from the dropdown menu
- Choose an operator (equals, contains, does not contain)
- Enter or select the value you're looking for
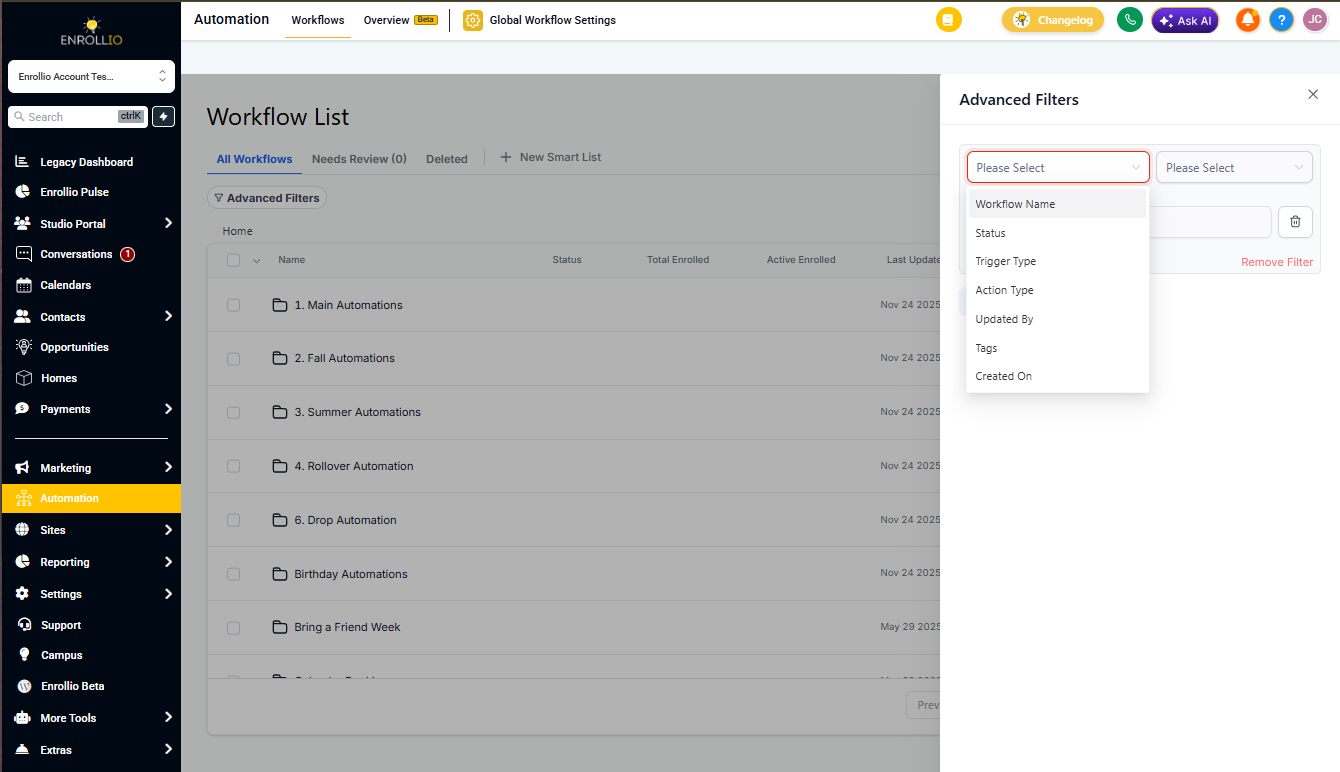
Step 4: Add Multiple Filters
For more precise results, combine multiple filters:
- + And Condition: Automations must match ALL selected filters. Example: Published AND uses "Tour Scheduled" trigger
- Or Condition: Automations match at least ONE of the selected filters. Example: Published OR has "Tour" tag
- + Add Filter Condition: Add another filter for even more flexibility
To remove a filter, click the trash bin icon next to it.
Step 5: Apply Your Filters
Click the Apply button to see your filtered results. Your automation list will update to show only the automations matching your criteria.
How to Use Smart Lists
Step 1: Save Your Filtered View
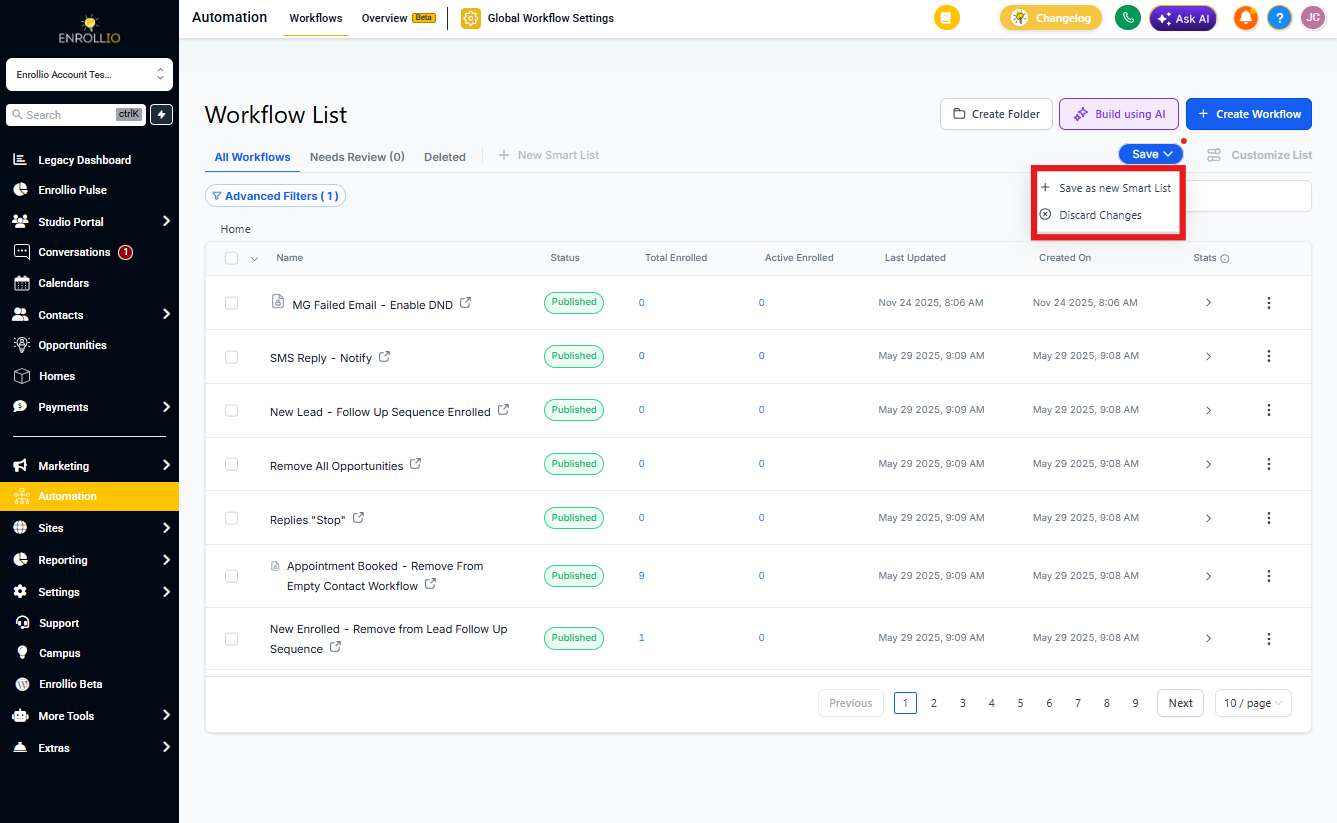
After applying filters that you'll use again, click the Save button (it becomes active once you've applied filters).
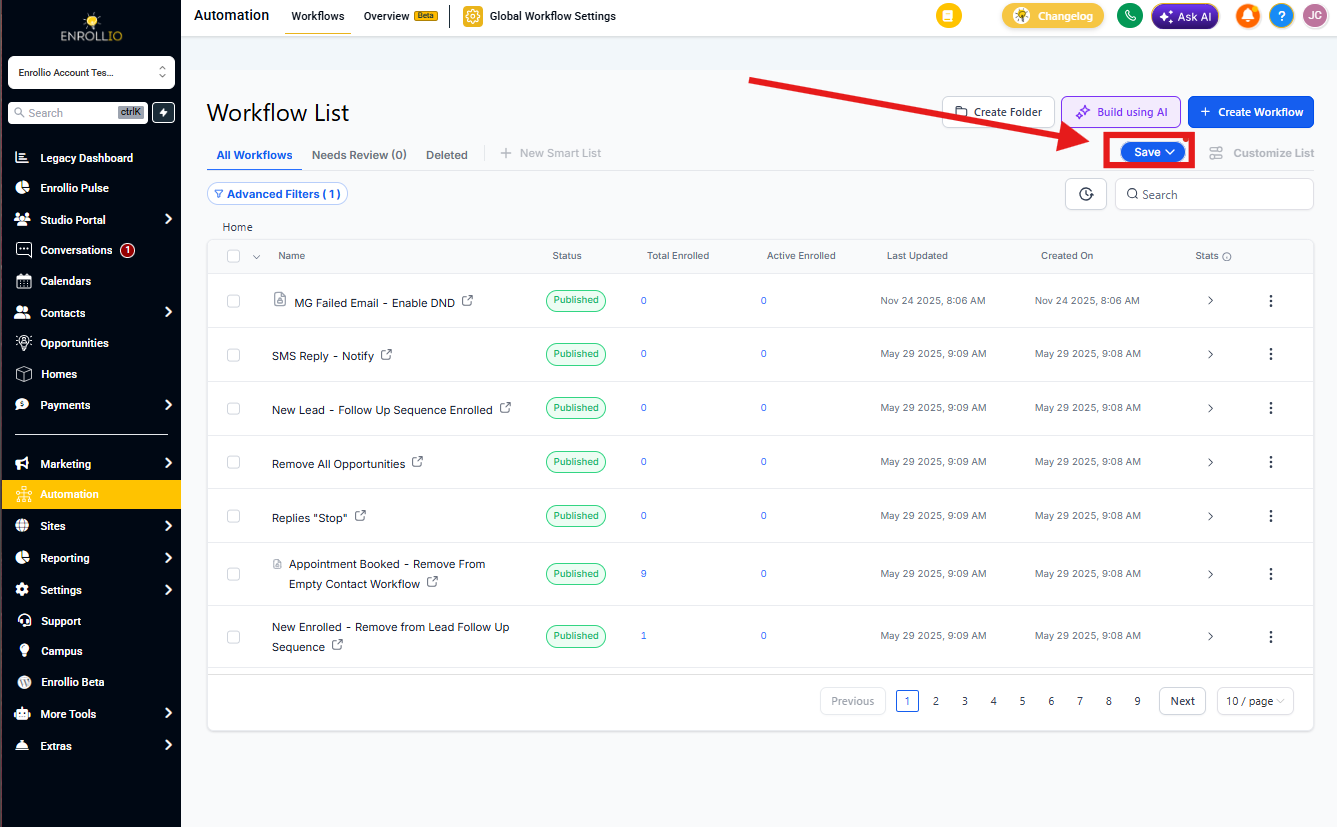
Step 2: Create Your Smart List
You'll see two options:
- Save as New Smart List: Saves your current filters as a reusable list
- Discard Changes: Removes your filters and returns to the full view
Click Save as New Smart List and give it a descriptive name like "Tour Automations" or "Enrollment Follow-ups".
Step 3: Access Your Smart Lists
Your saved Smart Lists appear at the top of the Automations page. Click any Smart List to instantly see those filtered automations.
Step 4: Create a Smart List from Scratch
You can also create a Smart List without applying filters first:
- Click + Smart List at the top of the Automations page
- Set up your filters
- Click Save and name your list
Step 5: Manage Your Smart Lists
To edit or delete a Smart List:
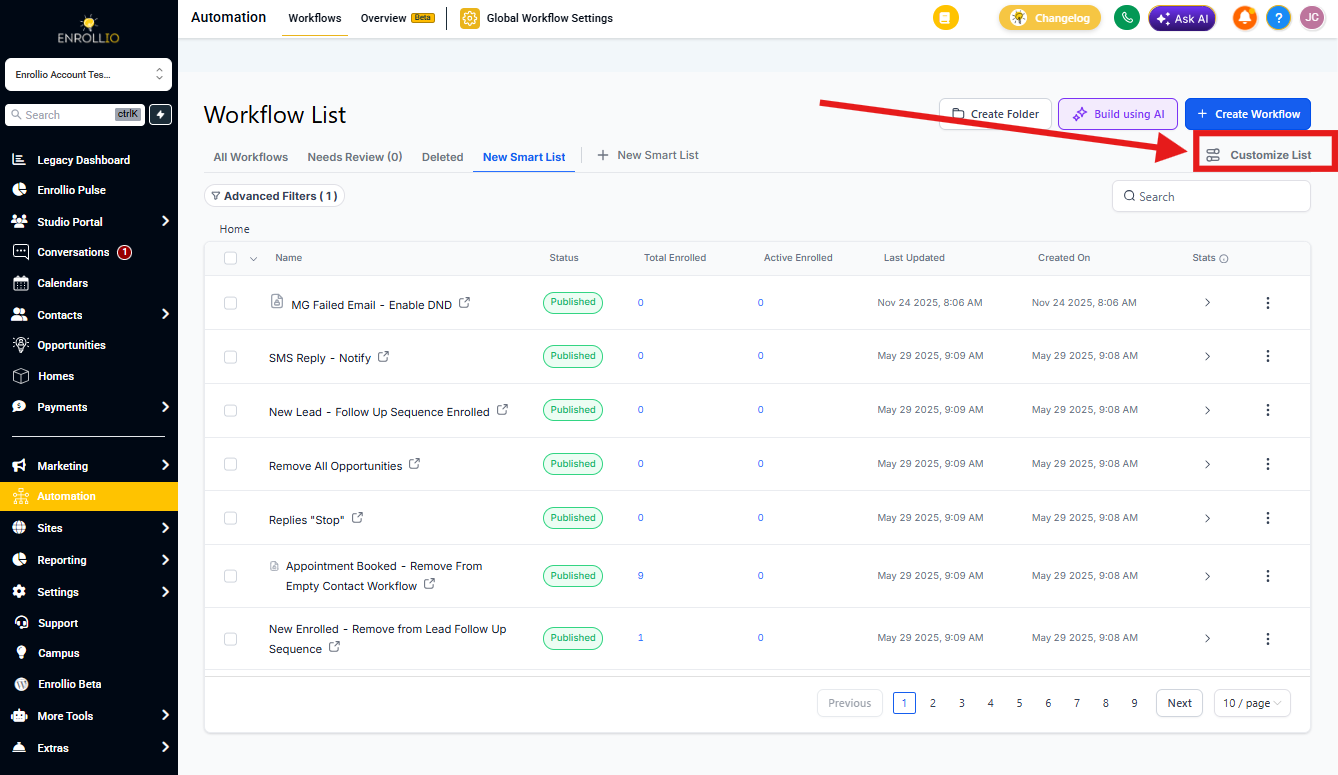
- Click on the Smart List you want to modify
- Click Customize List in the top-right corner
- Update your filters or click delete if you no longer need the list
- Click Save if you made changes
Frequently Asked Questions
What's the difference between a filter and a Smart List?
A filter temporarily narrows down your automations based on conditions you set. Once you navigate away, the filter is gone. A Smart List saves those filter conditions so you can access the same filtered view anytime with one click.
Can I share Smart Lists with my team?
Smart Lists are account-wide, so any staff member with access to your Automations section can see and use the Smart Lists you create.
How many filters can I use at once?
You can combine as many filters as you need to find exactly what you're looking for. Use "And" conditions when automations must match all criteria, or "Or" conditions when matching any criteria works.
Will Smart Lists update automatically?
Yes! Smart Lists are dynamic. As you create, modify, or archive automations, your Smart Lists automatically update to reflect current automations matching your saved criteria.
Can I create a Smart List for paused automations?
Absolutely. This is a great way to keep track of seasonal automations (like summer camp enrollment) or automations you're testing. Just filter by Status = Paused and save it as a Smart List.