
Automation Trigger - Payment Received
The Payment Received trigger helps you automate tasks whenever a payment comes through Enrollio. Use it to send confirmation texts, update family records, or manage enrollment fees automatically — all without lifting a finger.
This trigger works with all payment types in Enrollio: enrollment fees, tuition payments, invoices, and registration charges. You can customize it with filters to respond exactly how you need to for different payment scenarios.
What is the Payment Received Trigger?
The Payment Received trigger starts an automation instantly when a payment comes through your Enrollio account. It captures successful payments, failed transactions, and everything in between.
Once triggered, you can automate actions like:
- Send payment confirmation texts or emails to families
- Update enrollment records when tuition is paid
- Notify your team when registration fees come through
- Flag failed payments for follow-up
You control exactly which payments trigger the automation using filters. Target specific payment sources (like invoices or enrollment pages), payment amounts, or transaction statuses.
Key Benefits
The Payment Received trigger helps childcare centers streamline payment processing and improve the family experience:
Automated payment confirmation: Send families instant confirmation when their payment processes. Builds trust and reduces "did my payment go through?" questions.
Enrollment fee management: Automatically update enrollment status when registration fees are paid. Move families from waitlist to enrolled without manual work.
Failed payment resolution: Get notified immediately when a payment fails so you can reach out to families quickly and resolve issues before they become problems.
Tuition tracking: Monitor which families have paid tuition and which payments are pending. Use payment data to understand cash flow and enrollment trends.
How to Set Up the Payment Received Trigger
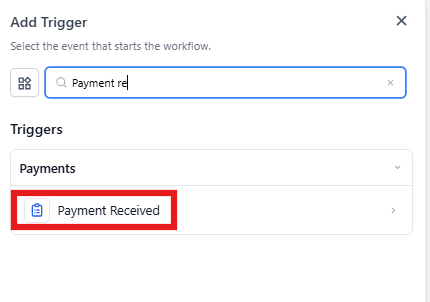
Step 1: In your automation, click to add a trigger and select Payment Received.
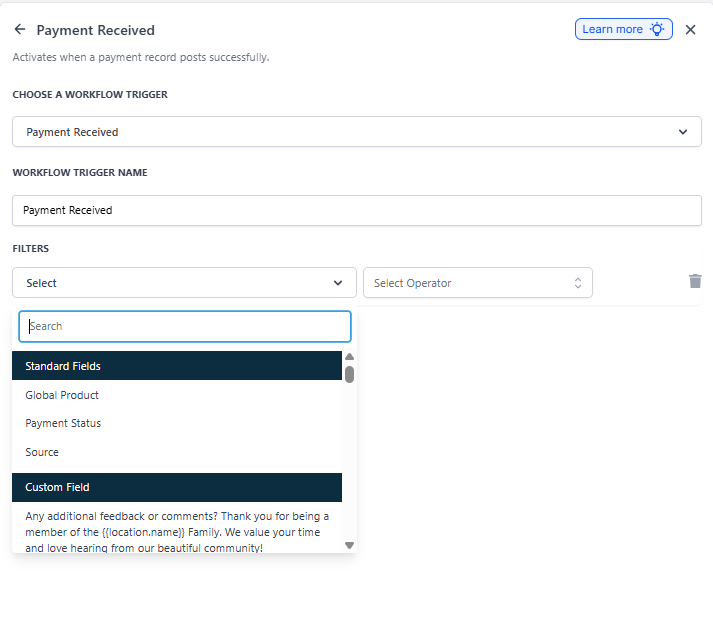
Step 2: Click Add Filter to specify which payments should trigger this automation. Then click Add Filter again to add sub-filters for more precise targeting.
Available Filters
Use filters to make your automation respond only to specific payment scenarios. Here are all available filter options:
| Filter | Sub-Filter Options | Details | Operators |
|---|---|---|---|
| Payment Source | Invoice | Sub-Source options: • Text2Pay link • One-time invoice • Recurring template |
is, is not |
| Payment Source | Enrollment Page / Landing Page | Sub-Source options: • One-step order form • Two-step order form • Upsell |
is, is not |
| Transaction Type | — | • Parent present/first transaction • Parent not present/recurring transaction |
is, is not |
| Global Product | — | Select from your product names | is, is not |
| Price | — | Price tiers for selected product | is, is not |
| Payment Status | — | Success or Failed | is, is not |
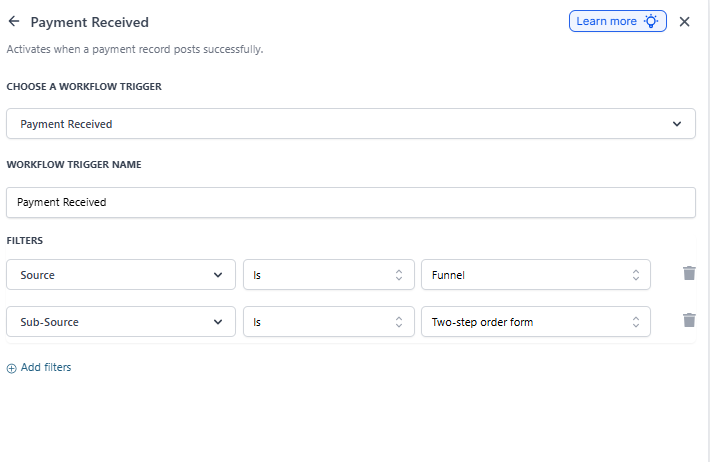
Example: To trigger when someone submits a two-step enrollment form, select: Payment Source > is > Enrollment Page, then click Add Filter > Sub-Source > is > two-step order form.
If/Else Conditions
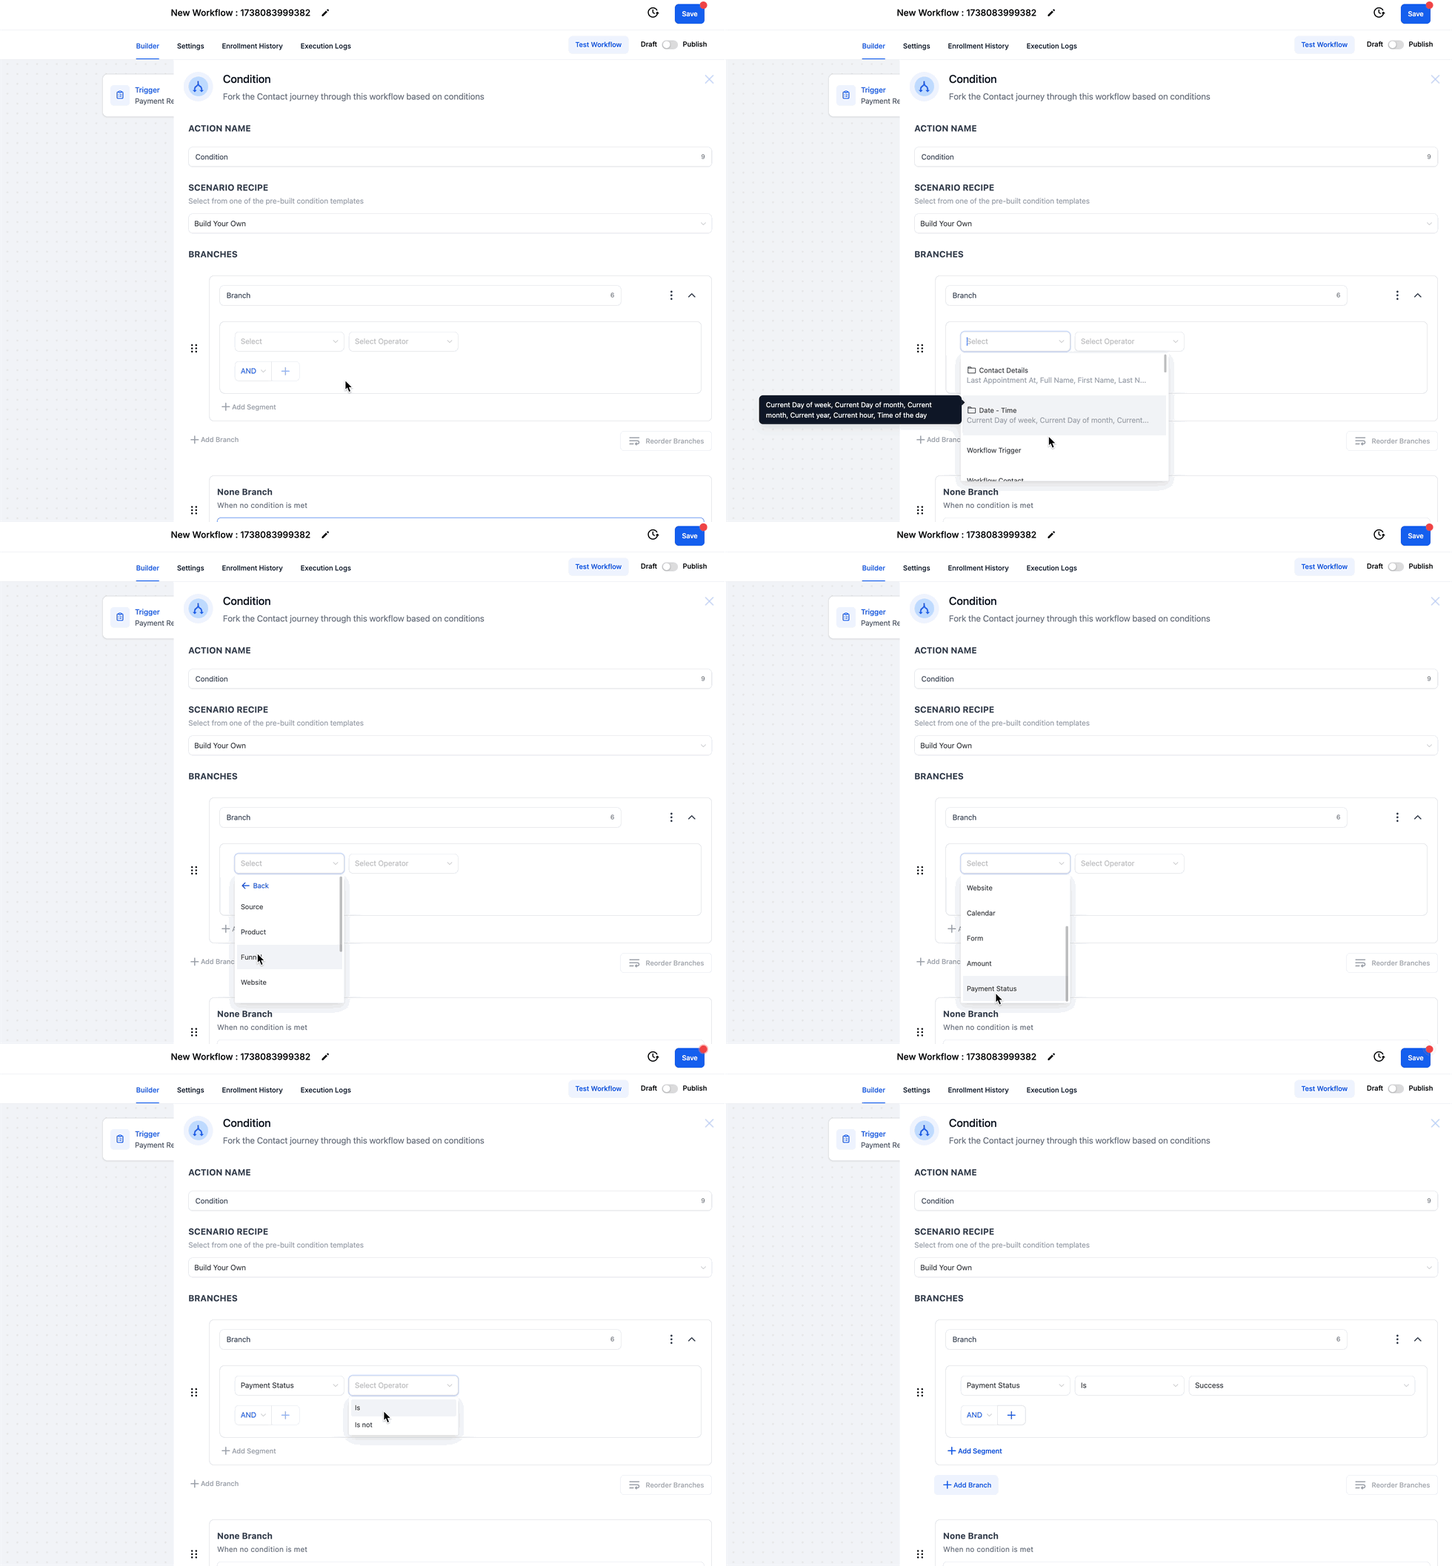
After adding your filters, you can branch your automation based on payment details using If/Else conditions. This lets you take different actions depending on the payment amount, product, source, or status.
| Condition Type | Options | Operators |
|---|---|---|
| Product | Your global product names | is, is not |
| Enrollment Page / Landing Page | Your page names | is, is not |
| Source | Invoice, Enrollment Page, Landing Page | is, is not |
| Payment Status | Success, Failed | is, is not |
| Amount | Dollar amount | Equal to, not equal to, greater than, greater than or equal to, less than, less than or equal to, is not empty, is empty |
Pro Tip: Use If/Else conditions to send different confirmation messages based on payment amount. For example, send a welcome packet for enrollment fees over $500, but just a simple receipt for smaller payments.
Custom Values for Payment Data
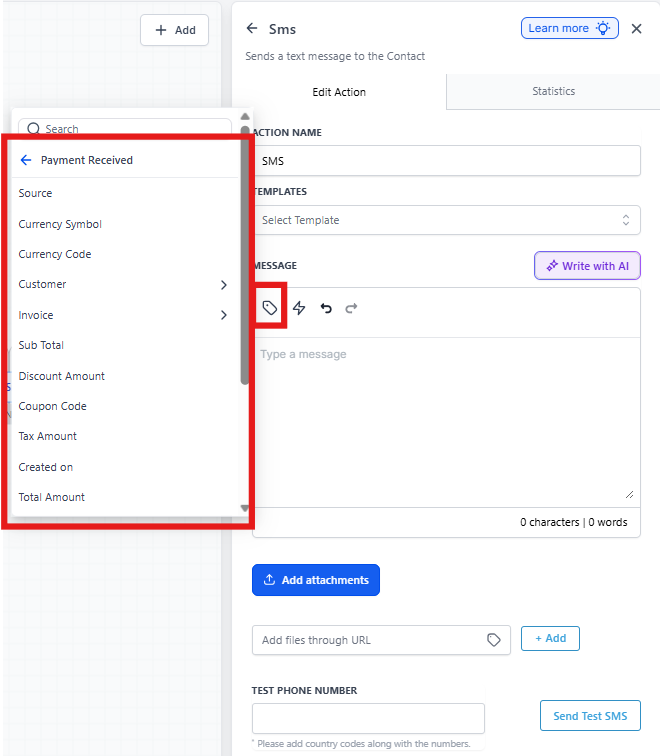
Once your Payment Received trigger is configured, you can insert payment details into text messages, emails, and notifications using custom values. This personalizes your communications with real payment data.
Here are all available custom values you can use:
Basic Payment Information
-
{{payment.source}}— Where the payment came from -
{{payment.currency_symbol}}— Currency symbol ($, €, etc.) -
{{payment.currency_code}}— Currency code (USD, EUR, etc.) -
{{payment.total_amount}}— Total payment amount -
{{payment.payment_status}}— Success or Failed -
{{payment.transaction_id}}— Unique transaction ID -
{{payment.created_on}}— Payment date and time -
{{payment.gateway}}— Payment processor used -
{{payment.method}}— Payment method (card, ACH, etc.)
Family Information
-
{{payment.customer.id}}— Family ID -
{{payment.customer.first_name}}— First name -
{{payment.customer.last_name}}— Last name -
{{payment.customer.name}}— Full name -
{{payment.customer.email}}— Email address -
{{payment.customer.phone}}— Phone number -
{{payment.customer.address}}— Full address -
{{payment.customer.city}}— City -
{{payment.customer.state}}— State -
{{payment.customer.country}}— Country -
{{payment.customer.postal_code}}— Postal code
Invoice Details
-
{{payment.invoice.name}}— Invoice name -
{{payment.invoice.number}}— Invoice number -
{{payment.invoice.issue_date}}— When invoice was created -
{{payment.invoice.due_date}}— Payment due date -
{{payment.invoice.url}}— Link to view invoice -
{{payment.invoice.recorded_by}}— Staff member who created it
Payment Breakdown
-
{{payment.sub_total_amount}}— Subtotal before discounts -
{{payment.discount_amount}}— Discount applied -
{{payment.coupon_code}}— Coupon used -
{{payment.tax_amount}}— Tax charged
Card Information
-
{{payment.card.last4}}— Last 4 digits of card -
{{payment.card.brand}}— Card brand (Visa, Mastercard, etc.)
Example: In a confirmation text, you could write: "Hi {{payment.customer.first_name}}, we received your payment of {{payment.currency_symbol}}{{payment.total_amount}} for {{payment.invoice.name}}. Your transaction ID is {{payment.transaction_id}}."
Frequently Asked Questions
What is a sub-source filter?
When you select a payment source like enrollment pages or invoices, sub-sources let you get even more specific. For example, payments from enrollment pages can come from one-step order forms, two-step order forms, or upsells. Sub-source filters help you pinpoint exactly where the payment originated.
Does this trigger include both initial and recurring tuition payments?
Yes. The trigger fires when a family pays directly (like submitting an enrollment form) and when recurring tuition charges process automatically in the background.
What does "Parent present/first transaction" mean versus "Parent not present/recurring transaction"?
We categorize transactions into two types:
Parent present/first transaction: The family is actively making the payment right now. This includes all one-time payments and the first payment when setting up recurring tuition.
Parent not present/recurring transaction: Automatic charges that happen in the background after recurring tuition is already set up. For example, if a family enrolls with a 14-day trial period, the initial enrollment ($0 in this case) is a "parent present" transaction. After 14 days when you charge $200 for the first month's tuition, that's a "parent not present" transaction because it processes automatically.