
Guide to Google Sheets Automation Actions
This guide shows you how to use Google Sheets automation actions in Enrollio. You'll learn how to automatically sync enrollment data, parent information, and tour records between Enrollio and Google Sheets — no third-party tools needed.
What Are Google Sheets Automation Actions?
Google Sheets automation actions let you connect your Google Sheets directly to Enrollio automations. When certain events happen in your childcare business — like a new tour booking or enrollment — Enrollio can automatically create, update, look up, or delete rows in your connected spreadsheet.
This keeps your enrollment data, waitlist tracking, and parent records organized without any manual copying and pasting.
Why Use Google Sheets with Enrollio?
- Stay Organized: Data flows into your spreadsheet the same way every time
- Save Time: Stop manually updating spreadsheets when enrollments change
- Reduce Errors: Eliminate duplicate entries and typos from manual data entry
- Scale Easily: Handle more families and enrollments without changing your process
Before You Start
Make sure you have:
- A Google account connected to your Enrollio Client Account
- A Google Sheet ready with clear column headers in the first row
- Premium Actions enabled in your account (these cost $0.01 per execution)
💡 Pro Tip: Name your spreadsheet and worksheet clearly (like "Enrollment Tracker" or "Waitlist 2025") so they're easy to find when setting up automations.
How to Set Up Google Sheets Actions
Step 1: Add the Action to Your Automation
- Go to Automations in your Enrollio dashboard
- Open an existing automation or create a new one
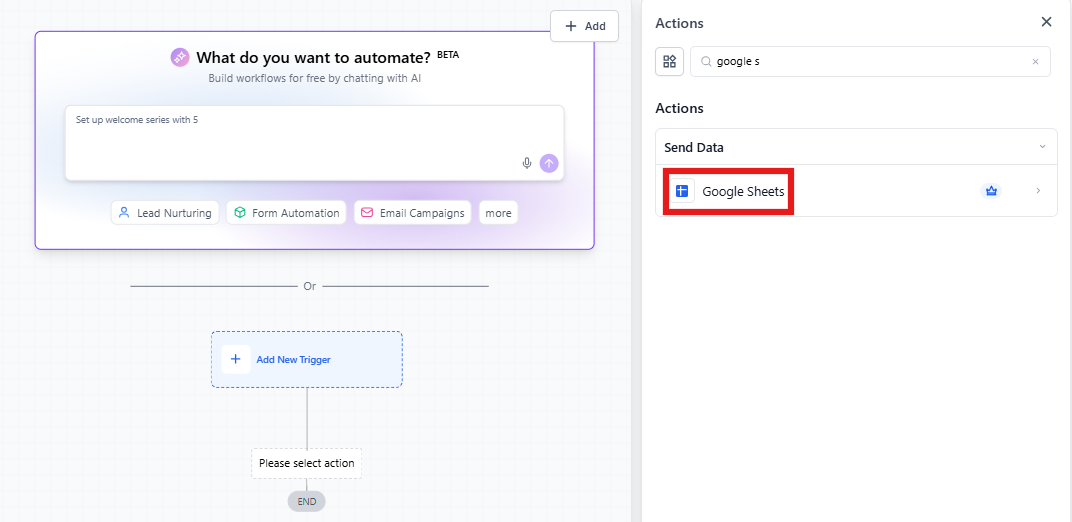
- Click + Add Action
- Select Google Sheets Premium Action
Step 2: Connect Your Google Account
If you haven't connected your Google account yet, click the prompt to authenticate. This gives Enrollio permission to access your Google Sheets.
Step 3: Configure Basic Settings
Follow these steps in order:
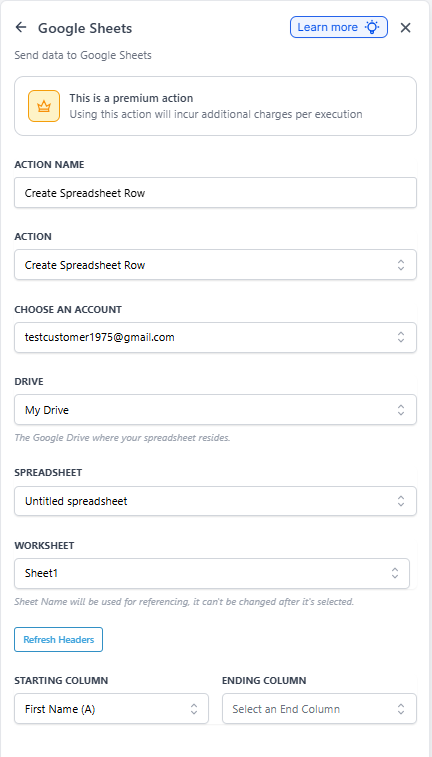
- Choose an Account: Select your connected Google account
- Choose a Drive: Usually "My Drive" unless you're using a shared drive
- Choose a Spreadsheet: Select the Google Sheet you want to update
- Choose a Worksheet: Pick the specific tab within that spreadsheet
- Refresh Headers: Click this to load your column headers from the first row
- Select Columns: Choose which columns you want to work with (or select all)
💡 Pro Tip: If you know the exact name of your spreadsheet, use the search function instead of scrolling through a long list.
Available Functions
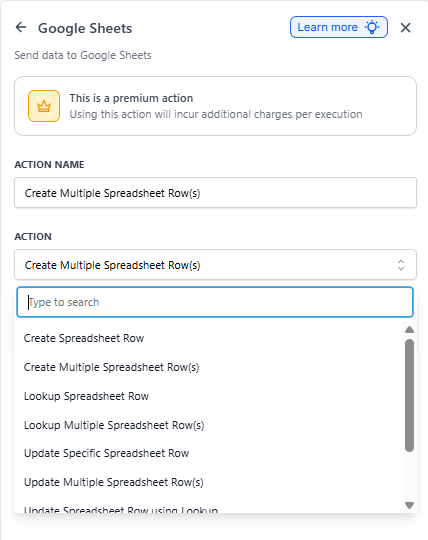
Once your sheet is connected, choose what you want Enrollio to do with your data:
| Function | What It Does |
|---|---|
| Create Spreadsheet Row | Adds a new row at the end of your sheet |
| Create Multiple Rows | Adds several new rows at once |
| Lookup Spreadsheet Row | Finds the first row that matches your search |
| Lookup Multiple Rows | Finds a match and returns additional rows |
| Update Specific Row | Changes data in a specific row number |
| Update Multiple Rows | Changes data in several rows at once |
| Update Row Using Lookup | Finds and updates a row based on search criteria |
| Delete Specific Row | Removes all data from a specific row number |
| Delete Row Using Lookup | Finds and deletes a row based on search criteria |
Common Use Cases for Childcare Centers
Track Enrollments Automatically
When a family completes enrollment, automatically create a new row in your "Active Enrollments" spreadsheet with their child's name, start date, program, and parent contact info.
Maintain Your Waitlist
Add families to your waitlist spreadsheet when they submit a waitlist form, then automatically remove them (using Delete Row Using Lookup) when a spot opens and you enroll them.
Tour Tracking
Create a row each time someone books a tour, then update that row after the tour happens with notes and outcome (enrolled, declined, or rescheduled).
Staff Scheduling
Update your staff schedule sheet when someone requests time off or when you approve schedule changes.
How to Use Each Function
Create Spreadsheet Row
Adds a new row to the bottom of your sheet. Use this when a new family, enrollment, or tour happens.
- Select Create Spreadsheet Row as your function
- Choose your Google account, drive, spreadsheet, and worksheet
- Map Enrollio data to your spreadsheet columns
For example, you might map:
- Parent First Name → Column A
- Parent Email → Column B
- Child Name → Column C
- Enrollment Date → Column D
⚠️ Important: New rows are always added after the last existing row with data.
Lookup Spreadsheet Row
Searches for a row based on criteria you specify. This is useful for finding existing parent records before updating them.
- Select Lookup Spreadsheet Row
- Choose your worksheet
- Select Search Order (usually "Search from Top")
- Choose which column to search in
- Enter what to search for (like a parent's email address)
After Enrollio finds the row, you can use that information in the next step of your automation.
Update Specific Spreadsheet Row
Changes data in a row when you know the exact row number.
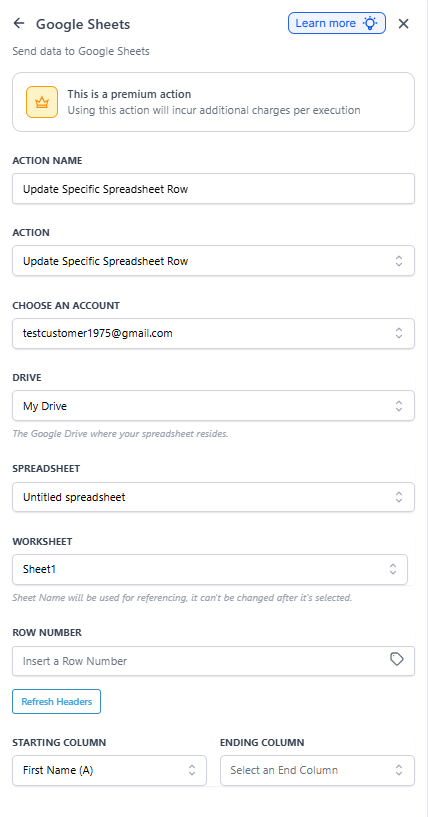
- Select Update Specific Spreadsheet Row
- Choose your worksheet
- Enter the row number (often from a previous Lookup action)
- Select which columns to update
- Map the new values to those columns
Update Row Using Lookup
This combines lookup and update in one step. Enrollio searches for a row, then updates it if found.
Perfect for updating a family's information when their enrollment status changes or their contact details are updated.
Delete Specific Spreadsheet Row
Removes data from a specific row number, leaving it blank.
- Select Delete Specific Spreadsheet Row
- Choose your worksheet
- Enter the row number to delete
💡 Pro Tip: Use a Lookup action first to find the row number, then use that number in your Delete action.
Delete Row Using Lookup
Finds a row based on search criteria and deletes it. Use this to remove families from your waitlist when they enroll, or archive old tour records.
Advanced Features
Lookup Multiple Rows
Retrieve several rows at once based on your criteria. This is helpful for generating reports or working with multiple families at the same time.
Custom Variable Mapping
After a Lookup action finds a row, Enrollio automatically creates custom variables from your spreadsheet headers. You can use these variables in later automation steps.
For example, if your lookup finds a row with a "Parent Phone" column, you can use that phone number to send a text message in the next action.
Troubleshooting Common Issues
Headers Not Loading
If you changed column headers in your Google Sheet, click Refresh Headers in the Enrollio action settings to reload them.
Authentication Errors
If you see a permission error, go to your Enrollio integrations and reconnect your Google account.
Spreadsheet Not Appearing
Make sure you're logged into the correct Google account and that the spreadsheet isn't in a restricted shared drive.
Wrong Row Gets Updated
Double-check your lookup criteria. Make sure you're searching the right column for unique values (like email addresses instead of first names).
Frequently Asked Questions
What happens if I rename my spreadsheet columns?
You'll need to refresh the headers in Enrollio and update any automations that use those columns.
Can I connect multiple Google Sheets to one automation?
Yes. Each Google Sheets action can point to a different spreadsheet, so you can update your enrollment tracker and your waitlist in the same automation.
How much do Google Sheets actions cost?
Each time an action executes, it costs $0.01. This is much less than other platforms charge for similar features.
Can I use Google Sheets actions with shared drives?
Yes, as long as your connected Google account has access to the shared drive.
Example: Automated Enrollment Tracking
Here's a complete example automation:
- Trigger: When a family completes your enrollment form
- Action 1: Lookup Spreadsheet Row to check if the family already exists (search by parent email)
- Action 2: If found, Update Row Using Lookup to update their enrollment status
- Action 3: If not found, Create Spreadsheet Row to add them as a new enrollment
- Action 4: Send a confirmation text message to the parent
This keeps your enrollment spreadsheet automatically synced while saving you hours of manual data entry each week.
Next Steps
Now that you understand Google Sheets automation actions, try setting up a simple automation to track new tour bookings or waitlist signups. Start with one spreadsheet and expand from there as you get comfortable.
Need more help? Check out our related articles on building automations and working with parent data in Enrollio.