
How to Add and Edit Shadows in Your Enrollment Site Builder
Make your enrollment pages stand out with customizable shadows. This feature helps your call-to-action buttons, images, and text pop off the page — creating a more engaging experience for prospective families.
What You Can Do
Add professional depth and dimension to any element on your enrollment pages. Whether you're designing a tour request form or showcasing your program features, shadows help guide parents' attention to what matters most.
Shadow Types
- Box Shadows: Apply to any element — buttons, images, forms, program cards
- Text Shadows: Add depth to headings, subheadings, and important text
Customization Options
- Add multiple shadows to a single element for complex effects
- Choose between outer shadows (makes elements appear raised) and inner shadows (creates a recessed look)
- Control shadow position, blur, size, and color
- Start with preset defaults and customize from there
How to Add Shadows
- Open your enrollment page or landing page in the builder
- Select the element you want to add a shadow to (button, image, text block, etc.)
- Click the Advanced tab in the right sidebar
- Click Shadow to expand the shadow editor
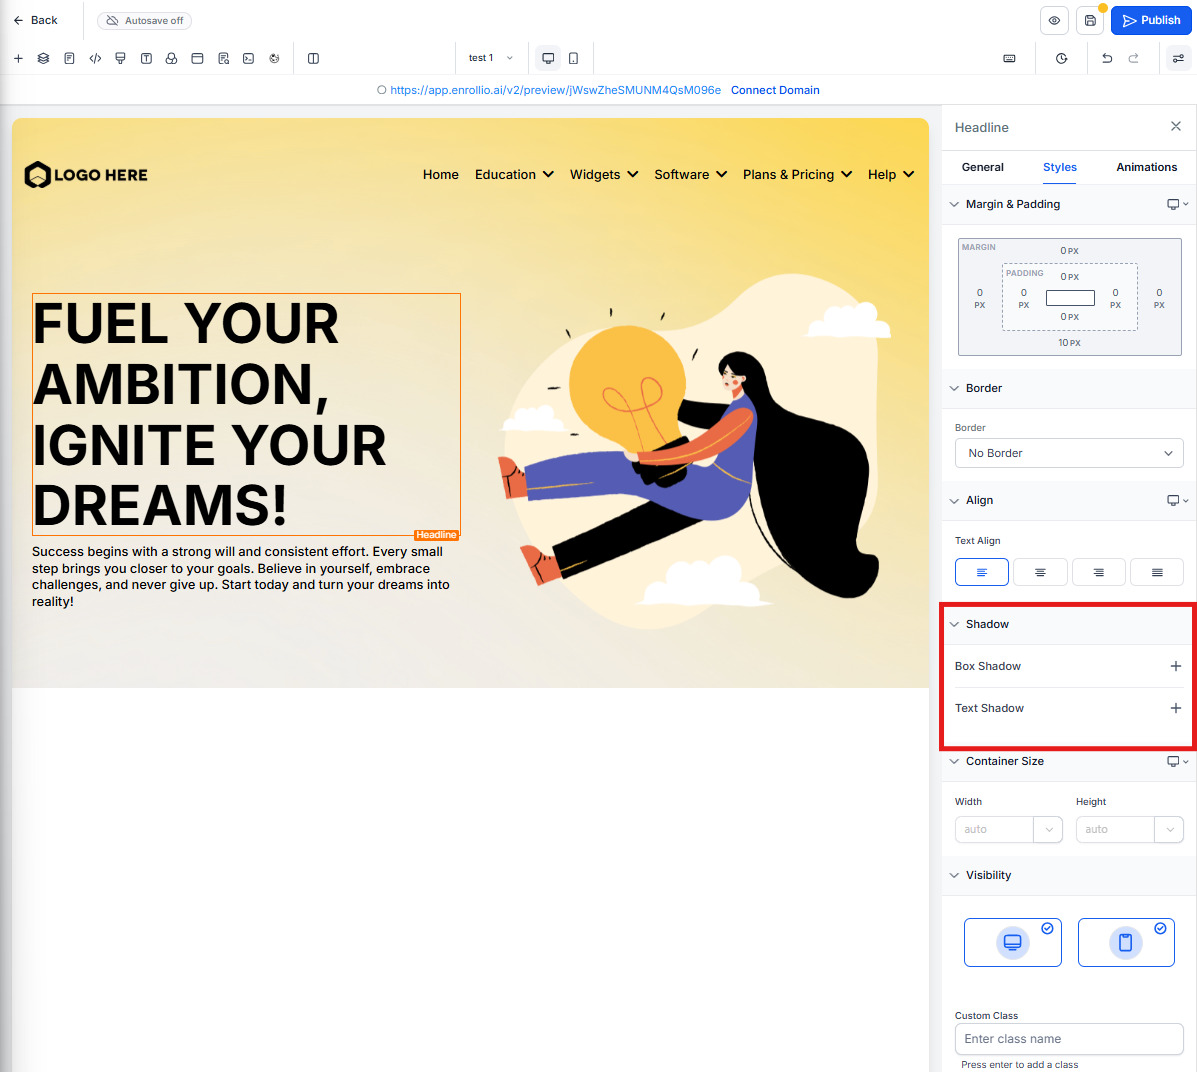
- Choose your shadow type:
- Click the + button next to Box Shadow for element shadows
- Click the + button next to Text Shadow for text-only elements
A default outer shadow appears immediately with preset values that work for most designs.
Customizing Your Shadow
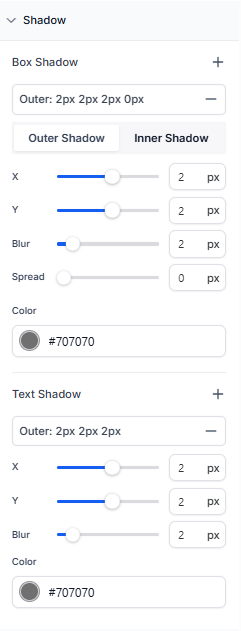
Click on the shadow title to reveal customization options:
Shadow Position
- Outer: Creates depth, making the element appear raised above the page
- Inner: Creates a sunken effect within the element
Shadow Settings
- X Value: Moves shadow left or right
- Y Value: Moves shadow up or down
- Blur: Controls softness (higher = softer edges)
- Spread: Expands or shrinks the shadow size
- Color: Choose any color to match your brand
Adding Multiple Shadows
Create more sophisticated effects by layering shadows:
- Click the + button again in the shadow editor
- Customize each shadow independently
- Combine outer and inner shadows for complex depth effects
Pro Tip: For tour request buttons, try a subtle outer shadow with a small Y offset and medium blur. This makes the button feel clickable without being overwhelming.
Design Ideas for Childcare Sites
- Enrollment buttons: Use outer shadows to make "Schedule a Tour" or "Enroll Now" buttons stand out
- Program cards: Add subtle shadows to your infant, toddler, and preschool program sections
- Testimonials: Inner shadows can create a nice recessed effect for parent quotes
- Photo galleries: Outer shadows make classroom photos pop off the page
- Hero headings: Text shadows improve readability over background images
Removing Shadows
To remove a shadow, click the trash icon next to the shadow title in the editor.
Pro Tip: Shadows look great, but use them purposefully. Too many shadows can make your page feel cluttered. Focus on key elements you want prospective families to notice first.