
Connecting Your Custom Domain to Enrollio
Connecting your domain to Enrollio ensures your branded presence is consistent across enrollment pages, landing pages, emails, and parent-facing tools. This guide walks you through the process step by step.
Two Ways to Connect Your Domain
1. Automatic Connection (Supported Providers)
If your domain is registered with GoDaddy, Google Domains, or Cloudflare, you can connect it automatically through API authentication.
Steps:
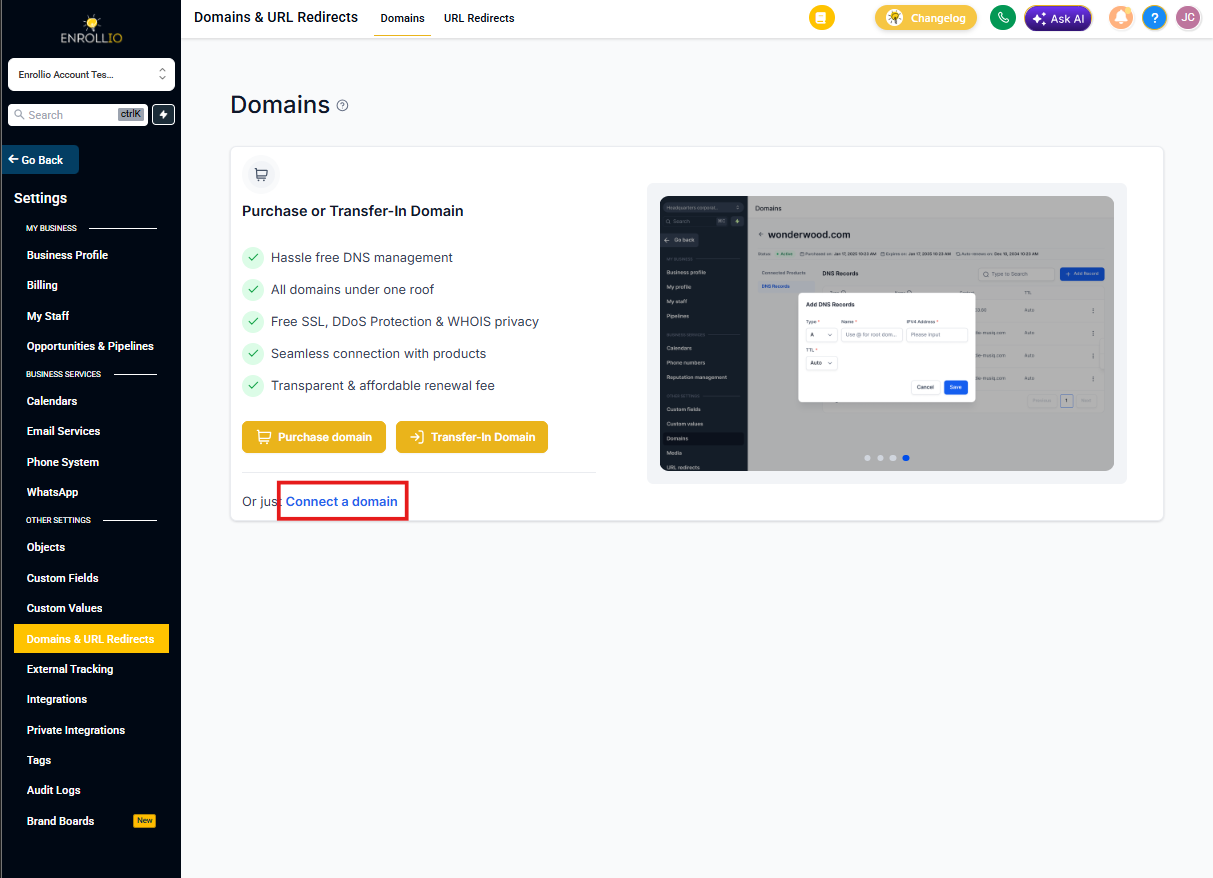
- Go to Sites > Settings > Domains in your Enrollio account
- Click "Connect a Domain"
- Choose the product you want to connect (enrollment page, landing page, or email)
- Enter your root domain or subdomain
- If you're adding the "www" subdomain, you'll see an option to also add the root domain
- For supported providers, click the "Authorize" button that appears
- Follow the prompts in your domain provider's interface to authorize Enrollio to access your DNS settings
- Once complete, close that tab and return to Enrollio
The required DNS records will be added automatically. Use this method whenever possible—it's faster and reduces errors.
2. Manual Connection (All Other Providers)
If your domain is with Namecheap, Bluehost, Squarespace, or any provider not listed above, you'll add DNS records manually.
Steps:
- Navigate to Sites > Settings > Domains
- Click "Connect a Domain"
- Choose your product type (enrollment page, landing page, etc.)
- Enter your domain name
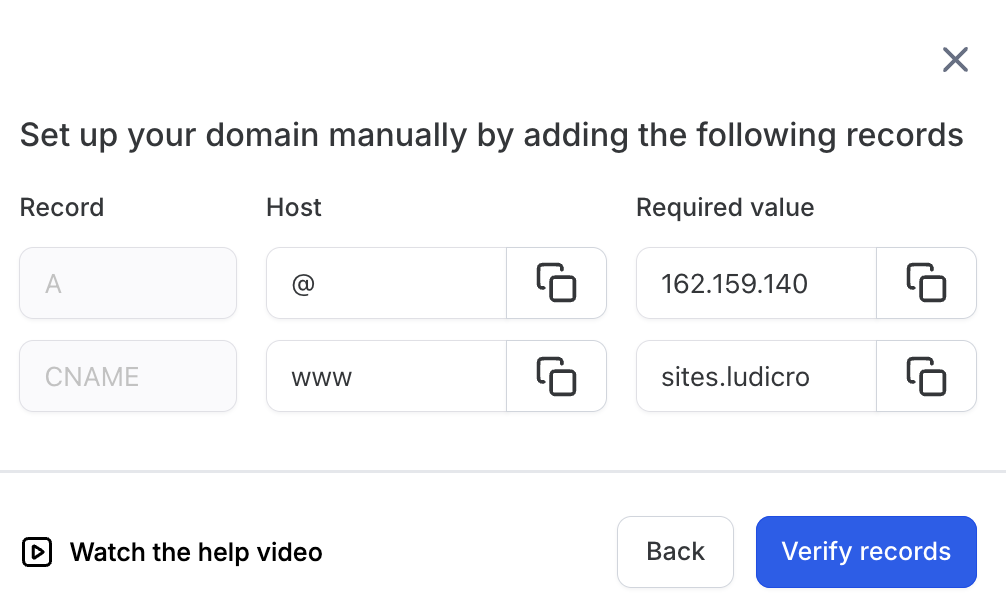
- Click "Add records manually"
- Enrollio will display the specific DNS records you need to add (A Records, CNAME, TXT)
- Log into your domain provider and navigate to DNS settings
- Add each record exactly as shown in Enrollio
- Save your changes
- Wait for DNS propagation (typically 15 minutes to 24 hours)
Manual DNS Setup by Provider
Cloudflare
- Log in to your Cloudflare dashboard
- Select your domain and click the DNS tab
- Click Add Record
- For each record from Enrollio:
- Select the type: A, CNAME, or TXT
- A Record for @ (root domain) points to the IP address
- CNAME for www or subdomains
- TXT for email verification (SPF/DKIM)
- Important: Toggle Proxy status to "DNS Only" (gray cloud icon) for A and CNAME records
- Click Save for each record
- Wait for propagation (a few minutes to 24 hours)
GoDaddy
- Log in to your GoDaddy account
- Go to My Products > Domains
- Click Manage DNS next to your domain
- Under Records, click Add
- Select the record type: A, CNAME, or TXT
- Use @ for root domain and www for subdomain
- Enter the record values exactly as shown in Enrollio
- Click Save after adding each record
- Allow time for changes to propagate
Namecheap
- Log in to your Namecheap dashboard
- Navigate to Domain List > Manage next to your domain
- Go to the Advanced DNS tab
- Under Host Records, click Add New Record
- Add each record type:
- A Record for @
- CNAME Record for www
- TXT Record for email verification (SPF/DKIM)
- Paste the exact values from Enrollio
- Click Save All Changes
- Wait up to 24 hours for DNS propagation
Squarespace
- Log in to your Squarespace account
- Go to Settings > Domains and select your domain
- Click DNS Settings (Advanced)
- Add the following:
- A Record for @ (use IP provided by Enrollio)
- CNAME for www (if required)
- TXT for email verification
- Click Save after each record
- Return to Enrollio and reconnect the domain once changes are saved
Troubleshooting Common Issues
While connecting your domain, you might encounter these common issues:
Multiple A Records Conflict
If you see an error about multiple A records, you'll need to remove any existing A records for @ or your subdomain before adding the Enrollio record.
AAAA Record Conflict
Remove any existing AAAA records (IPv6 addresses) that point to @ or your subdomain, then try reconnecting.
CAA Record Conflict
CAA records control which certificate authorities can issue SSL certificates for your domain. If you have a CAA record, make sure it allows Let's Encrypt (Enrollio's SSL provider).
DNS Records Do Not Match
Double-check that you've entered each record exactly as shown in Enrollio—even a small typo will prevent connection.
Domain is Connected Elsewhere
If your domain is already pointed to another service, you'll need to remove those DNS records before connecting to Enrollio.
What You Can Connect a Domain To
Enrollment Pages & Landing Pages
Use your domain to host parent-facing enrollment pages, registration forms, waitlist signups, and marketing landing pages. Your families see your brand, not a generic URL.
Email Authentication
Connecting your domain is required to authenticate email sending through SPF, DKIM, and DMARC records. This dramatically improves email deliverability and ensures your messages to parents don't end up in spam folders.
Learn more: Dedicated Email Sending Domains Overview & Setup
Branded System Links
Replace default system-generated URLs with your own domain for all links in text messages, emails, and parent communications. Everything appears under your brand.
Learn more: Branding System-Generated Links and How to Setup Branded Domains
Client Portal
Host your parent-facing dashboard on your custom domain. When families log in to view enrollment status, make payments, or access forms, they see your childcare center's brand throughout the experience.
Learn more: How to Set Up the Client Portal
Pro Tips
- DNS Propagation Time: Changes typically take 15 minutes to a few hours, but can take up to 24 hours to fully propagate worldwide
- SSL Certificates: Enrollio automatically provisions SSL certificates once your domain is connected and DNS records are verified—no extra steps needed
- Managing Domains: View and manage all your connected domains under Settings > Domains
- Stuck on Pending? If your domain shows "Pending" after 24 hours, verify your DNS records match exactly, then reach out to support
- Multiple Domains: You can connect different domains for different purposes (one for enrollment pages, another for email)