
The Class Booking Calendar in Enrollio helps you schedule group events like center tours, parent orientations, or open houses where one staff member meets with multiple families at once. Whether you're hosting weekly tour sessions or monthly meet-and-greets, this feature streamlines scheduling, automates payments, and manages attendees seamlessly.
What is the Class Booking Calendar?
The Class Booking Calendar is designed for situations where a single host meets multiple families in the same session. It's perfect for childcare centers offering group tours, parent workshops, or orientation sessions where families can reserve spots for specific dates and times.
This calendar type simplifies managing recurring events by letting you define seat limits, set up recurring schedules, and integrate payments — all within Enrollio. It reduces manual booking work and automates participant management.
Key Benefits of Class Booking Calendars
Class Booking Calendars help you efficiently organize group events, manage attendance, and automate the booking and payment process. Here's what makes them valuable for childcare centers:
- Flexible Scheduling: Define tour days, time slots, and available seats easily
- Built-in Payments: Accept tour fees or deposits directly via Stripe integration
- Automated Notifications: Keep families informed about bookings, reschedules, or cancellations
- Attendee Management: Track and manage each family's booking from your Enrollio dashboard
- Custom Branding: Customize colors, logos, and booking widgets to match your center's brand
How to Create a Class Booking Calendar
Step 1: Access Settings
From your Enrollio dashboard, click Settings in the left sidebar. This opens the settings panel where you manage calendars, team members, and other account configurations.

Step 2: Open Calendar Setup
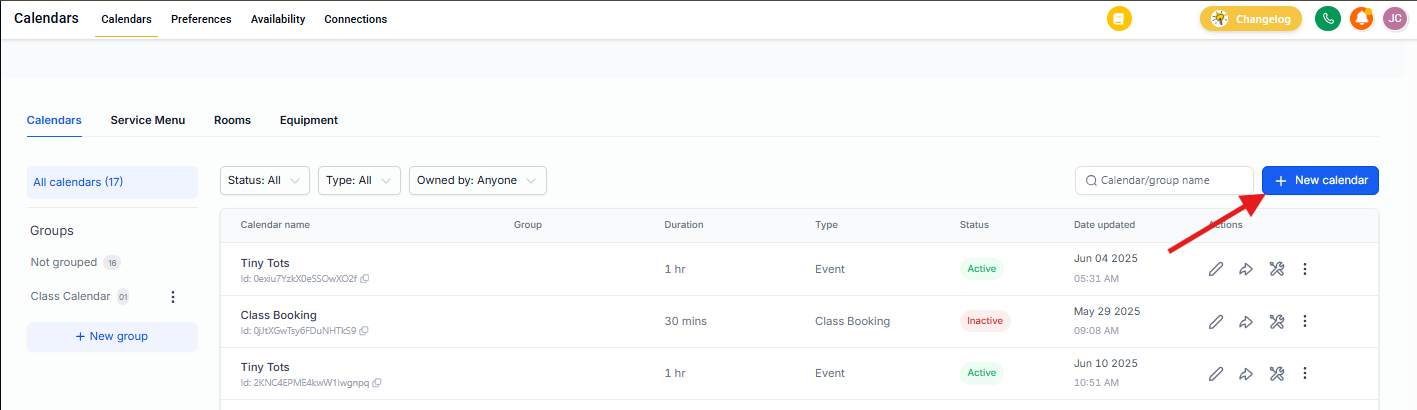
In the Settings menu, click Calendars on the left sidebar, then open the Meetings tab at the top. Click + New Calendar to start creating your new calendar.
Step 3: Select Class Booking
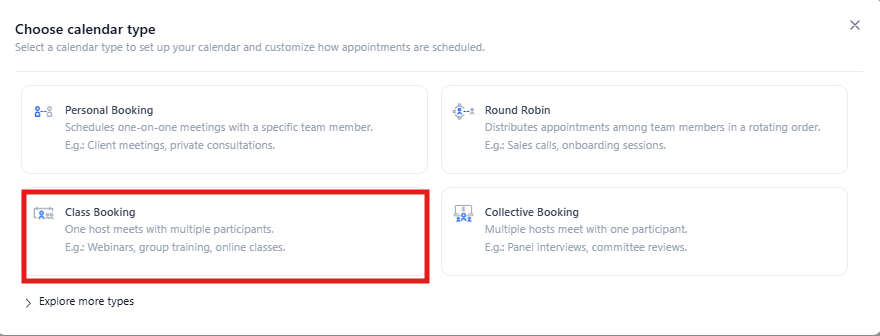
From the calendar type selection window, click Class Booking. This option is for scenarios where one staff member meets multiple families, such as group tours, orientations, or parent workshops.
Choosing this type ensures your calendar supports seat limits, group scheduling, and payment options.
Step 4: Name Your Calendar
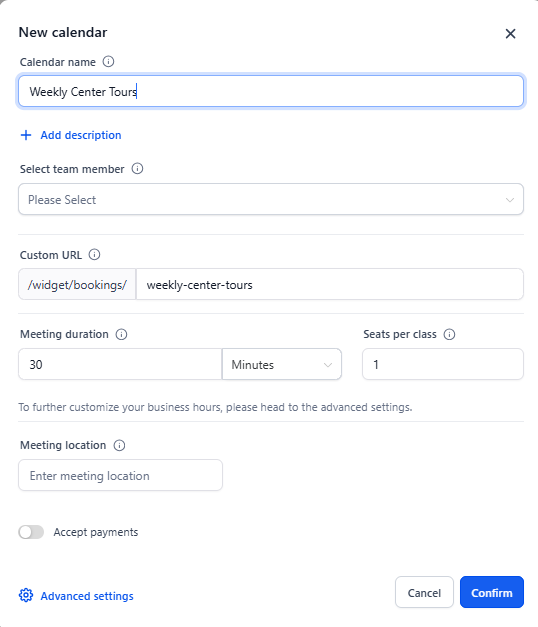
In the Calendar name field, enter a clear and descriptive name like "Weekly Center Tours" or "Parent Orientation Sessions." The name should reflect the event's purpose so it's easy to identify when managing multiple calendars.
A well-labeled calendar helps both your team and families recognize the correct booking link.
Step 5: Add a Calendar Description
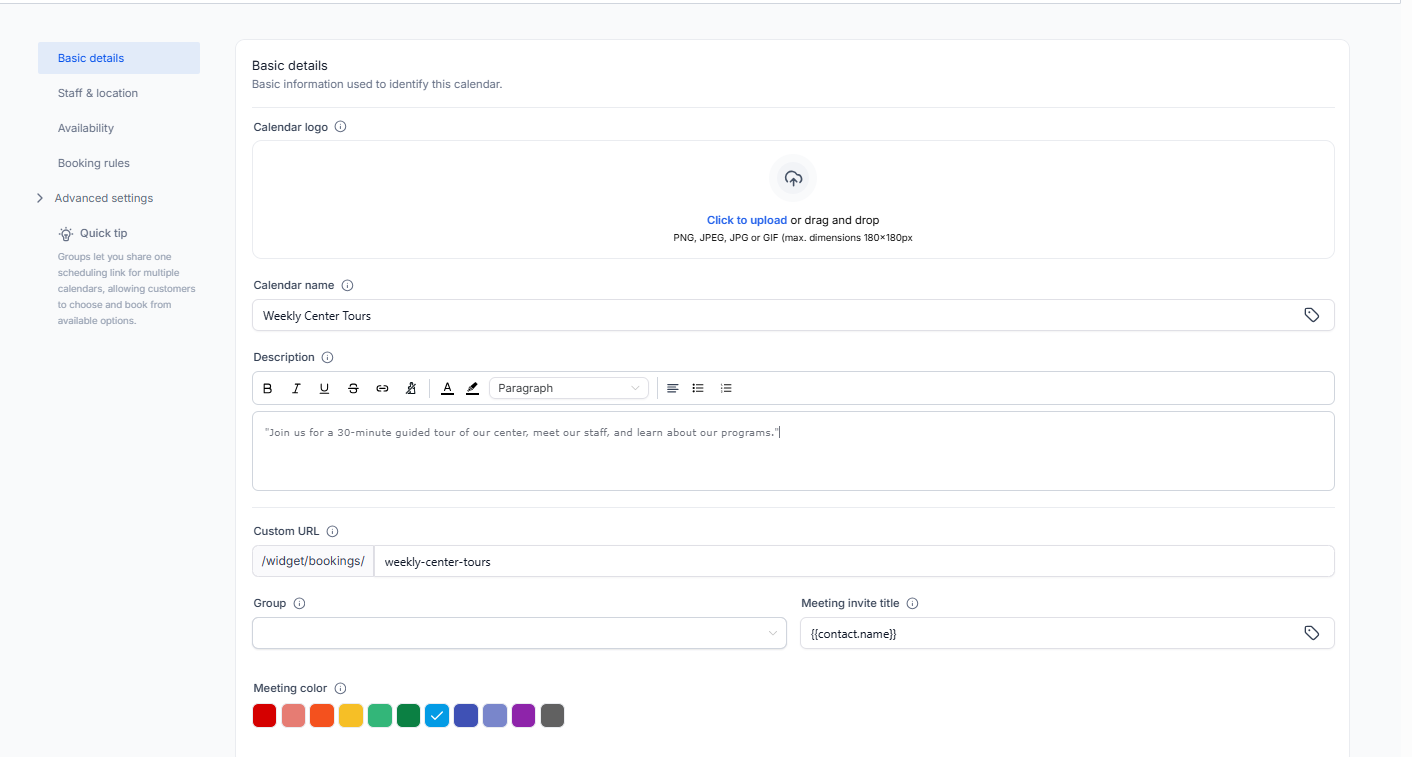
In the Description box, type a brief summary of your event. This description appears on your booking page and helps families understand what the session covers before reserving a spot.
Keep it concise and engaging to set clear expectations. For example: "Join us for a 30-minute guided tour of our center, meet our staff, and learn about our programs."
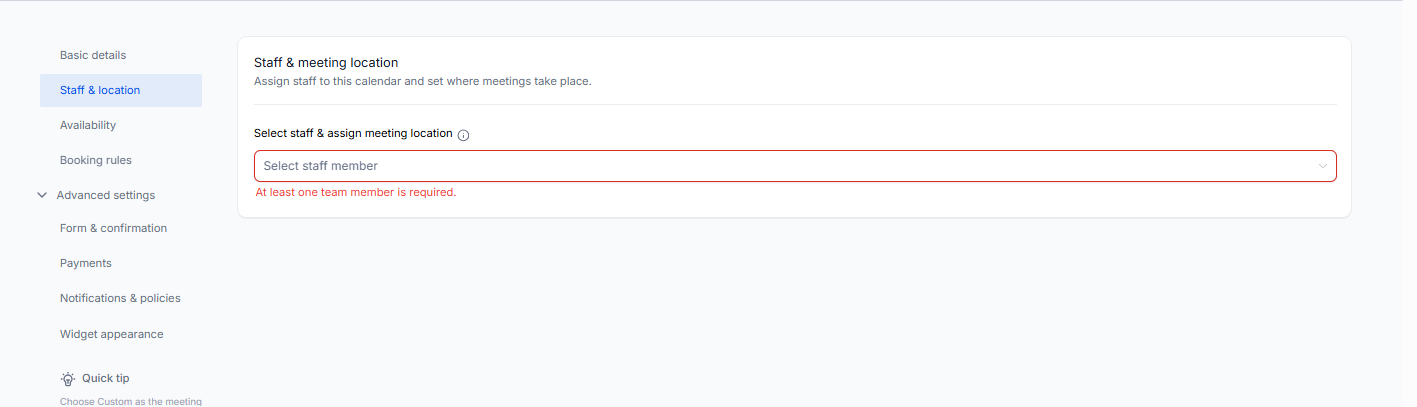
Step 6: Assign a Team Member
In the Select team member field, choose the staff member responsible for conducting the tour or event. This links the calendar to that person's schedule, ensuring all bookings sync with their availability.
Assigning a team member prevents scheduling conflicts and keeps host calendars up to date.
Step 7: Set a Custom URL
In the Custom URL field, enter a unique URL slug for your calendar, like "center-tour" or "parent-orientation." This creates a personalized link that families can easily access to book their sessions.
A clear, branded URL improves professionalism and makes sharing your booking page simpler.

Step 8: Set Meeting Duration
In the Meeting duration field, define how long each session will last — for example, 30 minutes or 1 hour. This ensures all bookings follow a consistent time frame and helps the system manage session intervals accurately.
Setting the right duration maintains your schedule and prevents overlap between sessions.
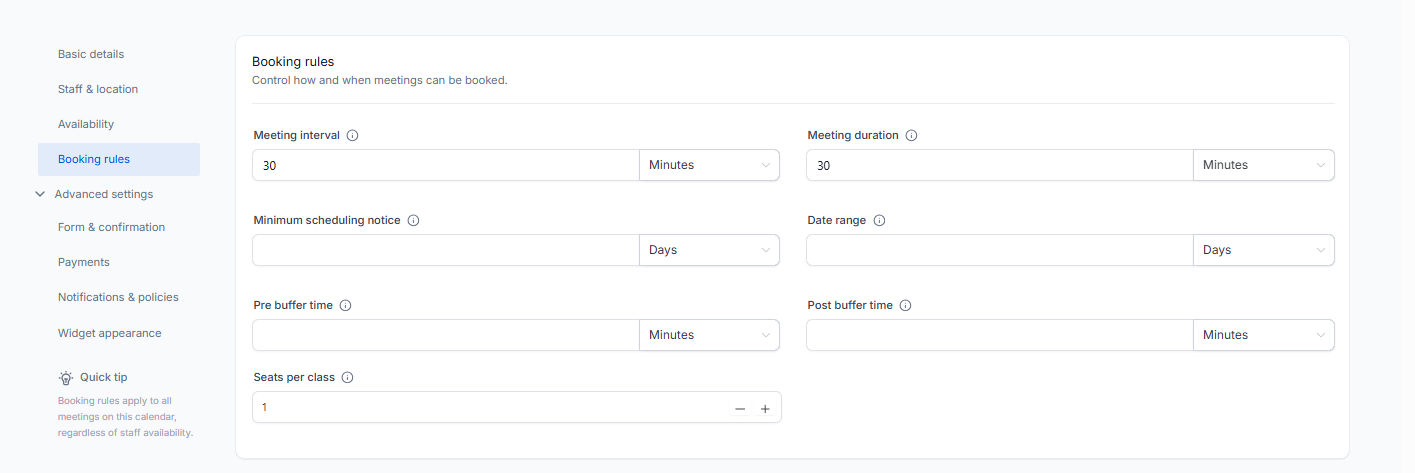
Step 9: Set Seats per Class
In the Seats per class field, enter the maximum number of families allowed for each session. This limit ensures your group size stays manageable and that no additional bookings are accepted once all spots are filled.
Setting an accurate seat count helps maintain an organized registration process and prevents overbooking.

Step 10: Add Meeting Location
In the Meeting Location field, enter the address or meeting details. For in-person tours, include your center's street address. For virtual sessions, add your Zoom or Google Meet link.
This ensures families receive the correct meeting details automatically in their booking confirmation.

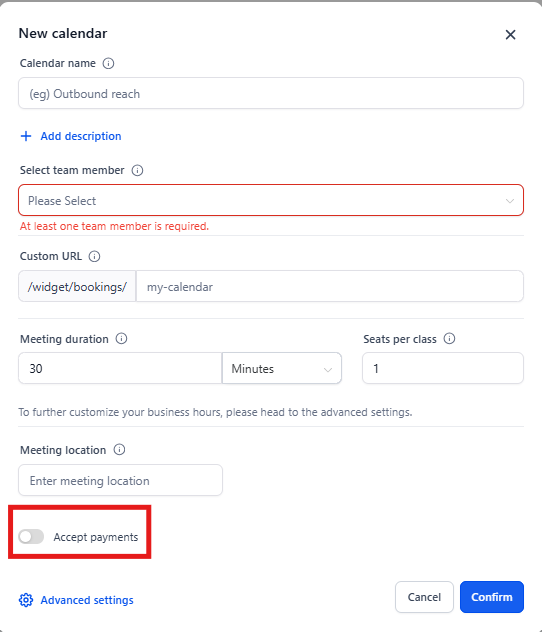
Step 11: Enable Payment Collection (Optional)
Toggle on Accept payments to activate payment collection for your event. Enter the Amount and Currency, then add a short Description explaining the purpose of the payment (e.g., "Tour deposit" or "Registration fee").
This ensures families are informed about costs upfront and allows seamless payment processing through your connected Stripe account.
Step 12: Access Advanced Settings
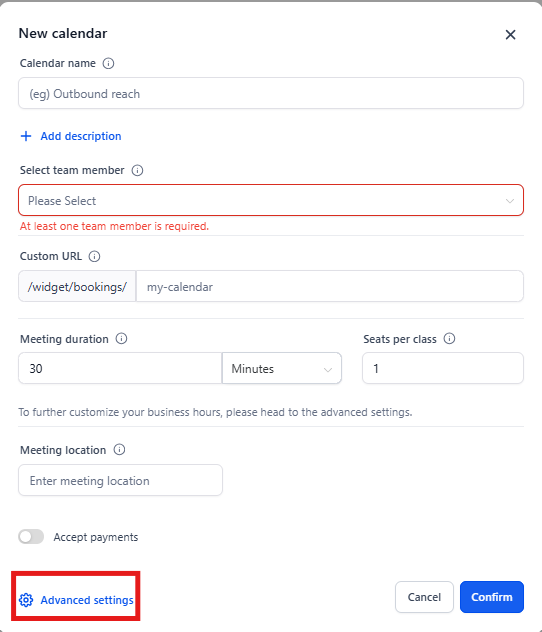
Click Advanced Settings at the bottom of the calendar setup window. This opens additional configuration options, allowing you to fine-tune availability, notifications, and customization settings.
Accessing this section ensures your class booking calendar aligns with your preferred schedule and branding requirements.
Configure Advanced Settings
Meeting Details
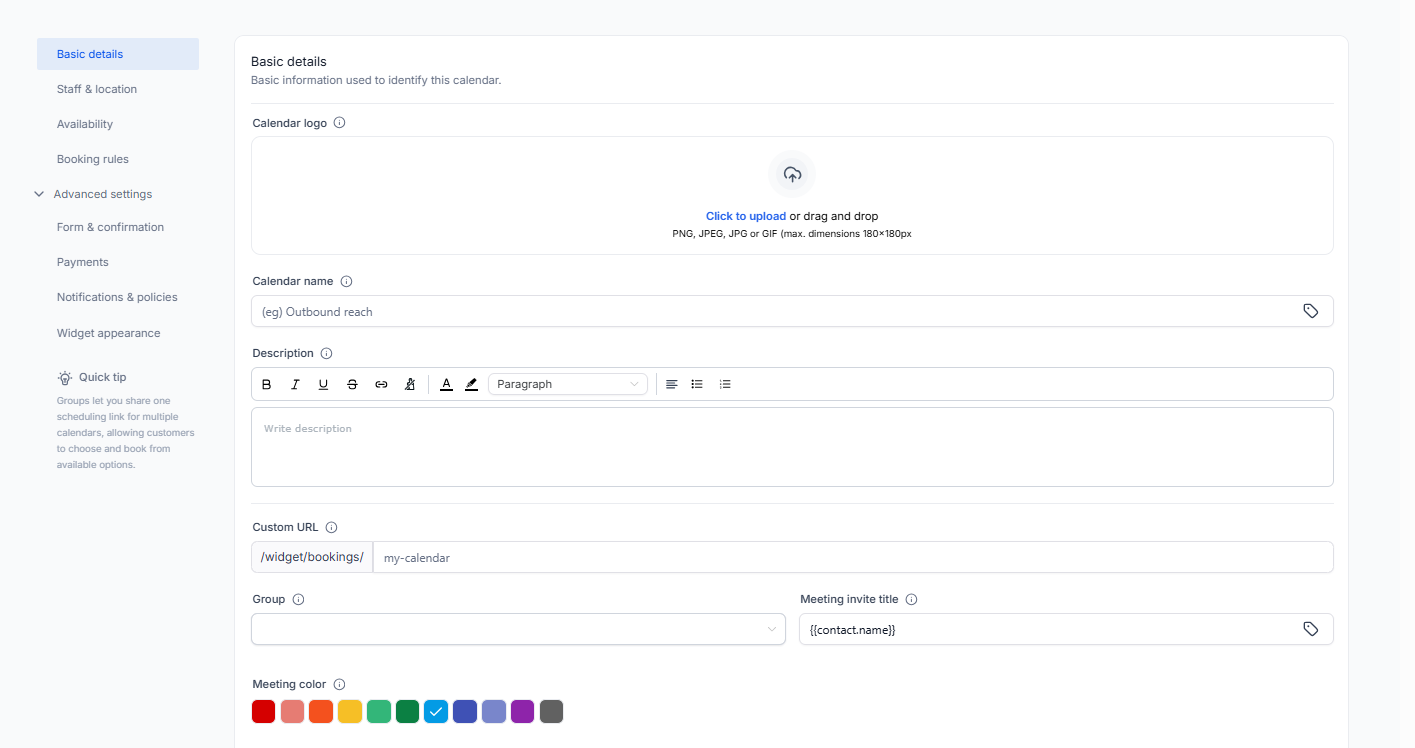
The Meeting Details section lets you define the key information displayed to families on your booking page. Each element helps personalize and organize your calendar for a professional appearance.
- Calendar Logo: Upload an image (PNG, JPEG, or GIF) to brand your calendar with your center's logo. This visual helps families instantly recognize your business.
- Calendar Name: Give your calendar a clear title to identify which event it represents.
- Description: Add a short, informative overview of what the session covers. This appears on the booking page and provides clarity to attendees.
- Group: (Optional) Assign your calendar to a group for better organization if you manage multiple calendars.
- Custom URL: Create a simple, branded link that can be shared with families for direct access to your booking page.
This section ensures your calendar is clearly labeled, visually branded, and easy for families to understand.
Availability and Booking Rules
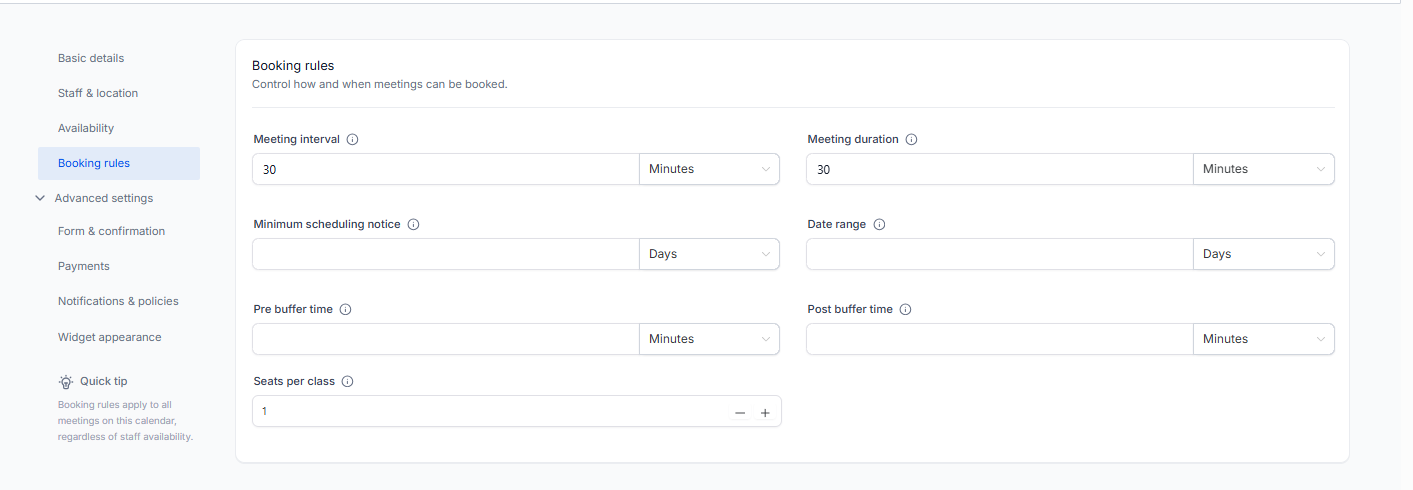
The Availability & Booking Rules section allows you to control when and how families can book your sessions. Here's what each field does:
- Booking Availability: Shows the assigned team member's available hours for scheduling
- Recurring Meeting: Toggle this on if the same session repeats regularly (like weekly tours every Tuesday)
- Meeting Interval: Defines the gap between available booking slots (e.g., every 30 minutes)
- Meeting Duration: Specifies how long each session lasts (e.g., 30 minutes)
- Minimum Scheduling Notice: Sets how far in advance families must book a session (e.g., 24 hours)
- Date Range: Limits how far into the future families can book (e.g., 60 days out)
Save Your Calendar
Once you've configured all settings, click Save or Create Calendar to finalize your setup. Your new Class Booking Calendar is now ready to share with families.
You can embed the booking link on your website, share it via text or email, or include it in your marketing materials.
Frequently Asked Questions
Can I create multiple class booking calendars?
Yes. You can create separate calendars for different events — like one for center tours, another for parent workshops, and another for open houses. Each calendar can have its own availability, seat limits, and team members.
What happens when all seats are filled?
When a session reaches its seat limit, that time slot automatically becomes unavailable for new bookings. Families will see other available sessions instead.
Can families reschedule their bookings?
Yes. You can enable rescheduling options in your calendar settings, allowing families to change their booking to a different available time slot.
How do families receive their booking confirmation?
After booking, families automatically receive a confirmation email with the session details, meeting location, and any payment receipt if applicable. You can customize these notification emails in your calendar settings.
Can I charge a deposit for tours?
Yes. Enable payment collection in your calendar settings and connect your Stripe account. Many centers keep tours free, but you can require a small deposit that's refundable or applied toward enrollment fees.