
Resources in Services
Resources in Services let you reserve the real-world assets needed to deliver an appointment, like classrooms, play areas, or activity stations, so booking stays accurate. This article covers what resources are, when to use them, and how to set them up.
Overview of Resources in Services
Resources represent physical assets such as classrooms, outdoor spaces, or activity stations that are required to deliver a service. Assigning resources to services ensures that when the service is booked, the associated resource is also reserved—preventing double bookings and keeping availability accurate.
Resources should be created only when availability matters. For example:
- A crayon box does not need to be created as a resource for an art class, since there are usually plenty.
- An outdoor play area should be created as a resource if there's only one available. Even if 3 staff members are free, only one outdoor session can be booked simultaneously because of the space limitation.
Key Benefits of Resources
Understanding the benefits helps you decide where you can use resources to add the most value in your scheduling processes.
Fewer Scheduling Mistakes: Prevents double-booking so you avoid last-minute cancellations, reschedules, and frustrated families.
Control Capacity: Resources can limit how many appointments are allowed at the same time, based on their defined capacity.
Less Manual Oversight: Automatically reserves the required asset when a service is booked, freeing your team from constant checks.
Keeps Appointments Moving: When multiple equivalent resources are assigned, the platform books any available one so one busy classroom or activity space doesn't stall the schedule.
Capacity vs. Quantity
It's important to distinguish between resource quantity and resource capacity:
Quantity: Create a separate resource for each physical unit (e.g., Classroom 1, Classroom 2, Classroom 3).
Capacity: Set how many children/appointments that unit can handle at once (e.g., Classroom 1 has a capacity of 12 children).
Example: Your center has 3 classrooms → create 3 resources: Classroom 1, Classroom 2, Classroom 3. If Classroom 1 can host 12 children at the same time → set its capacity to 12.
How to Create a Resource
Use the steps below to set up a resource—details, timing, pricing, staff, and preview—so your booking page is accurate and ready to share.
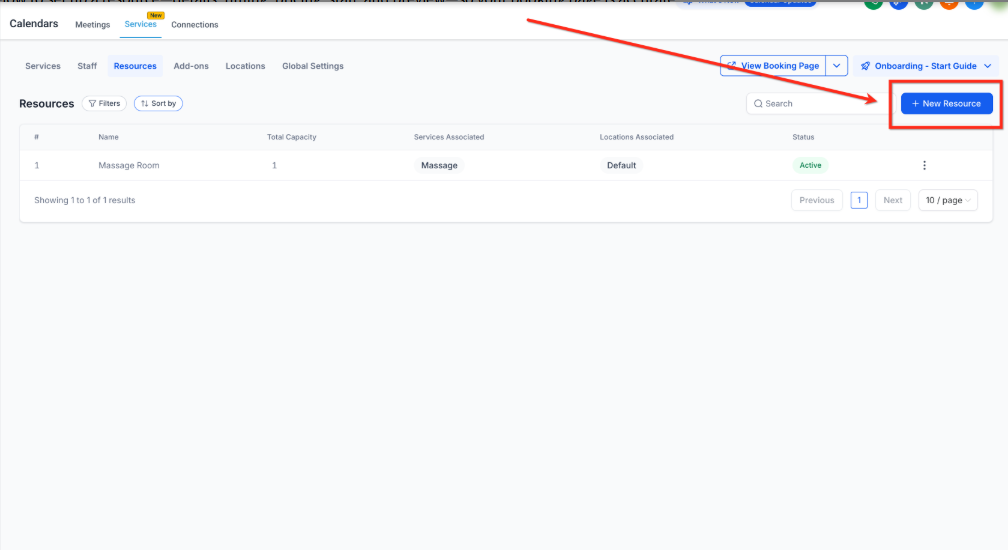
Step 1: Navigate to + New Resources
- Navigate to the Resources Page (Calendar > Calendar Settings > Services > Resources)
- Click the + New Resource button in the upper right corner
Step 2: Add Resource Details
- Enter the Resource Name and optionally a description.
- Select Service(s) that will use this resource.
- Select Location(s) where the resource is available.
- Define the capacity for each location (if multiple).
- Save your changes by clicking the blue Create button
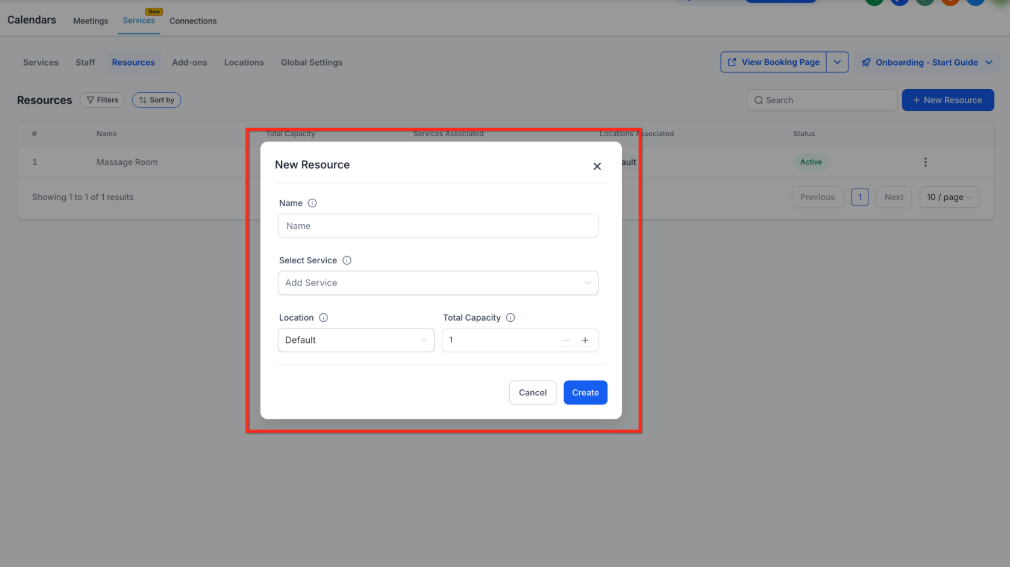
Once created, the resource will be automatically reserved whenever its associated services are booked.
Assigning Resources to Services
When creating or editing a resource, you'll need to:
- Assign Services – Select which services require this resource.
- Assign Locations – Choose where the resource is available (useful if you operate multiple locations).
- Set Capacities – Define the maximum capacity for each location for flexible scheduling.
You can assign resources either from the Services tab or directly in the Resources tab. Once linked, the platform will automatically block off that resource whenever its assigned service is booked.
If the resource is not available at the requested time, the appointment cannot be scheduled.
Best Practices
- Only create resources for real limiting factors (e.g., classrooms, outdoor spaces, activity areas).
- Use clear, descriptive names (e.g., Toddler Room 1, Outdoor Play Area 2).
- Always set the correct capacity to avoid overbooking.
- Assign resources consistently across locations to keep scheduling accurate.
Frequently Asked Questions
Q: I don't see the Resources tab—how do I turn it on?
Make sure Services is enabled for your Client Account. Click here to learn how to turn on Services.
Q: Can a service book more than one resource at a time?
No. A service can book only one resource at a time. You can assign multiple resources to the service, and the platform will book any one that's available.
Q: What happens if the required resource is unavailable?
The time slot will not be offered; the appointment cannot be scheduled at that time.
Q: What's the difference between Rooms/Equipment and Resources in Services?
Rooms & Equipment are managed under Calendar Rooms & Equipment to prevent double-bookings at the calendar level, while Resources live inside Services and are tied to service bookings. They're separate setups—choose the one that best fits your workflow.
Q: Why isn't my service showing on the public booking page?
Check if the service is set to Private. Private services don't appear on the public booking page; share the direct link instead.
Related Articles
- Services - Overview & How to Get Started
- Global Settings in Services
- How to Enable Services
- Configuring Staff in Services
- Categories in Services
- How to Create in Services