
Using Coupon Codes for Calendar Bookings
Coupon codes let you offer discounts on calendar bookings made through your booking widget. Parents can enter a valid code at checkout to receive a discount, and you'll see the full details tracked in the Payments tab of each appointment.
What You Can Do with Coupon Codes
Coupon codes give parents a simple way to apply discounts during booking. When they enter a valid code, your booking widget recalculates the price instantly. The appointment record shows an itemized discount line in the Payments tab.
You control every aspect: percentage or dollar amount, start and end dates, usage limits, and which calendars or products the code applies to.
Why Use Coupon Codes
Targeted promotions help you attract and convert more families:
- Higher conversion: Timely discounts reduce booking friction and abandoned checkouts
- Flexible promotions: Run percentage or fixed-amount discounts for seasonal campaigns or special events
- Control and targeting: Limit redemptions per family or overall to prevent overuse
- Better parent experience: Parents apply or remove codes right in the booking widget with instant price updates
What's Supported
Coupon codes work across all calendar types for both Neo and Classic booking widgets, as well as Services (v2).
Important limitations:
- Coupon codes don't work with the older Service Menu (v1). We recommend upgrading to Services (v2) for ongoing support and access to features like coupon codes.
- Coupon codes are only available through the booking widget. You can't apply them to appointments created manually in the app. Support for manual application is coming in a future release.
How to Set Up Coupon Codes
Step 1: Enable Payments and Coupons on Your Calendar
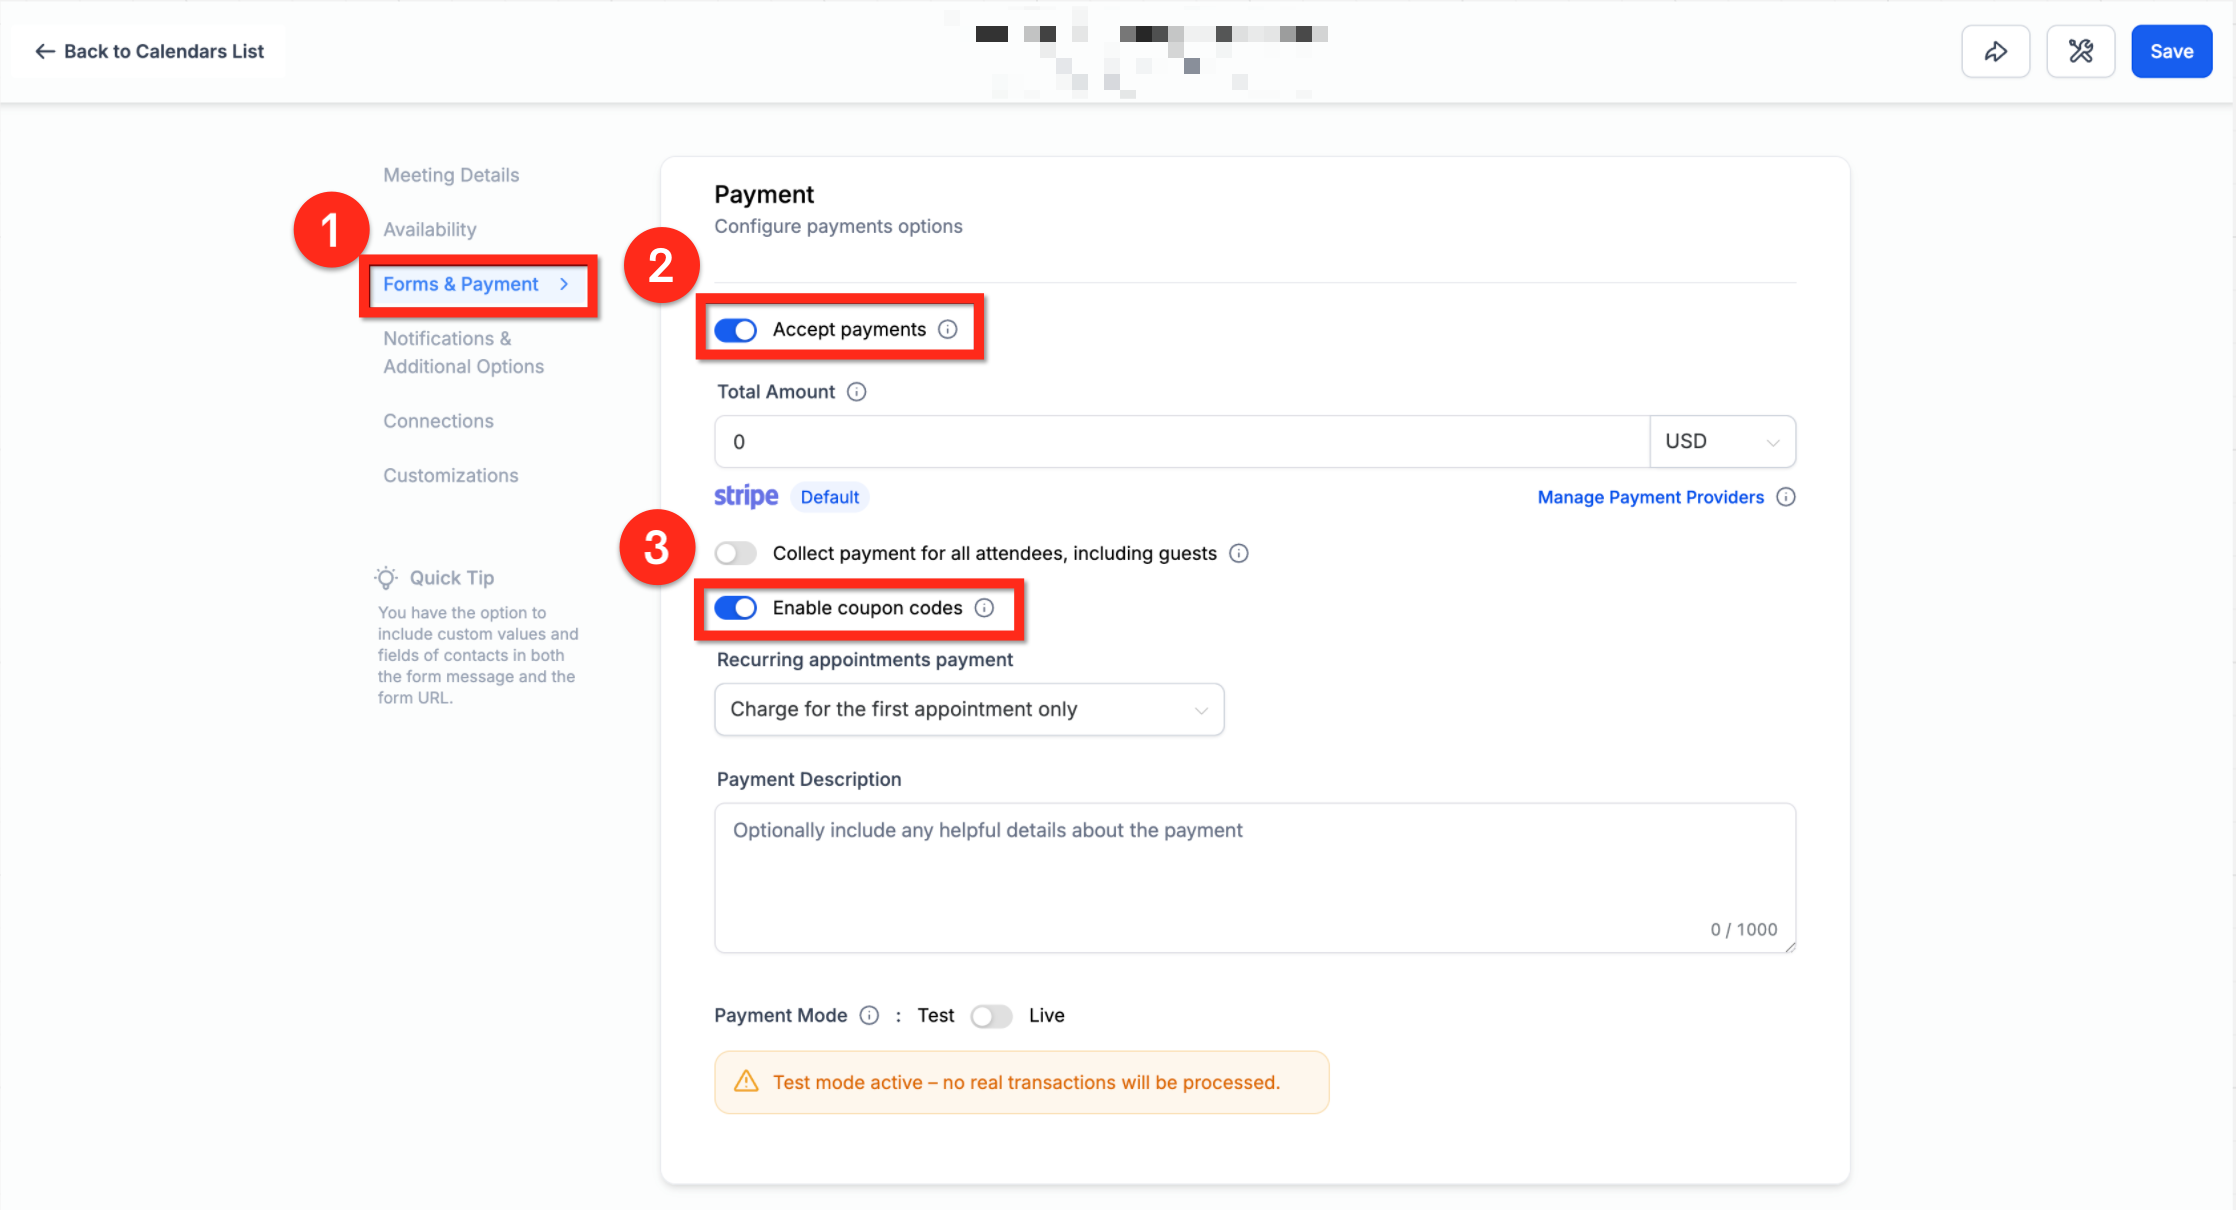
Before creating coupons, enable payments on your calendar:
- Go to Calendar Settings → Forms & Payments
- Enable Accept Payments
- A product is automatically created in your Products tab with a Calendar tag (you can't delete this product)
- Scroll down and enable Enable Coupon Code
- This adds a coupon input field to your booking widget
Note: Enable coupons individually for each calendar where you want them active.
Step 2: Create Your Coupon
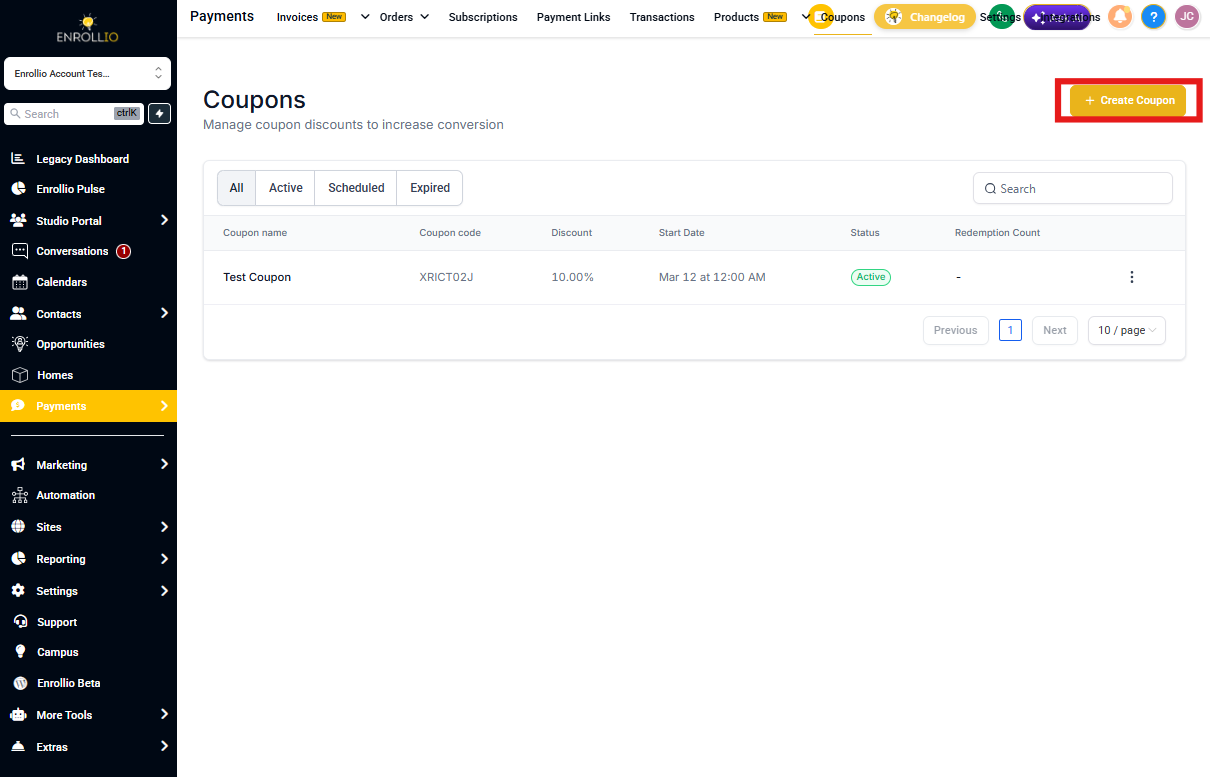
- Navigate to Payments → Coupons
- Click New Coupon
- Configure your coupon settings:
- Coupon Code: Enter a custom code (like TOUR25) or click Generate to create one automatically
- Coupon Type: Choose Percentage (10% off) or Fixed Amount ($50 off)
- Discount Offered: Enter the percentage or dollar value
- Start & End Date/Time: Set when the coupon is valid
- Limit Redemptions: (Optional) Cap total uses across all families
- Limit to Products/Offers: Choose which calendars or products the coupon applies to
- Limit to One Use Per Customer: Prevent the same family from using it multiple times
Once saved, your coupon is ready to share with families.
Step 3: What Parents See
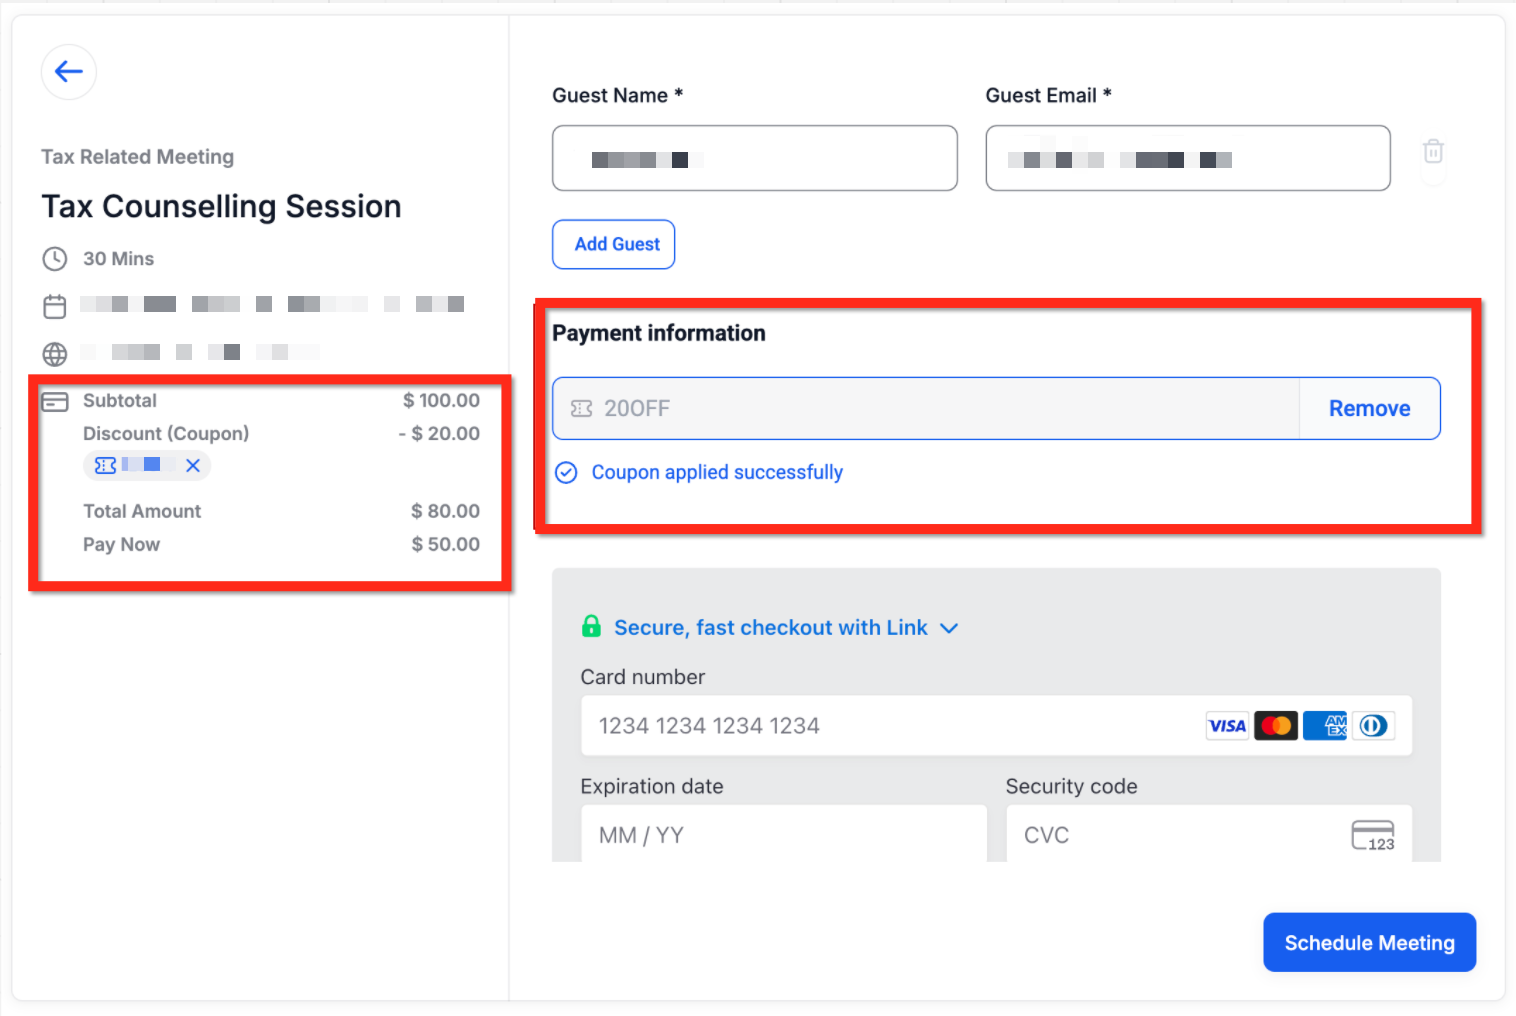
When booking through your calendar widget, parents see a coupon code input box.
If the code is valid:
- The discount applies instantly
- The adjusted total shows before checkout
If the code is invalid:
- An error message appears
Step 4: Track Coupon Usage
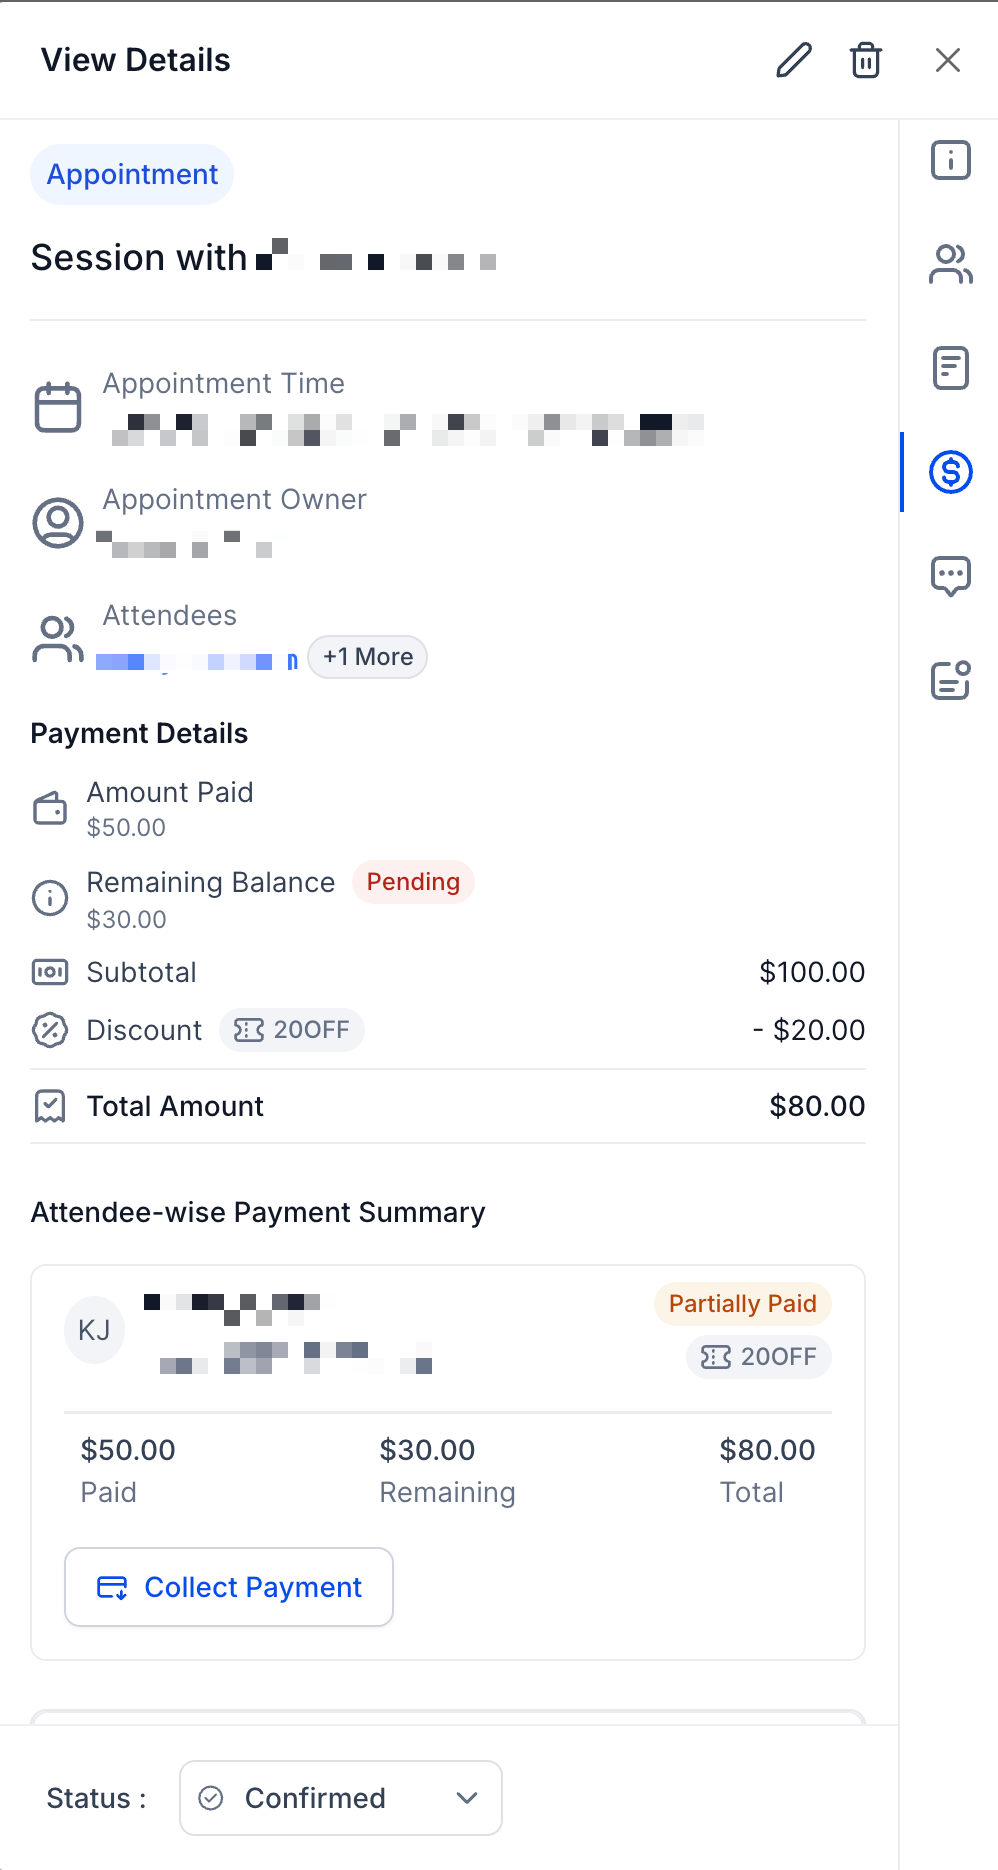
All payment and coupon details appear in the Payments tab of the appointment:
- Coupon code applied
- Discount amount
- Adjusted total
- Payment breakdown by attendee
Important: How Orders and $0 Transactions Work
As of December 2025, we changed how orders, invoices, and transactions behave with coupon codes. Here's what you need to know.
Orders Replace Invoices for Calendar Payments
Previously, partial payments created a partially paid invoice automatically. Now, an order is created instead. Payments are collected against the order, not an invoice.
This standardizes payment tracking across Enrollio.
Why You See $0 Transactions
When an order is created through the booking flow, you'll see a $0 transaction recorded. This represents order creation, not an actual payment or charge.
When Orders Are Created
An order is created whenever your calendar has payments enabled, even if:
- A coupon brings the total to $0
- No payment is collected at booking time
If payments aren't enabled on the calendar, no order is created.
Update Your Automations
If you built automations using the "Invoice Created" trigger, you'll need to update them:
- Replace: Invoice Created triggers
- With: Order Created triggers
This ensures your automations continue working as expected.
Filter Out $0 Transactions in Automations
To prevent automations from firing on $0 system transactions, update payment-related automations:
- Use the Payment Received trigger
- Add an If/Else condition
- In the If branch, set: Amount is greater than 0
- Place your automation actions in this branch
This ensures automations only run for actual payments.
Frequently Asked Questions
How do I see the discount after a family books?
Open the appointment and check the Payments tab. You'll see the discount (coupon), amount paid, and remaining balance.
Can I edit or disable a coupon after it's live?
Yes. Go to Payments → Coupons and open the coupon to update limits, dates, or disable it. Changes affect future bookings only.
How can I test a coupon without charging a real card?
Set your calendar's Payment Mode to Test, complete a test booking using your payment gateway's test credentials (like Stripe test cards), then switch back to Live when ready.
Can parents use multiple coupons on one booking?
No. Only one code per checkout is supported. Parents can remove one code and apply a different one before paying.
Are coupon codes case-sensitive?
No. If your code is SUMMER25, entering Summer25 or summer25 will work the same.