
Overview
Global Settings for Tour Scheduling centralizes your most important configuration choices for tours and facility visits. Use it to quickly apply consistent rules for booking pages, payments, scheduling, notifications, and calendar behavior across all your tour types.
This article walks you through every option available in Global Settings for Tour Scheduling.
Key Benefits of Global Settings
Centralized configuration supports a consistent, streamlined booking experience across all tour types:
- Centralized Control: Apply booking, payment, scheduling, and notification rules from one place.
- Consistent Parent Experience: Keep the booking page layout, labels, and choices uniform across all tour types.
- Faster Updates: Change global behaviors — like staff selection or payment visibility — without editing each tour type individually.
- Smoother Scaling: As your offerings grow, add new tour types that inherit existing settings without reinventing your scheduling setup.
Global Settings Sections
Settings are organized into five main areas:
- In-App Settings: Configure options for your internal platform view.
- Booking Page: Manage settings for your parent-facing booking widget.
- Payment Settings: Configure payment modes, currencies, and payment-related options.
- Tour Settings: Control options for tour bookings and appointments.
- Additional Settings: Miscellaneous settings for added functionality.
- Notification Settings: Customize how and when parents and staff are notified about bookings.
In-App Settings
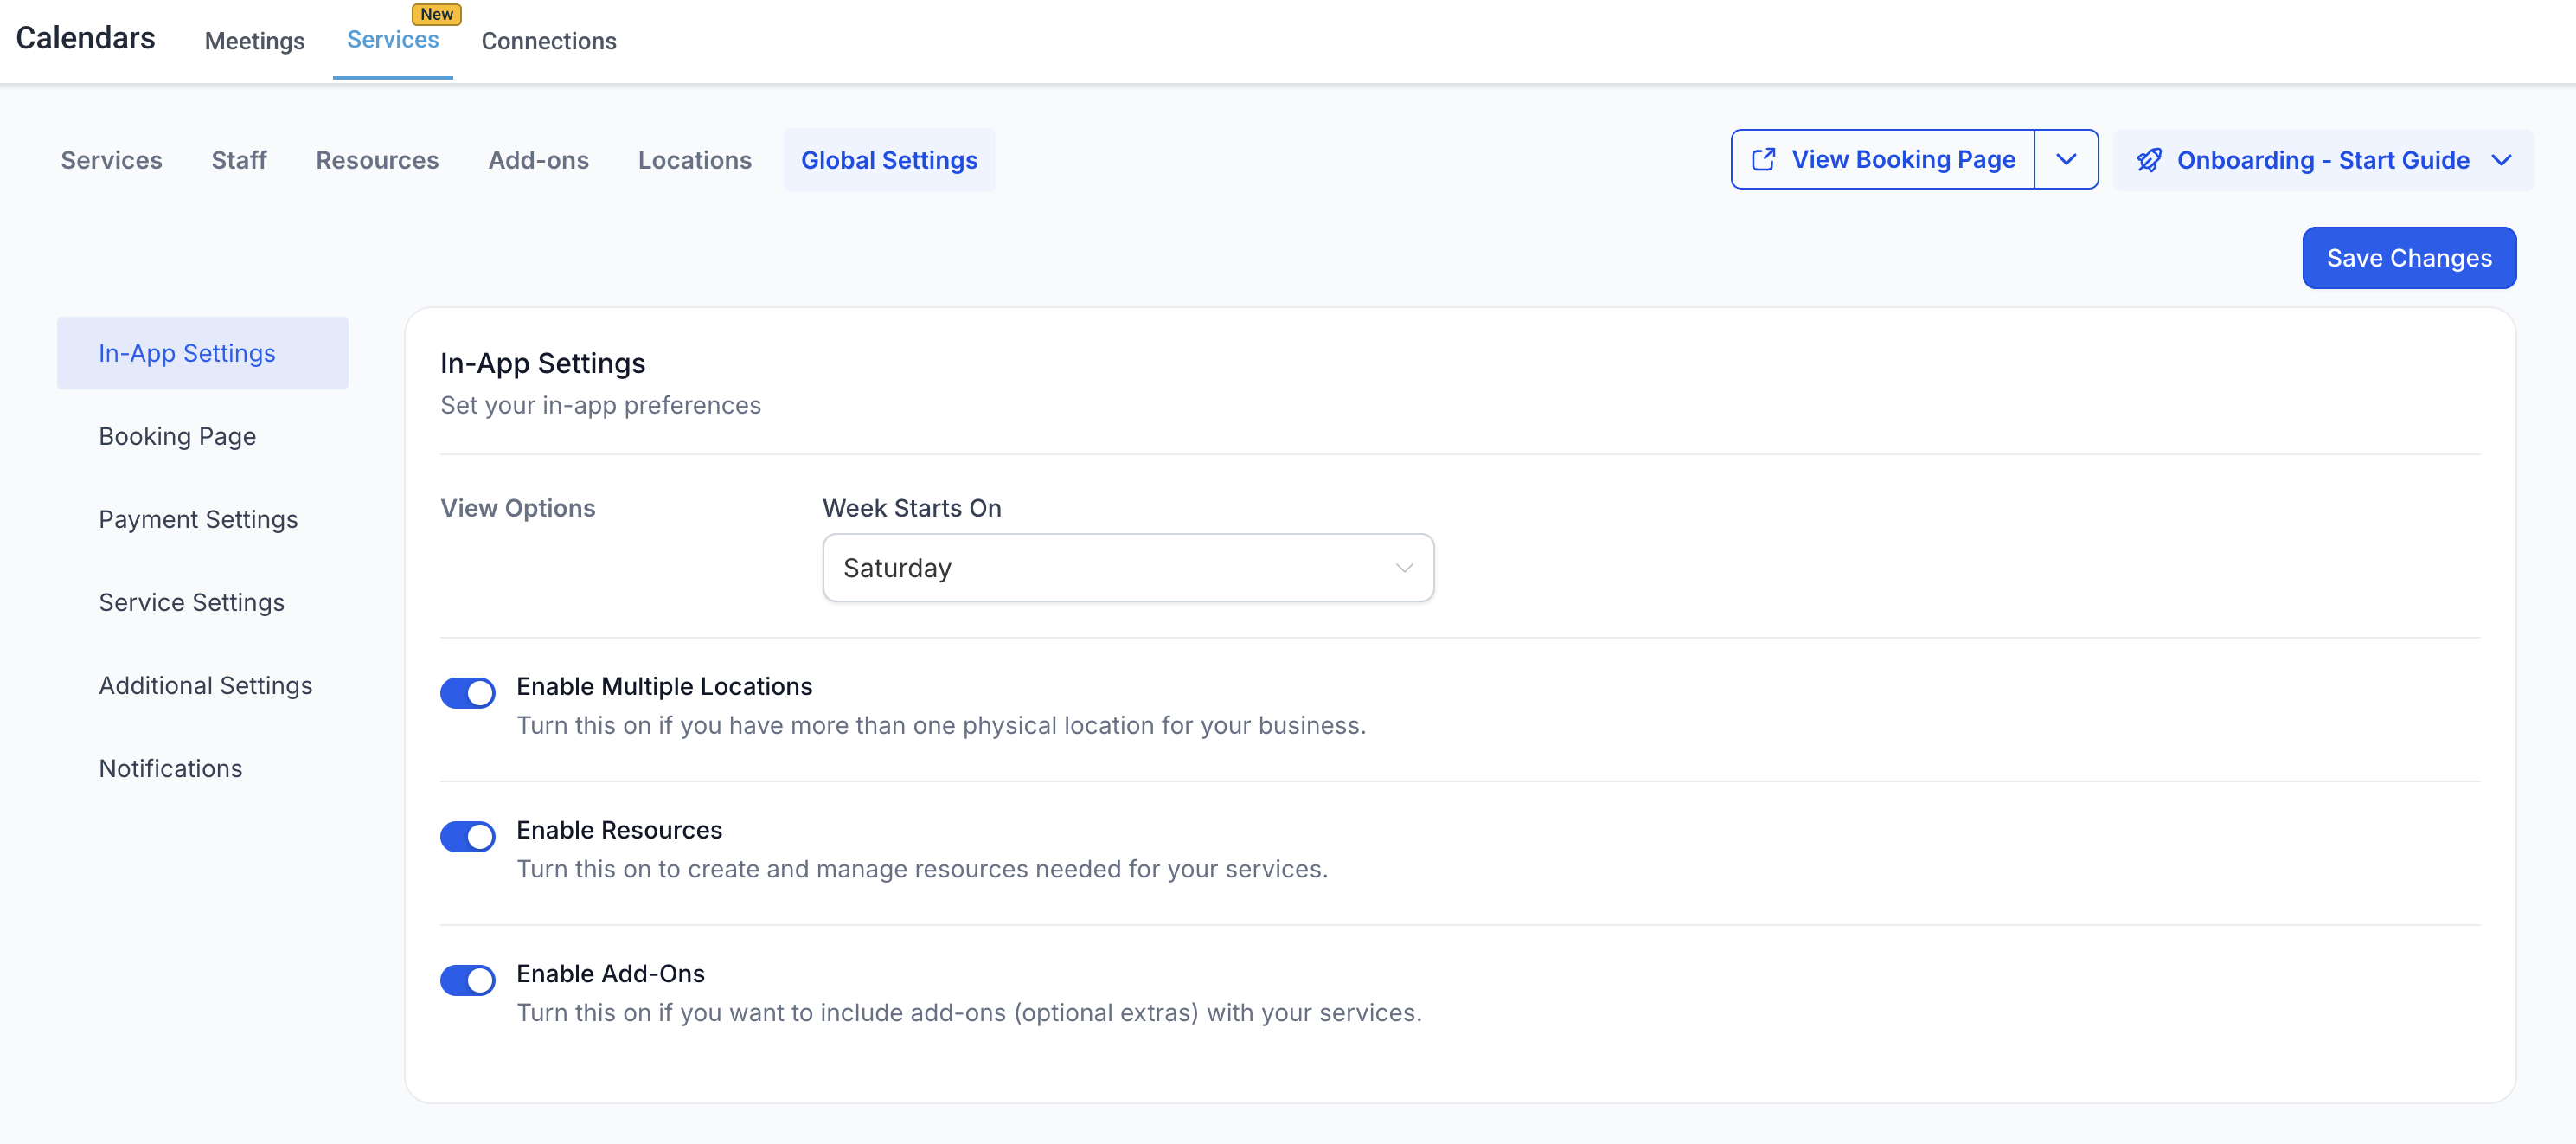
These settings control how you view and manage tours inside Enrollio.
View Options
Choose which day your calendar view should start on: Monday, Saturday, or Sunday.
Enable Multiple Locations
Enable this if your childcare business operates in multiple locations. This allows you to create and display more than one location on your booking page, so parents can choose where to schedule their tour.
Enable Resources
If you use specific resources like classrooms, playrooms, or activity spaces for tours, toggle this on to manage and track them. It prevents double bookings and ensures the correct spaces are reserved.
Enabling this adds a "Resources" tab where you can configure these settings.
Enable Add-ons
Toggle this on if you offer extras when booking a tour — like virtual tours, meet-and-greet sessions, or enrollment packets.
Enabling this adds an "Add-ons" tab for configuration.
Booking Page Settings
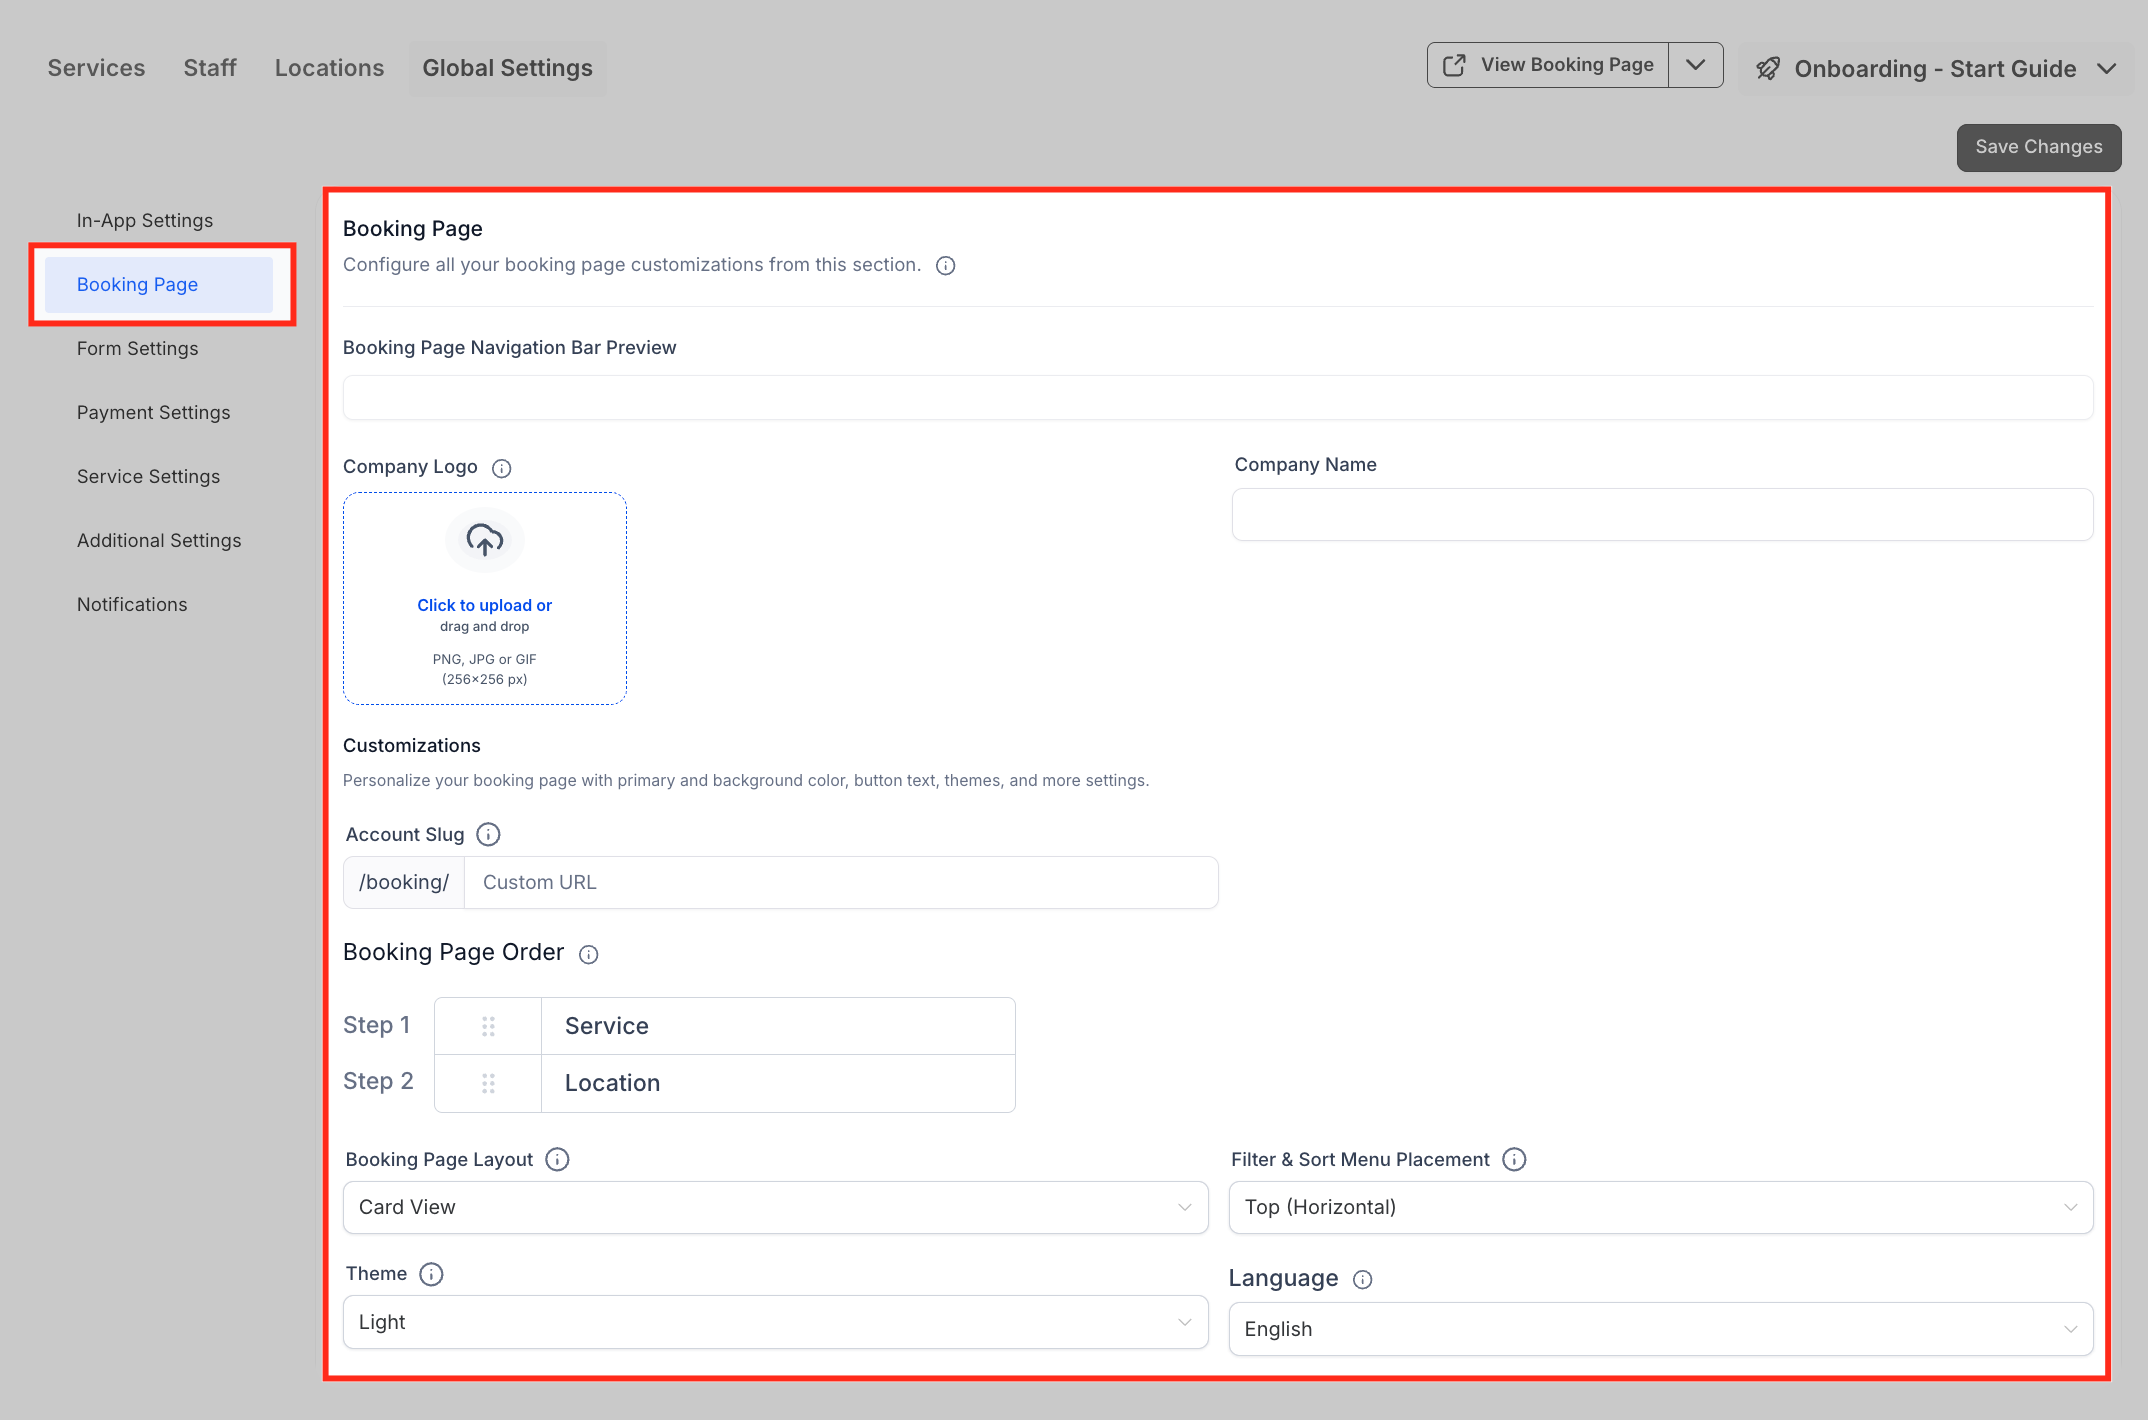
Customize how parents see and interact with your tour booking page. These settings are broken down into four sections.
Customize Booking Page
Company Name & Logo
Add your childcare center's name and upload your logo. Both will be displayed on your booking page.
Account Slug
Your account slug is a unique identifier used as the base for all your tour booking URLs.
Booking Page Order
If you have multiple locations, decide the flow of your booking page. Choose whether parents select a tour type first or a location first before proceeding.
Booking Page Layout
Decide how tour types appear on your booking page — display them in a card view, a list view, or give parents the option to choose their preferred view in real time.
Filter & Sort Menu Placement
Set how filters and sorting options are displayed — either horizontally at the top or vertically on the left.
Theme
Choose between a light or dark theme for your booking page, which affects the header, footer, and widgets.
Language
Select the language in which the booking page will be displayed to parents.
Primary Color
Set the color for all action buttons and date selection elements.
Background Color
Choose the background color for the booking page.
Tour Selection Button Label
Customize the button text that appears when parents select a tour type (e.g., 'BOOK TOUR').
Final Booking Button Label
Set the text for the final button where parents complete their tour booking (e.g., 'Schedule Tour').
Preview
Preview your booking page with your changes applied before publishing.
Insert Custom Code
Add custom CSS to further customize the look and feel of your booking page. Simply paste your code and save to apply changes.
Additional Settings
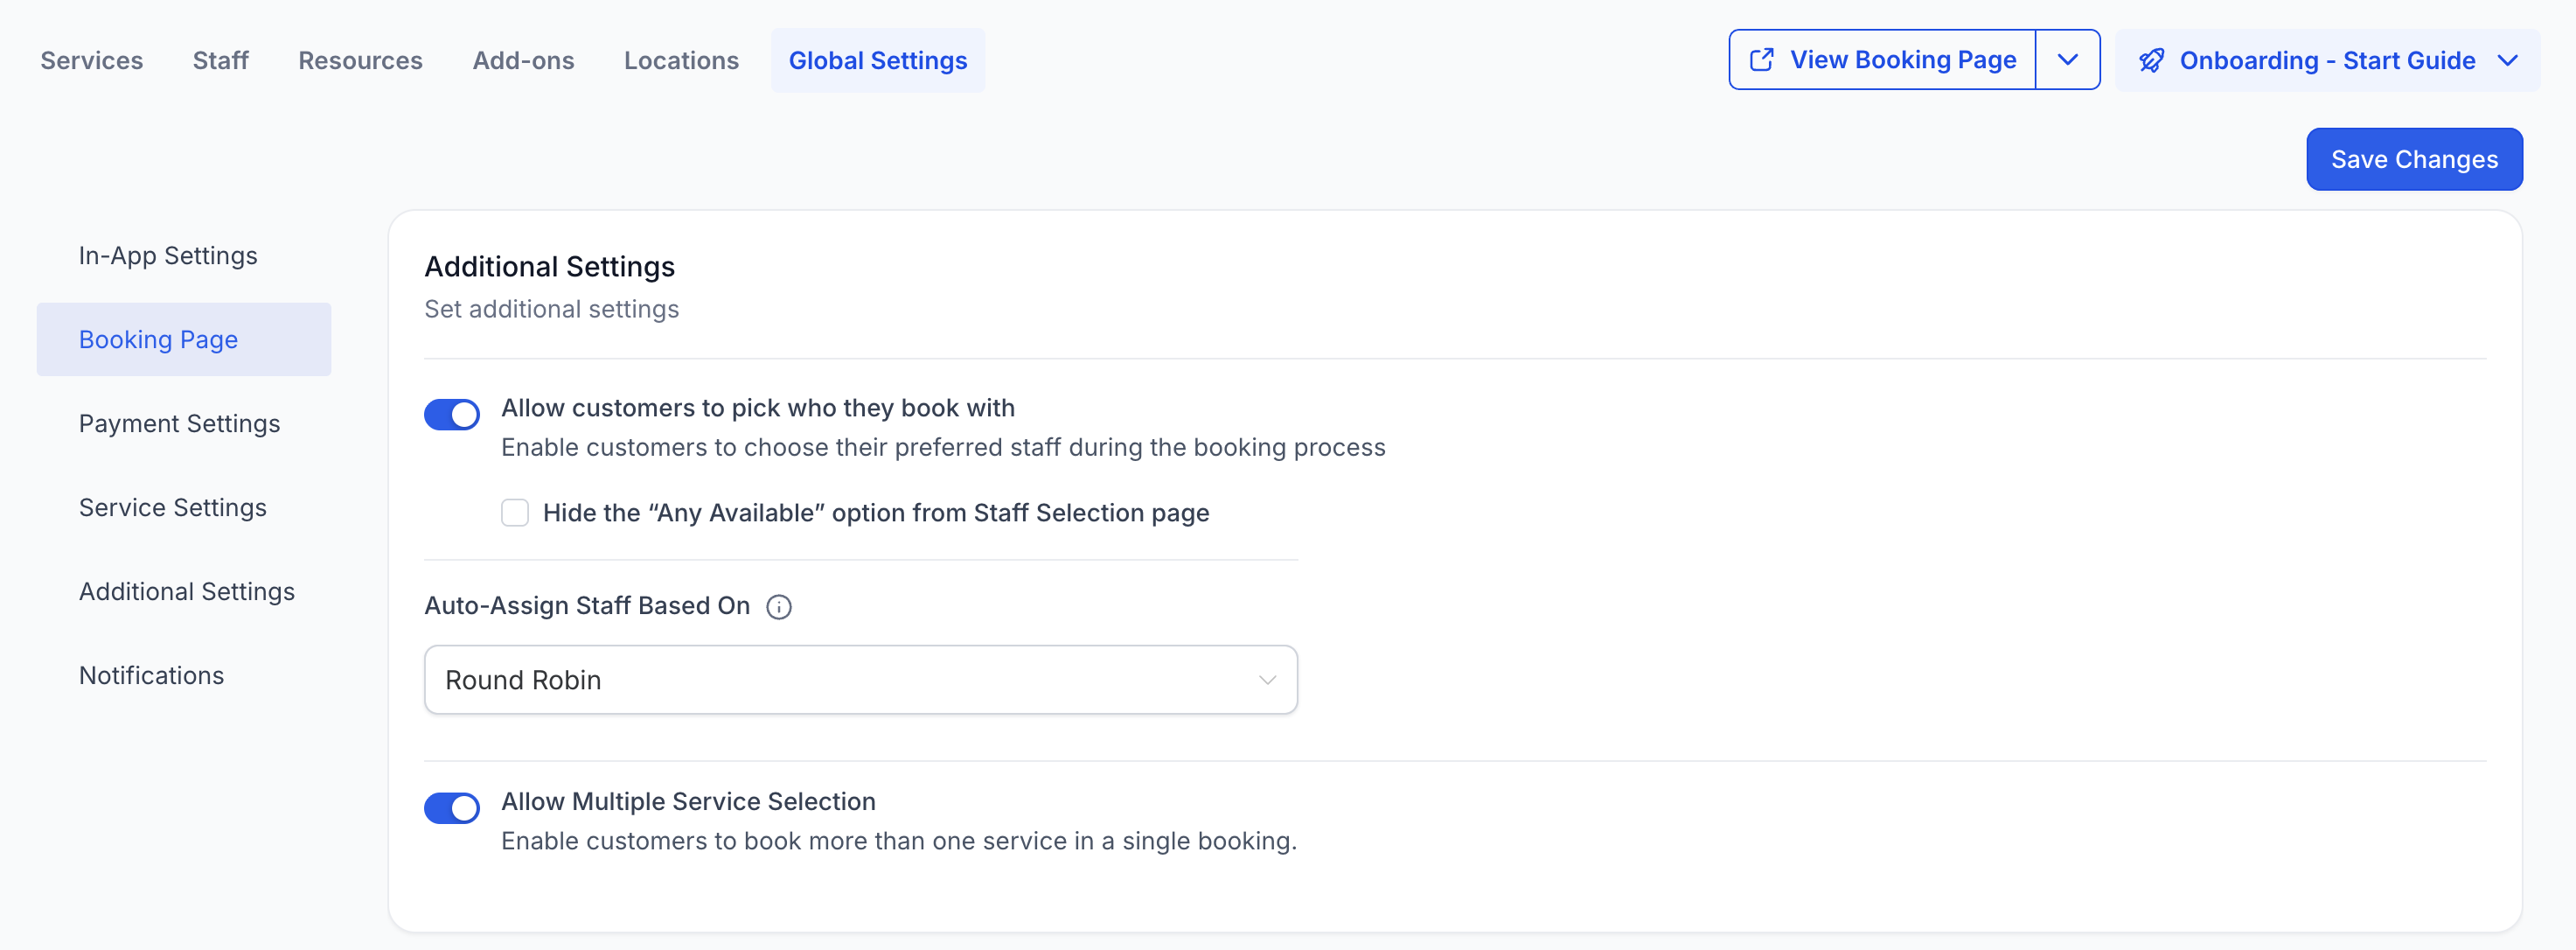
Allow parents to pick who they book with
Enable this if you want parents to select a specific staff member during booking. Otherwise, the system will assign a staff member automatically based on availability and round-robin logic.
Hide the "Any Available" option from Staff Selection page
If staff selection is enabled, you can hide the "Any Available" option, requiring parents to always select a specific staff member.
Allow Multiple Tour Selection
Enable this to let parents book multiple tour types in one session — useful if families want to see both infant and toddler classrooms, for example.
Auto-Assign Staff Based On
When parents don't select a staff member, the system will follow this preference to assign one automatically.
Forms
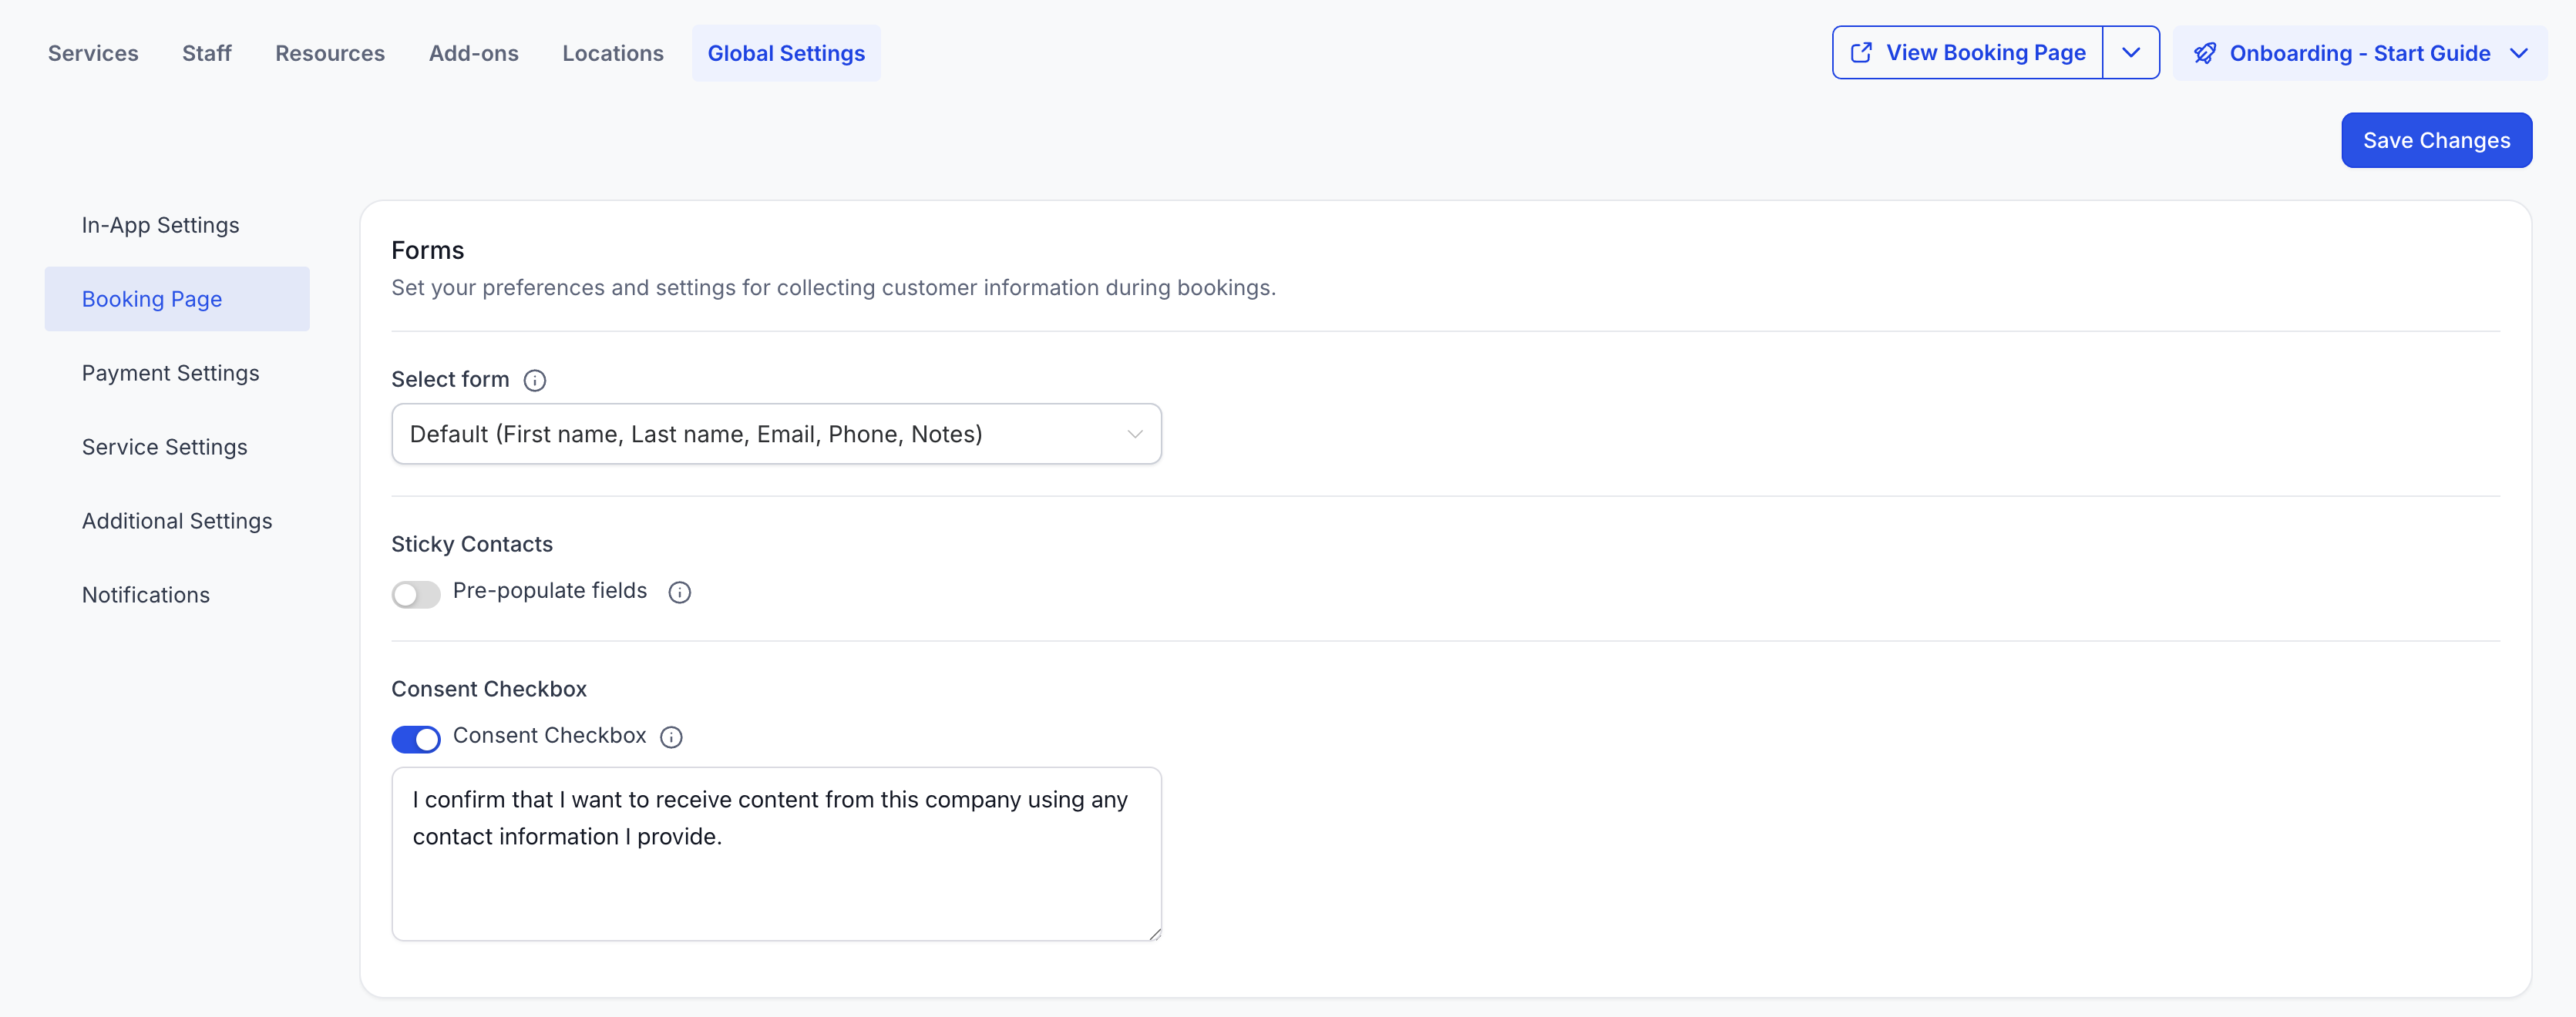
Select Form
Choose the form that should be displayed when booking tours. You can use the Default Form (First Name, Last Name, Phone, and Email) or create a custom form in Sites → Forms.
The form collects the parent's information and creates a contact record in Enrollio.
Pre-populate Fields (Sticky Contacts)
This feature remembers parent information using browser cookies and pre-populates the booking form for returning families.
Pro Tip: Only enable this when parents are filling out the form themselves. If you're using a shared computer or tablet at your front desk, different families may see each other's information.
Consent Checkbox
Enable this to obtain parent consent during the booking process. You can customize the consent message. This is only available when using the Default Form.
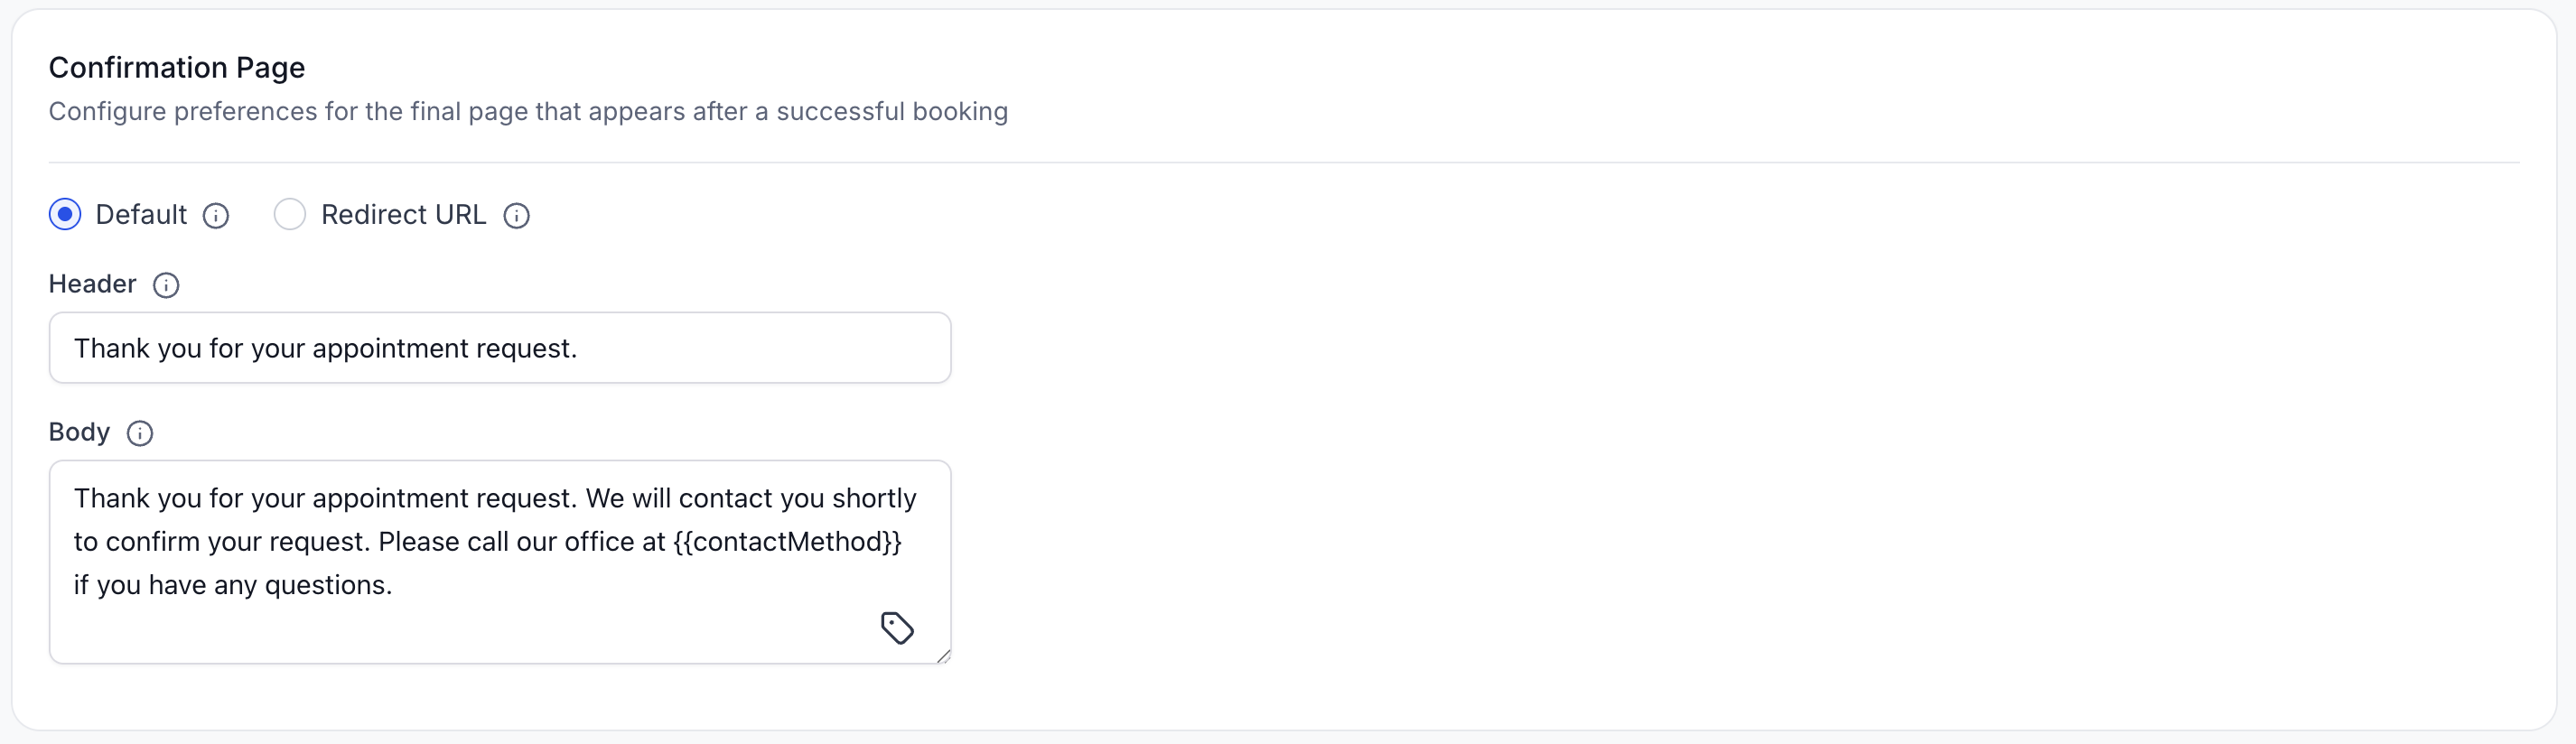
Confirmation Page
After a booking is made, choose to show a custom message on the default confirmation page or redirect the parent to another page on your enrollment site.
Payment Settings
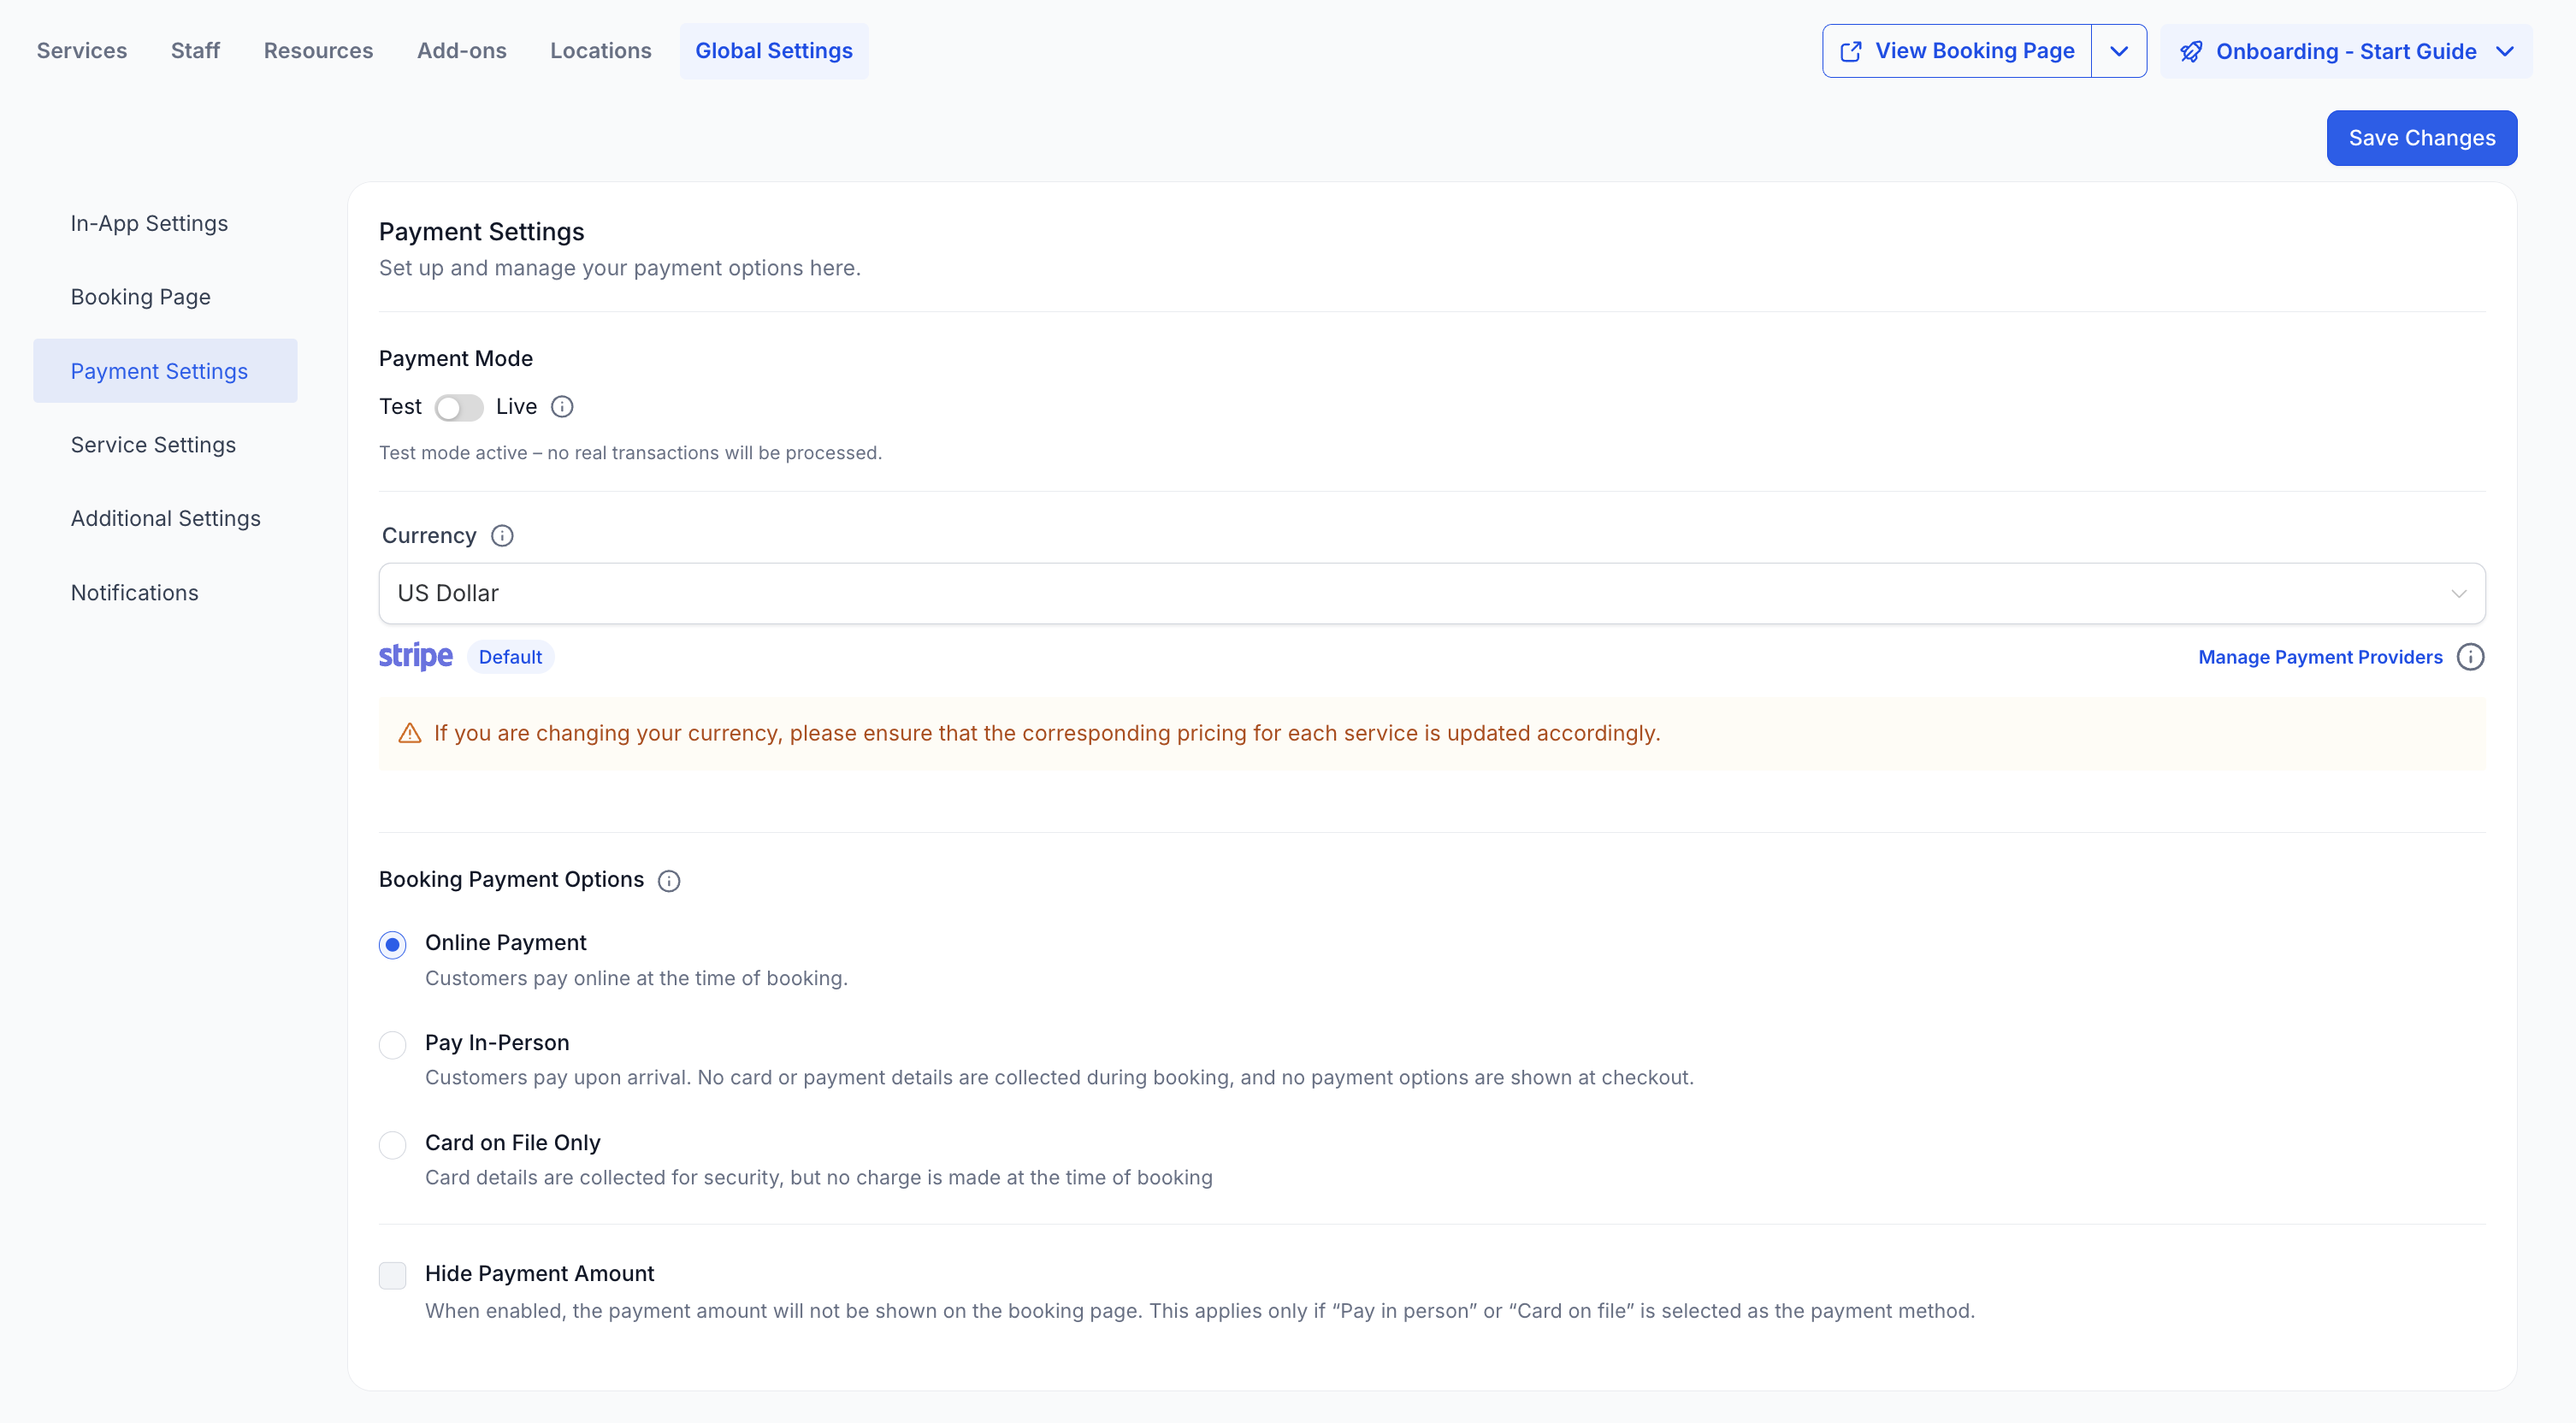
Test Mode vs. Live Mode
Enable "Test Mode" to simulate the booking and payment process without processing real transactions. Once testing is complete, toggle to "Live Mode" to start accepting real payments.
Currency
Select the currency in which payments will be displayed and collected. This applies to all tour types.
Important: If you change your currency, update the corresponding pricing for each tour type accordingly.
Booking Payment Options
Set how payments are handled on your booking page. This determines what parents see during checkout — for example, whether to collect a tour deposit, registration fee, or accept payment later.
Hide Payment Amount
Enable this option to hide the payment amount on the booking page. This setting only applies when the payment method is set to Pay in Person or Card on File.
Tour Settings
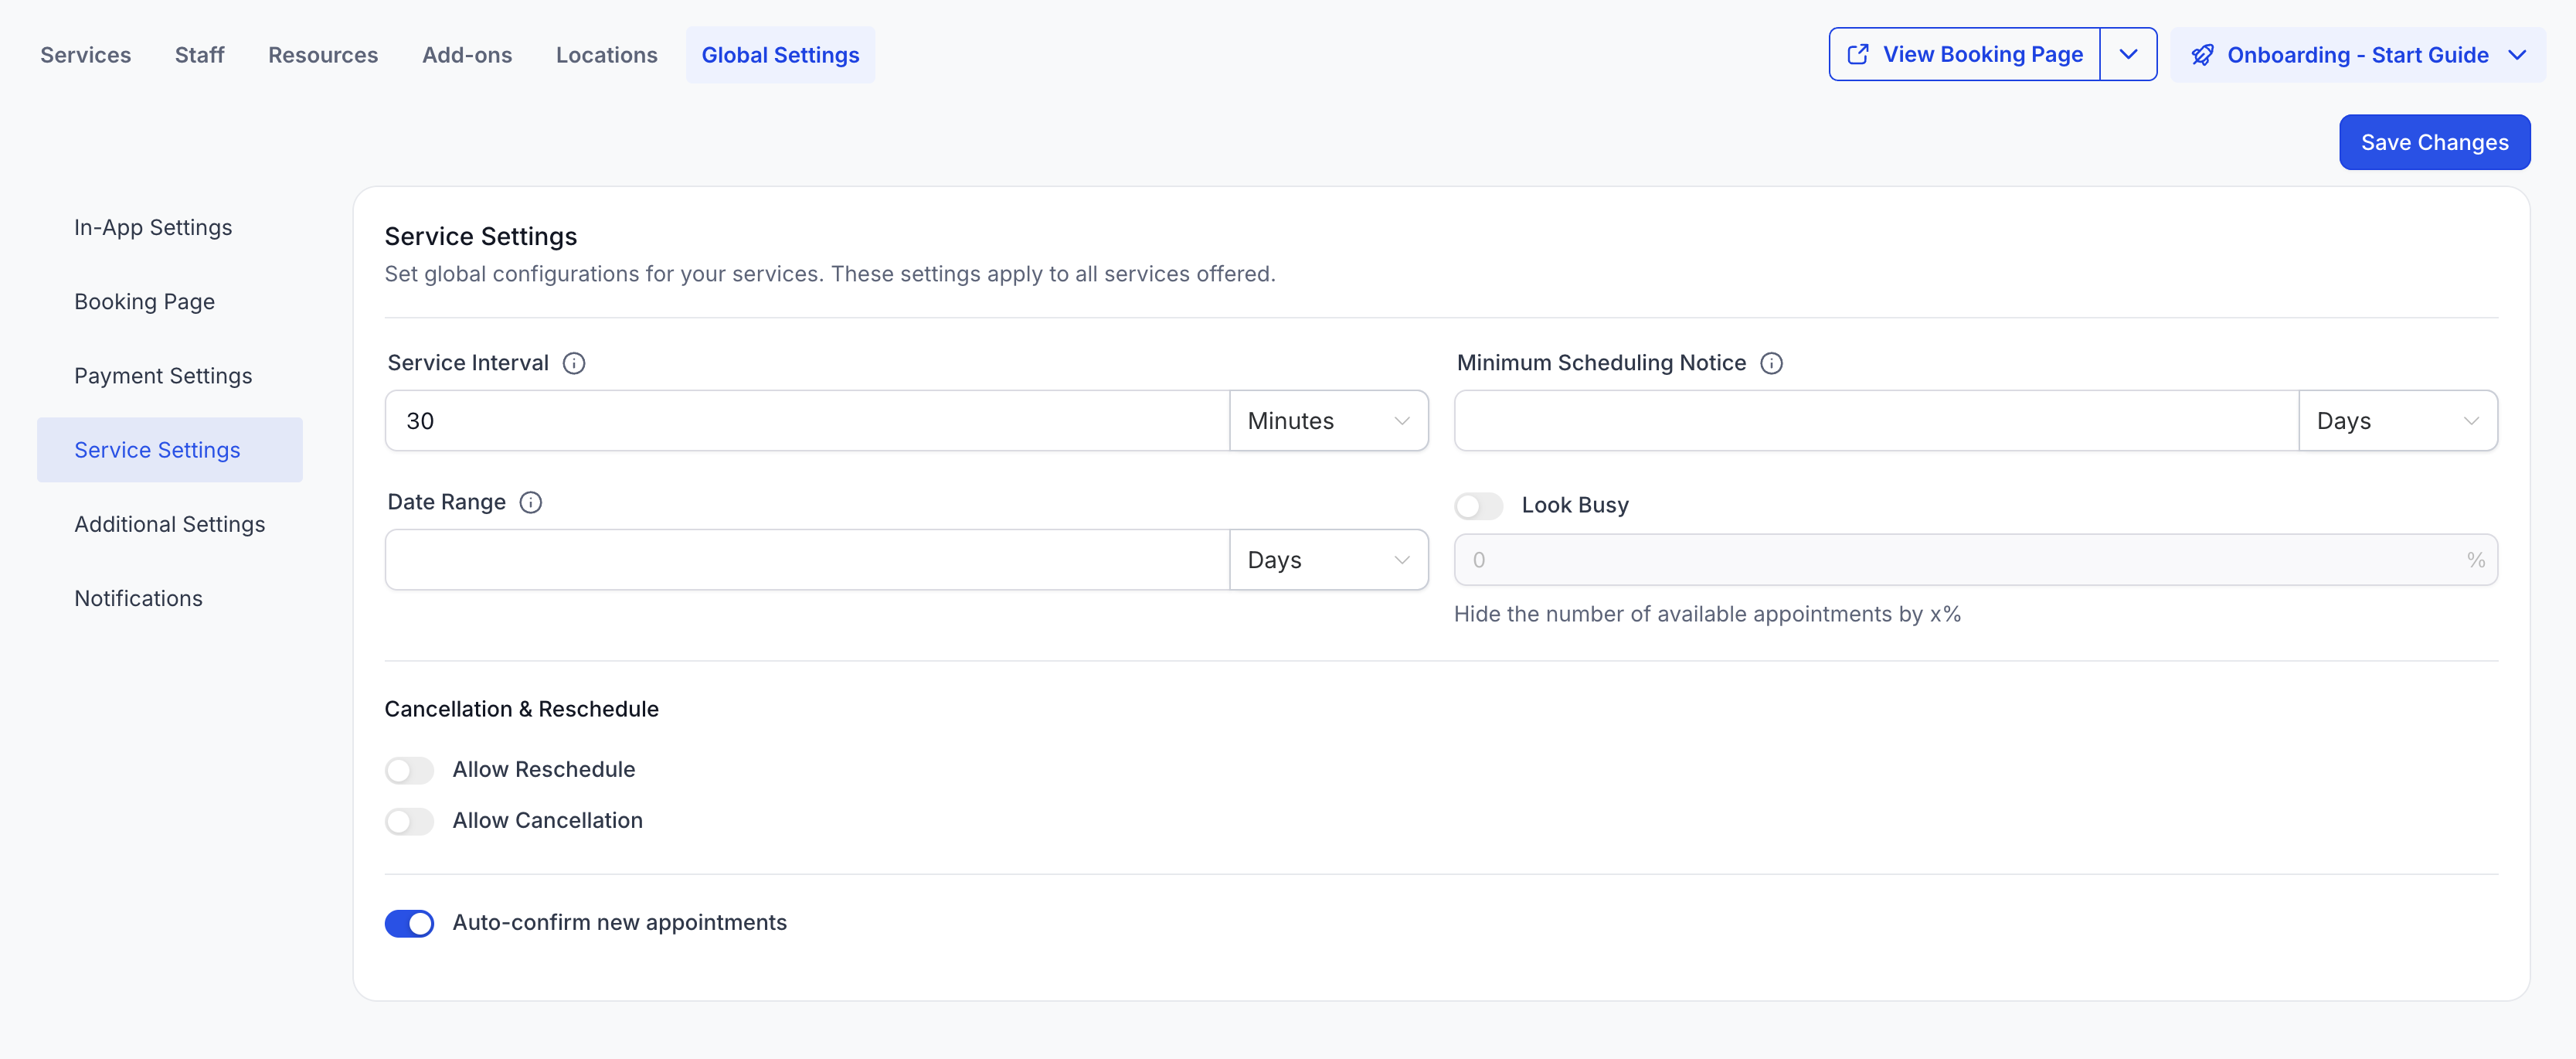
Tour Interval
Determines how often time slots are available for booking. For example:
- If the interval is set to 1 hour, available slots will be shown every hour (e.g., 9:00 AM, 10:00 AM).
- If the interval is set to 30 minutes, available slots will appear every 30 minutes (e.g., 9:00 AM, 9:30 AM, 10:00 AM).
This allows booking slots to be spaced out based on your center's tour schedule.
Minimum Scheduling Notice
The minimum time required before an appointment can be booked. For example, if the notice is set to 2 hours, a 10 AM tour slot cannot be booked after 8 AM on the same day.
Pro Tip: Set this to give your team enough time to prepare for incoming tours.
Date Range
Set how far in advance parents can book tours — for example, up to 60 days in the future.
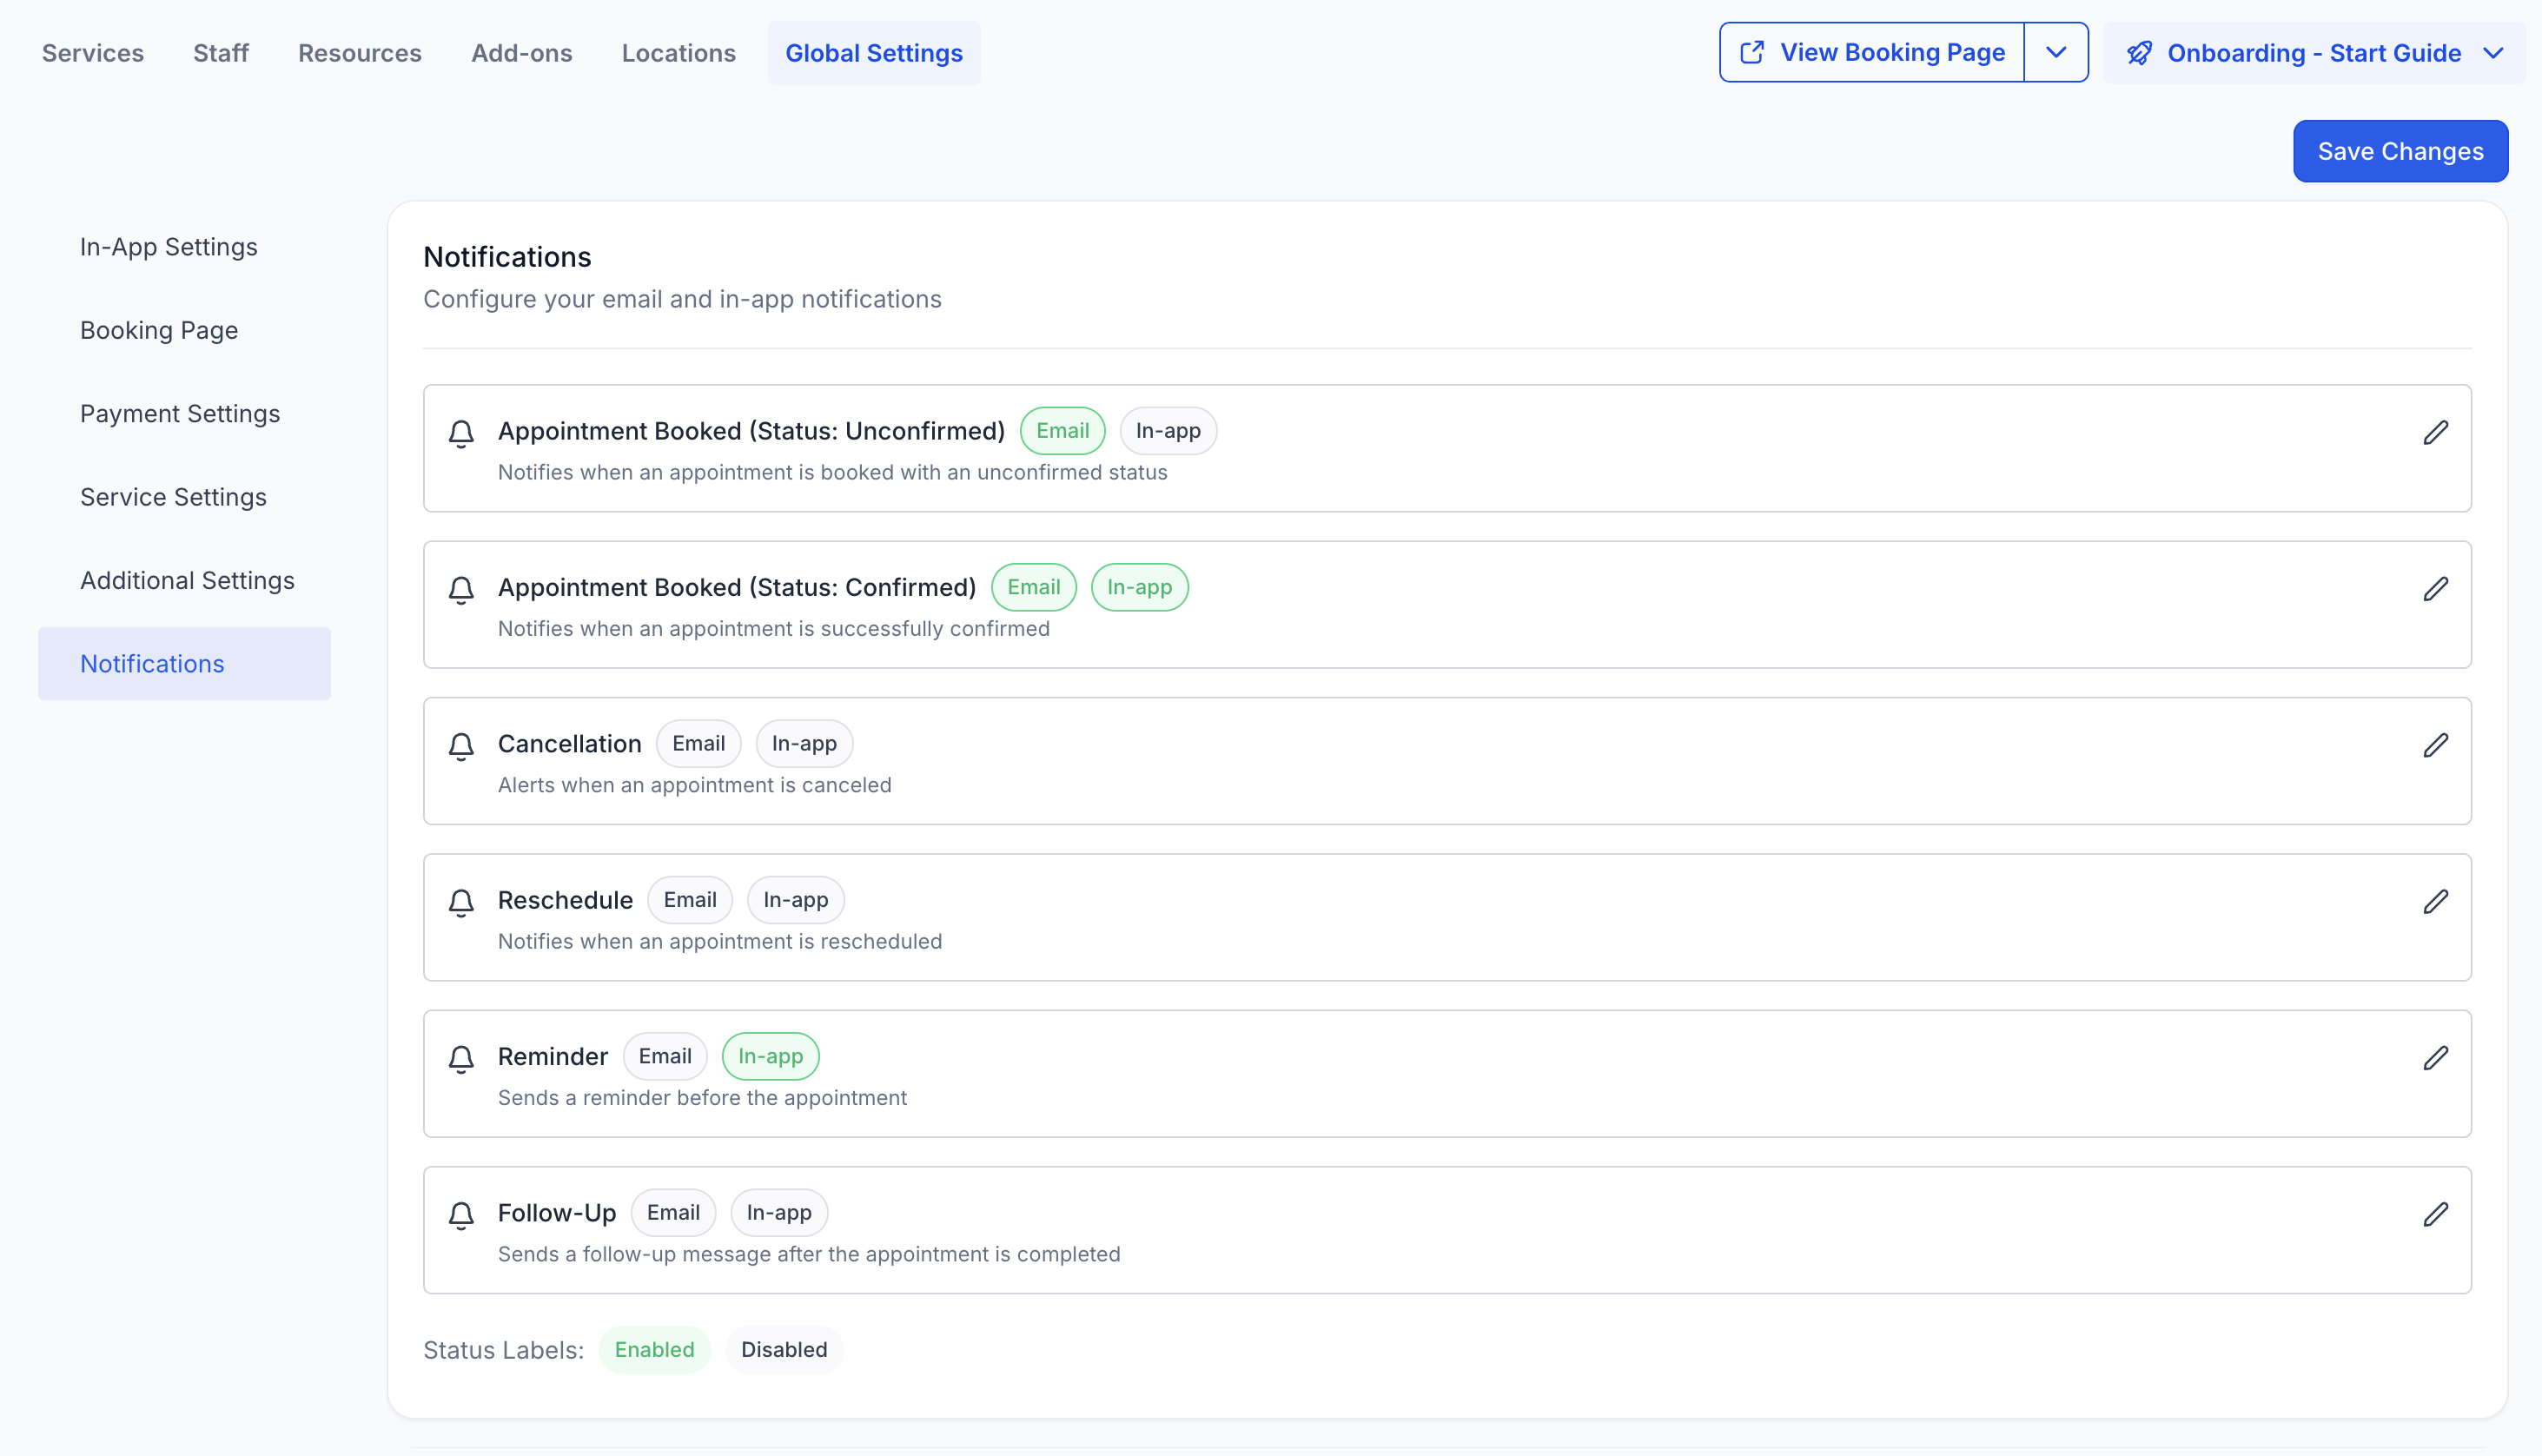
Notification Settings
Customize how and when parents and staff are notified about tour bookings. You can configure email and text message notifications for booking confirmations, reminders, and cancellations.
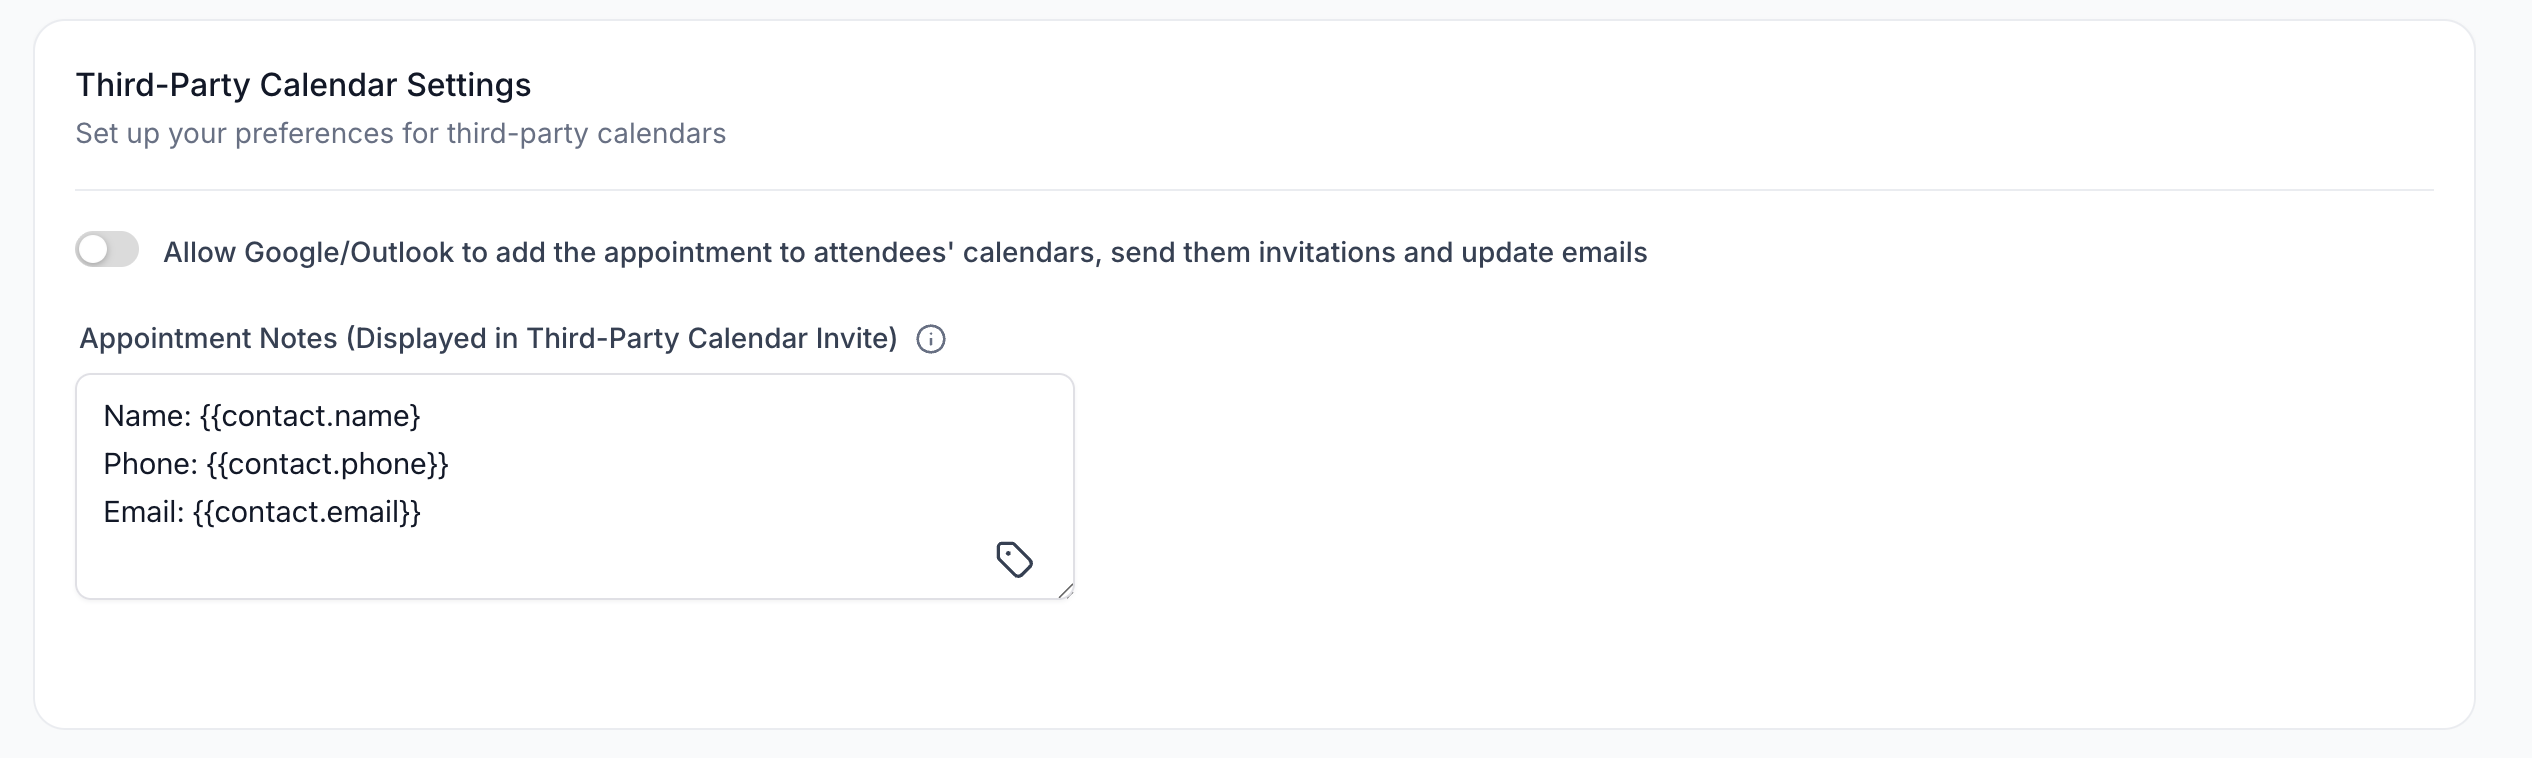
Third-Party Calendar Settings
Connect your Google Calendar or other external calendars to sync tour bookings automatically. This prevents double bookings and keeps your team's schedules up to date.
Frequently Asked Questions
Can I override global settings for a specific tour type?
Yes. Global Settings provide defaults that apply to all tour types, but you can override most settings at the individual tour level if needed.
What happens if I change my currency after setting up tour types?
You'll need to manually update the pricing for each tour type to reflect the new currency. The system won't convert prices automatically.
Should I enable "Pre-populate Fields" if families use a shared device?
No. Only enable this if parents are booking from their own devices. If multiple families use the same computer or tablet, their information may overlap.
How do I test my booking page before going live?
Enable "Test Mode" in Payment Settings, then complete a test booking. No real payments will be processed while Test Mode is on.