Importing a comprehensive contact list is a cornerstone of effective database management. When done correctly, it ensures your contacts are organized with the best data, facilitating more efficient business operations.
IMPORTANT: If you're not an Admin User, you won't be able to import/export contacts. You can adjust your User Settings by visiting Settings > My Staff > Team Management.
A .csv file with the contacts you want to import
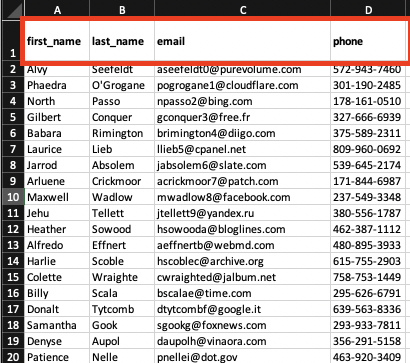
Row 1 of the file should have essential headers such as ‘first name’, ‘last name’, ‘email’, ‘phone’, ‘additional phones’, ‘tag’, and so forth.
When adding multiple phone numbers for a single contact, list them in the "additional phones" column. This feature allows you to manage multiple phone numbers seamlessly.
Format phone numbers correctly. If a "+" sign is required, add an apostrophe at the start (e.g., '+191668128779').
Avoid using File Upload and Signature Fields in the import.
For DND columns, remember that contacts will be set to DND for all channels unless specified otherwise through workflows and tags.
Clean your list and check for duplicates before importing. This is crucial for maintaining data integrity and avoiding deliverability issues.
Two options exist for adding contacts:
Manually create a contact by clicking the “+” sign in the top left corner.
Or, use the import icon (an upward-pointing arrow) to introduce contacts via your .csv file. Choosing “Import Contacts” lets you batch-import, which is time-efficient and effective.
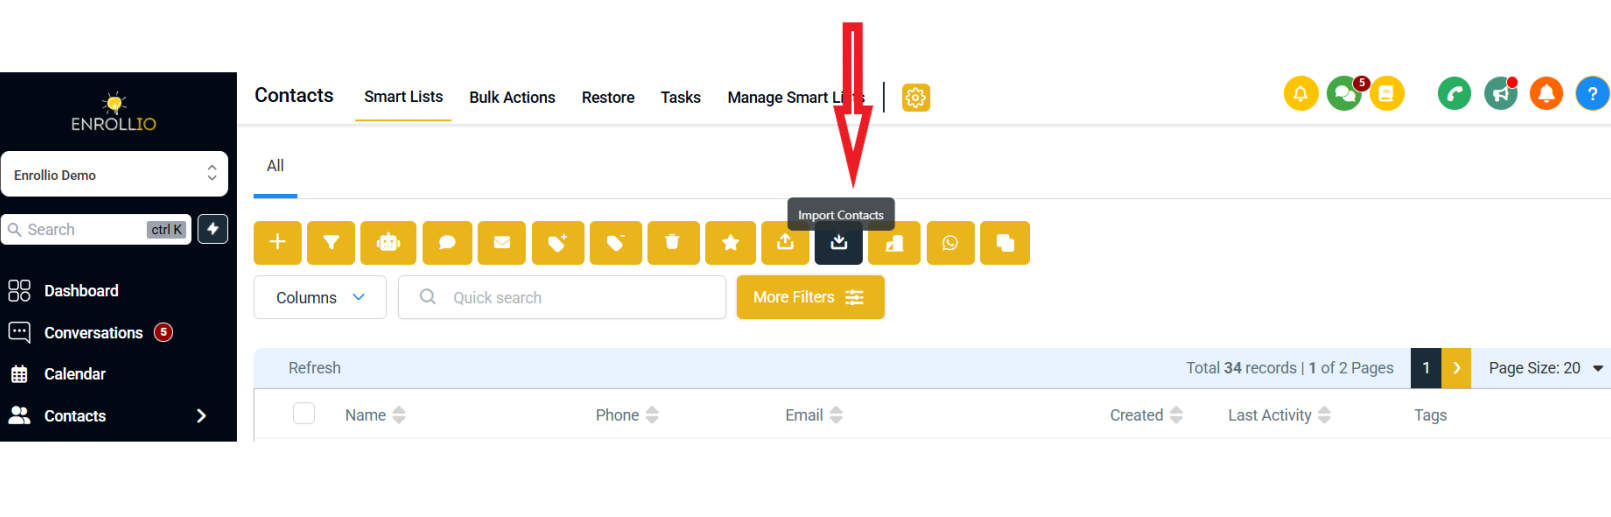
You can also Import Contacts and Opportunities in one CSV file
Access Import Option
Navigate to the Opportunities section and click the three dots (options menu).
Choose the Import option to begin the process.
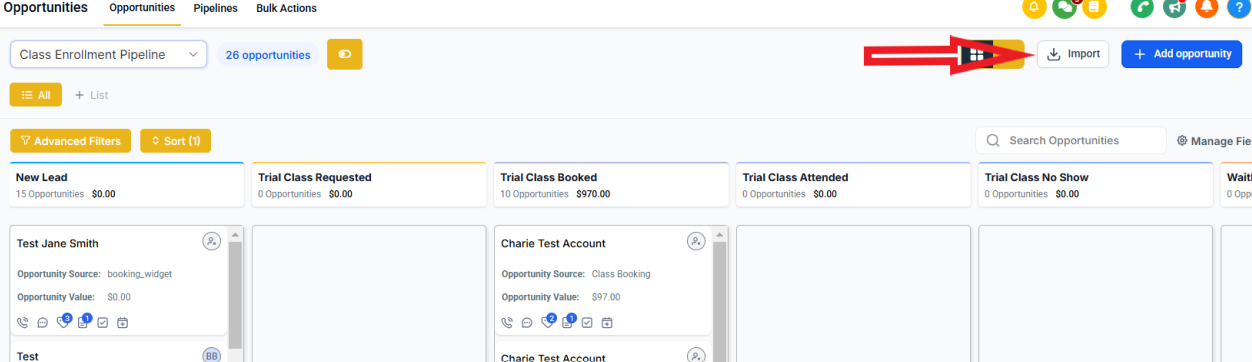
Select Objects to Import
In the import screen, select Contacts and Opportunities as the objects you want to import and click "Next.”

If the Import/Export icons are not visible, ensure a user profile has been created under Settings --> Team Management. Need help? Please Contact Support.
Upon selecting 'Import Contacts':
Select “Contacts” on the objects to start importing, then click '“Next”.

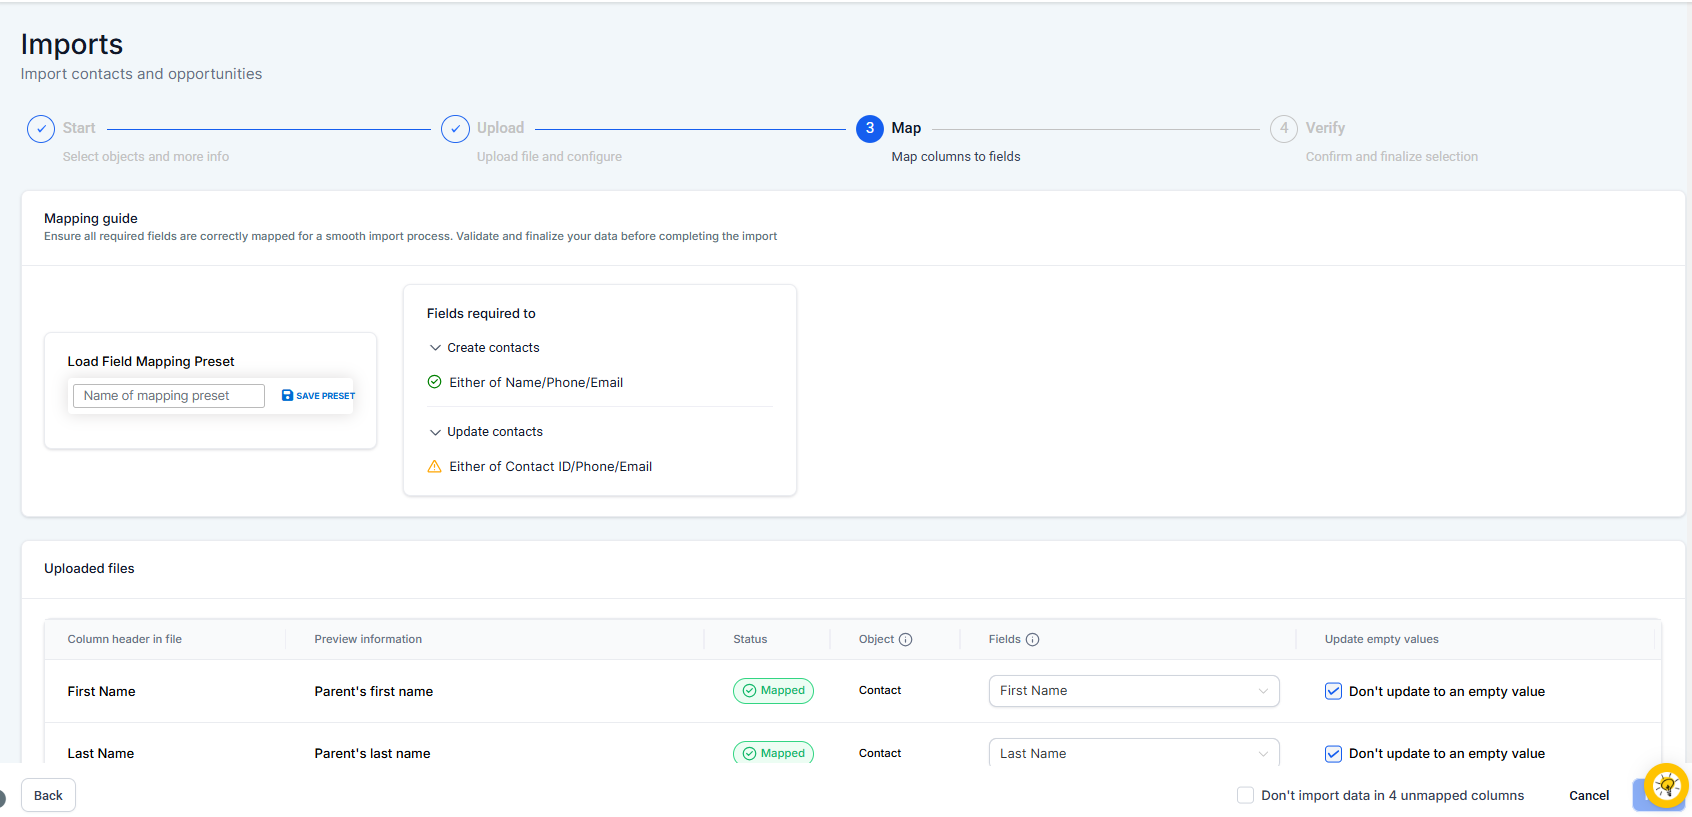
Upload the file for importing and then click on "Choose how to import contacts" to decide whether you want to create, update, or do both.
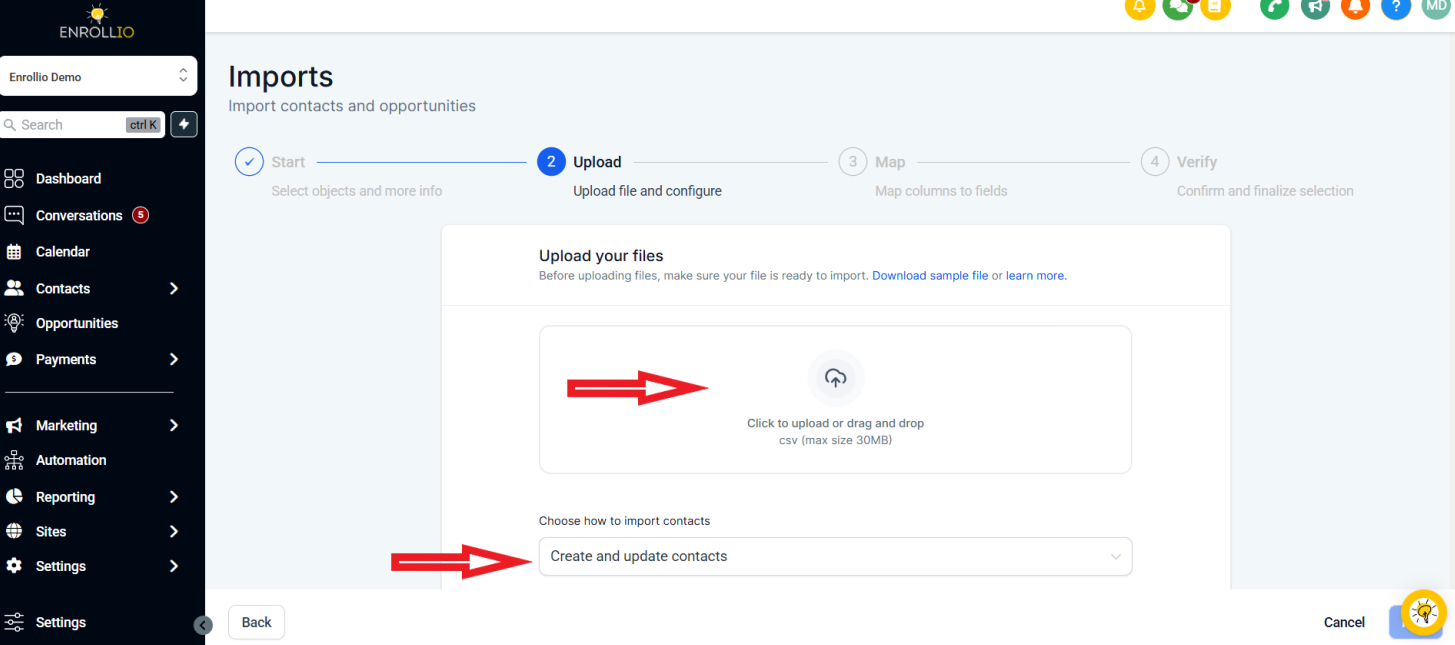
De-duplication preferences are respected when finding contacts and creating and updating contacts.
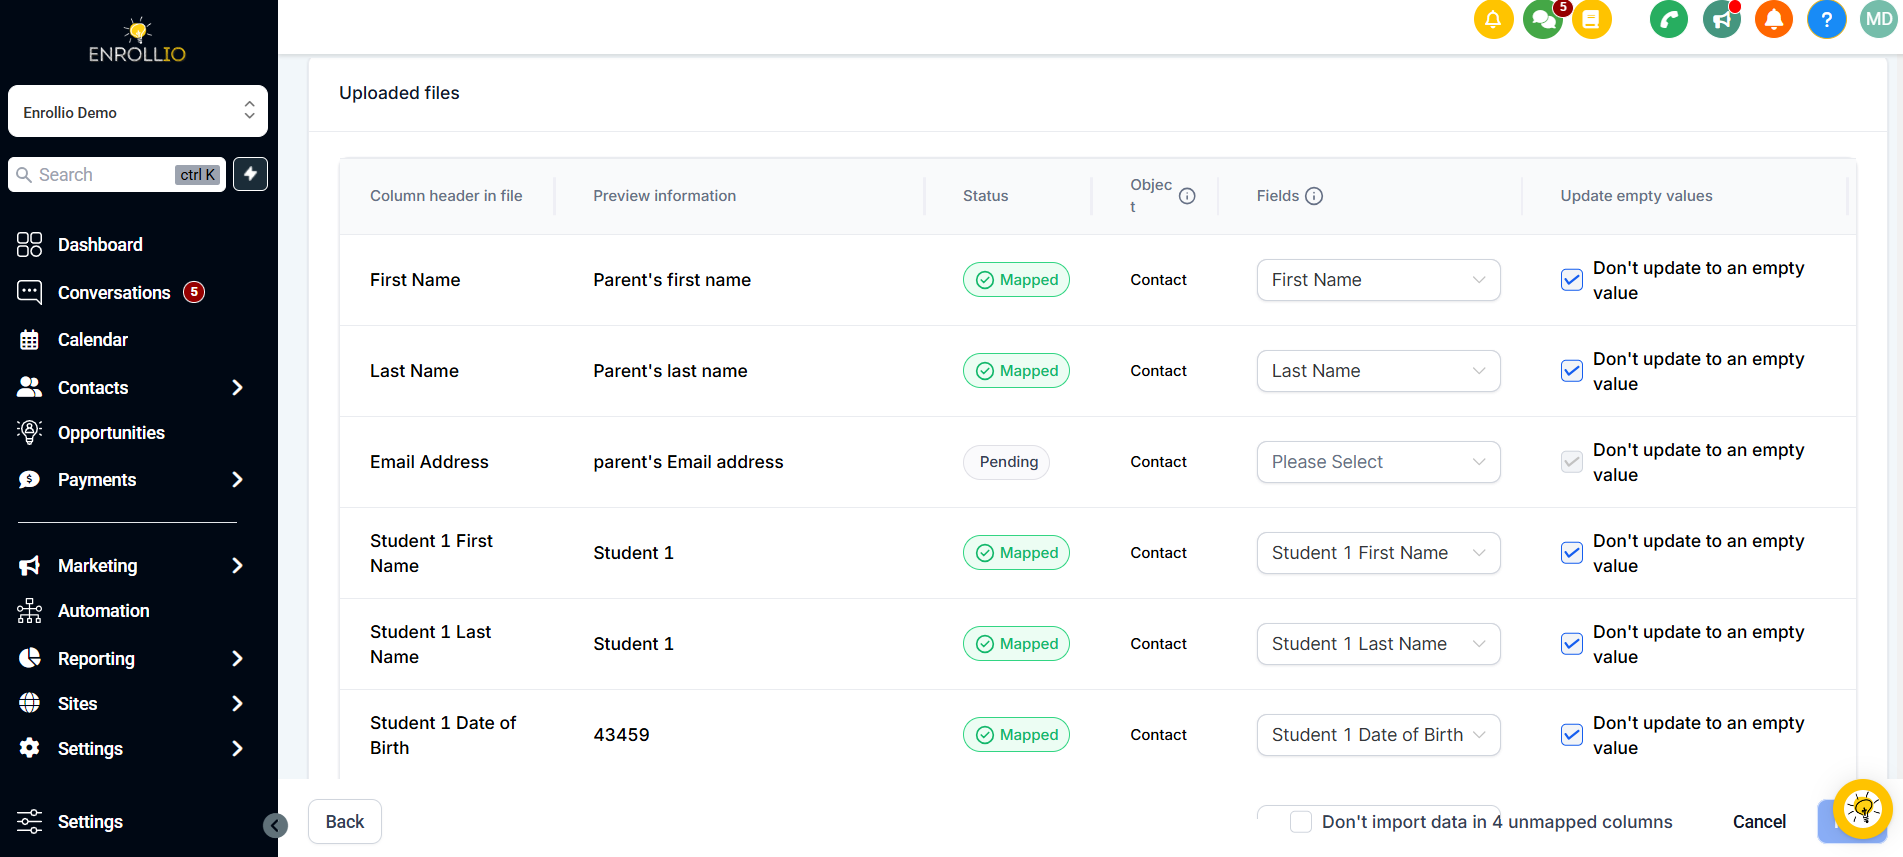
Map Your Fields: Ensure each column in your file is correctly mapped to the corresponding field in the system.
Adjust the mappings if necessary.
A few things to note:
Checking the "Don't update Empty Values" checkbox will not update any field if the imported file has empty values and the field does have some value for the opportunity
If you decide not to import a certain field, you can choose to keep it unmapped and check the box at the bottom to proceed. -"Please ensure all mandatory fields are mapped. To proceed, either map all fields or choose Don't import data for unmapped columns."
6. Review and Confirm: Review the data preview to ensure everything looks correct. Confirm the import to proceed.
Note that it is mandatory to check the box on the bottom and accept the disclaimer before importing.
You can add tags to the corresponding contacts for these opportunities on this screen.
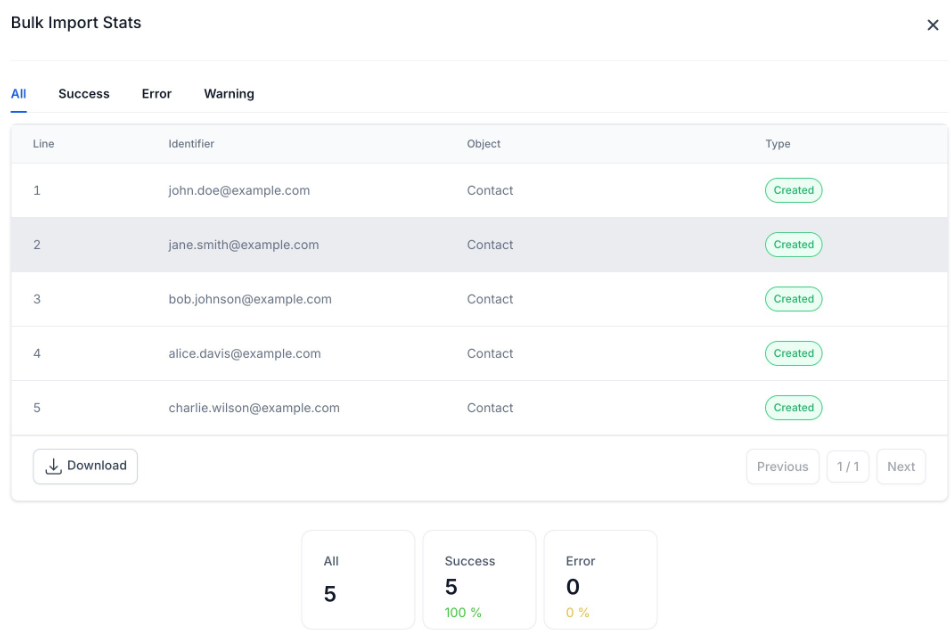
Monitor the Import: Check the import progress under Opportunities > Bulk Actions. If any errors occur, refer to the error messages provided for guidance on fixing them.
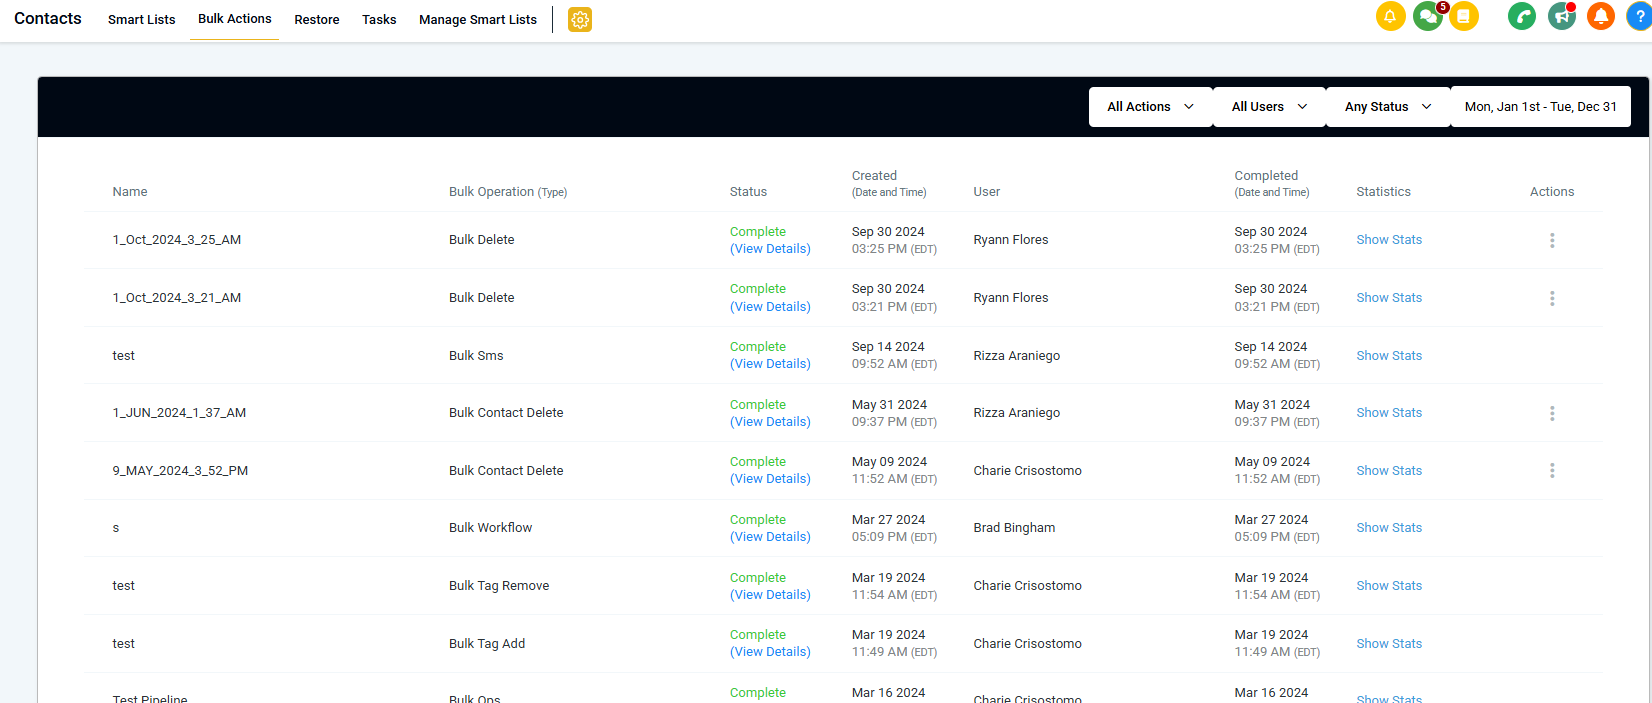
Monitor stats, errors, and warnings by clicking on the "Show Stats" button for any import.
Errors: Failures in mandatory fields that cause the import to fail for that row
Warnings: Failures in optional fields where the import happens for that row, but that specific field is not updated
NOTES:
Every contact record should have at least one phone number or email address for a successful import. Just listing names won’t work.
Address common issues such as error code 1007, which requires adding country codes to phone numbers.
For importing notes for a contact, ensure only one note per contact with a limit of 5000 characters. Use a large text custom field for more extensive notes.
Exporting contacts from Enrollio is an essential feature that enhances data management, facilitates smooth transitions between systems, and supports various strategic initiatives. This guide will walk you through the process, its benefits, and some FAQs to address common queries.
1. Migrating to a New Enrollio or Account
Benefits: Seamless transition, retention of contact details, no manual data entry.
2. Creating Targeted Marketing Campaigns
Benefits: Improved marketing efficiency, higher conversion rates, personalized outreach.
3. Collaborating with Team Members
Benefits: Enhanced teamwork, consistent information, centralized data management.
4. Generating Reports and Analytics
Benefits: Data-driven decisions, identification of trends, understanding customer needs.
5. Backup and Data Security
Benefits: Protection against data loss, easy data restoration, and increased peace of mind.
Step 1: Accessing Contacts
Who Can Export: Only account admins.
How-To: Log into your account and navigate to the Contacts tab.
Step 2: Selecting Contacts
Process: Browse and select contacts individually or use filters for bulk selection.
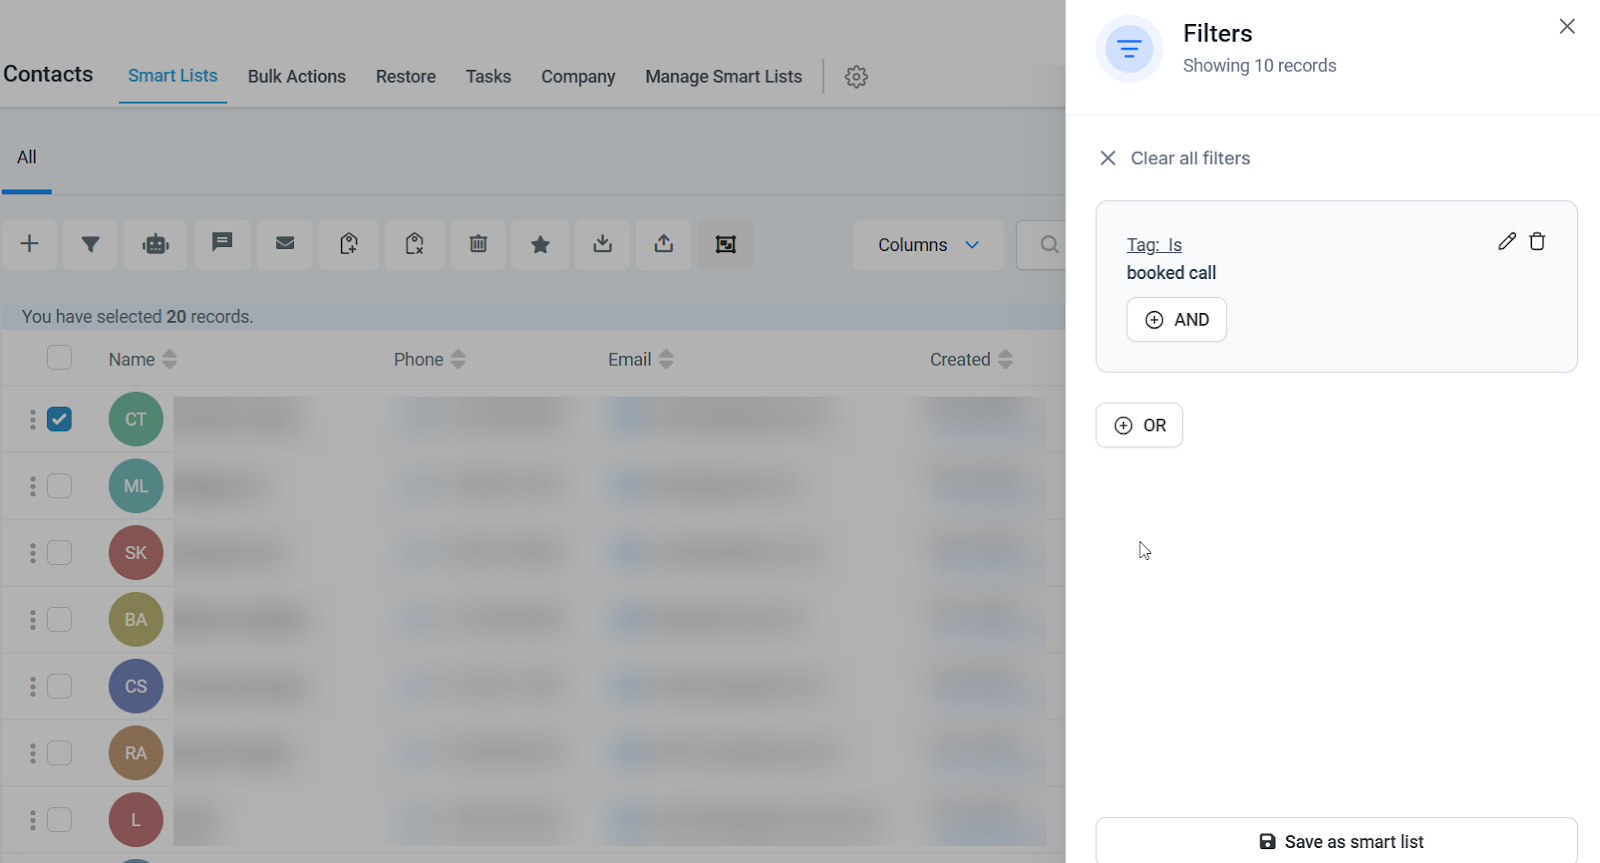
Note: You can choose all contacts on a page or the entire list.
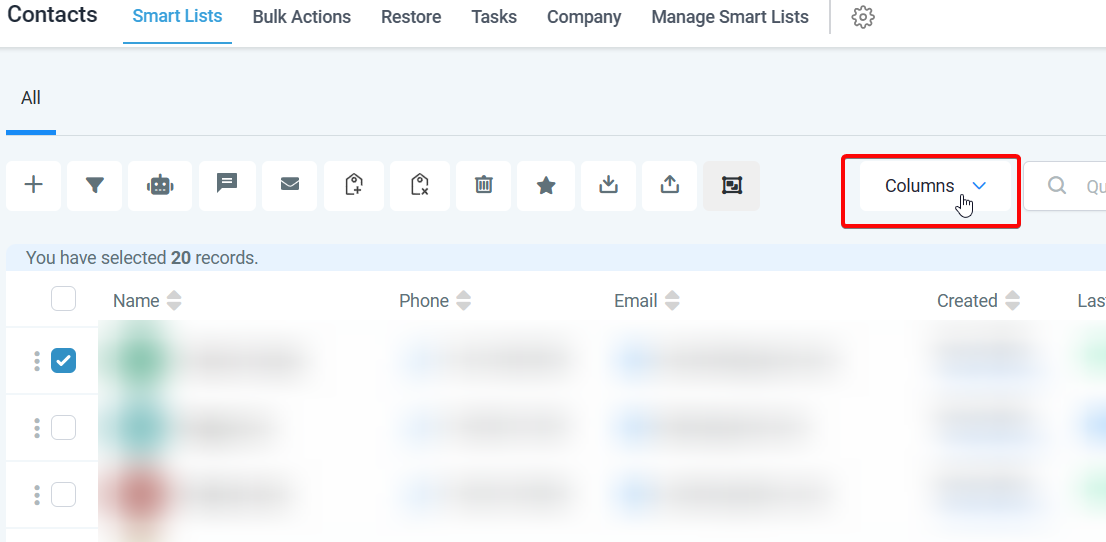
Step 3: Customizing Columns (Optional)
Action: Click the Columns button and select the data fields you want in your export.
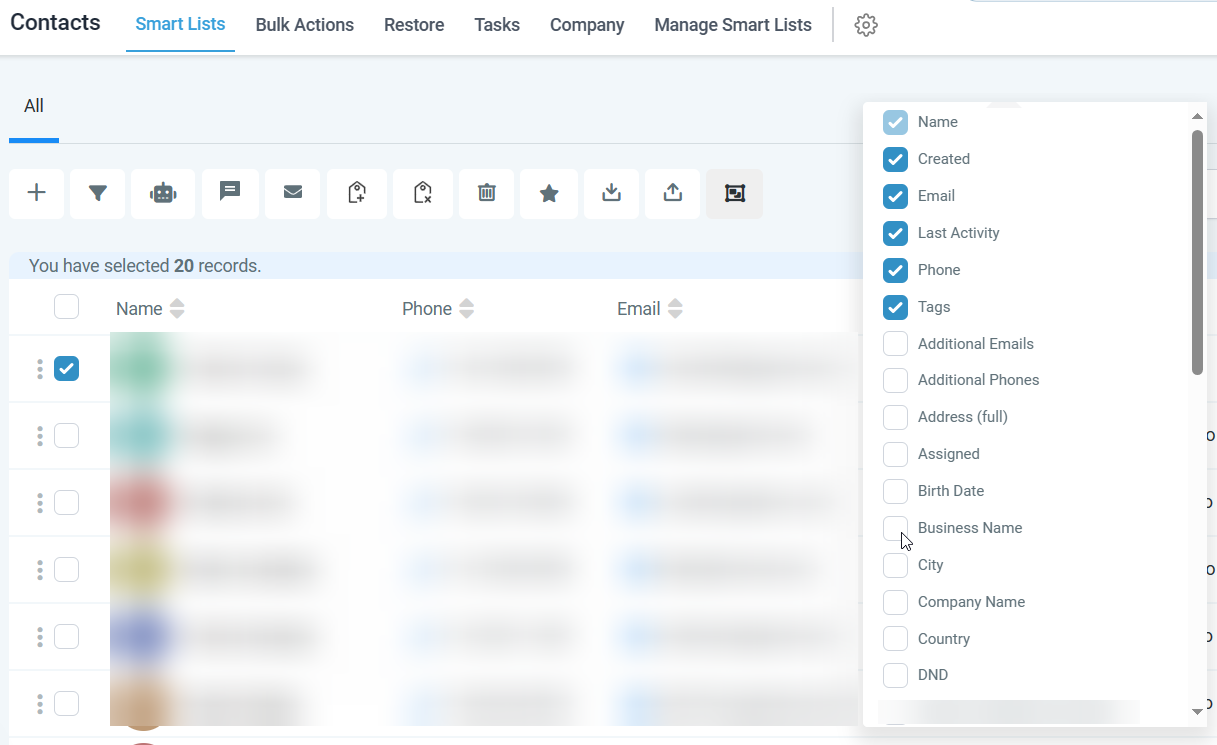
Additional Email Column: If selected in the smart list, the “Additional Email” column will appear in the export.
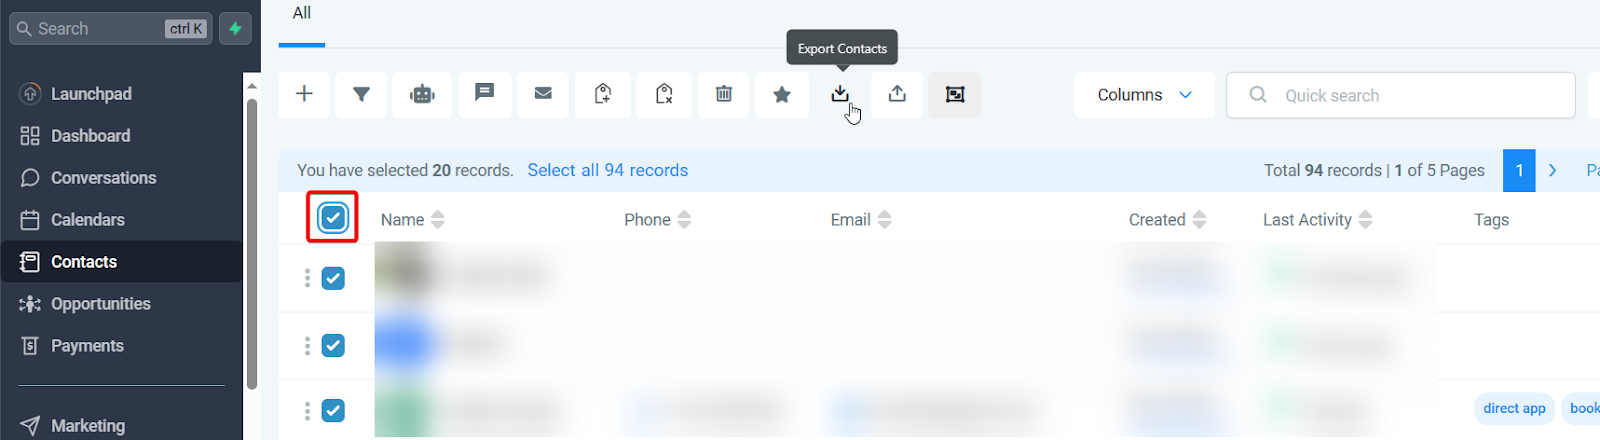
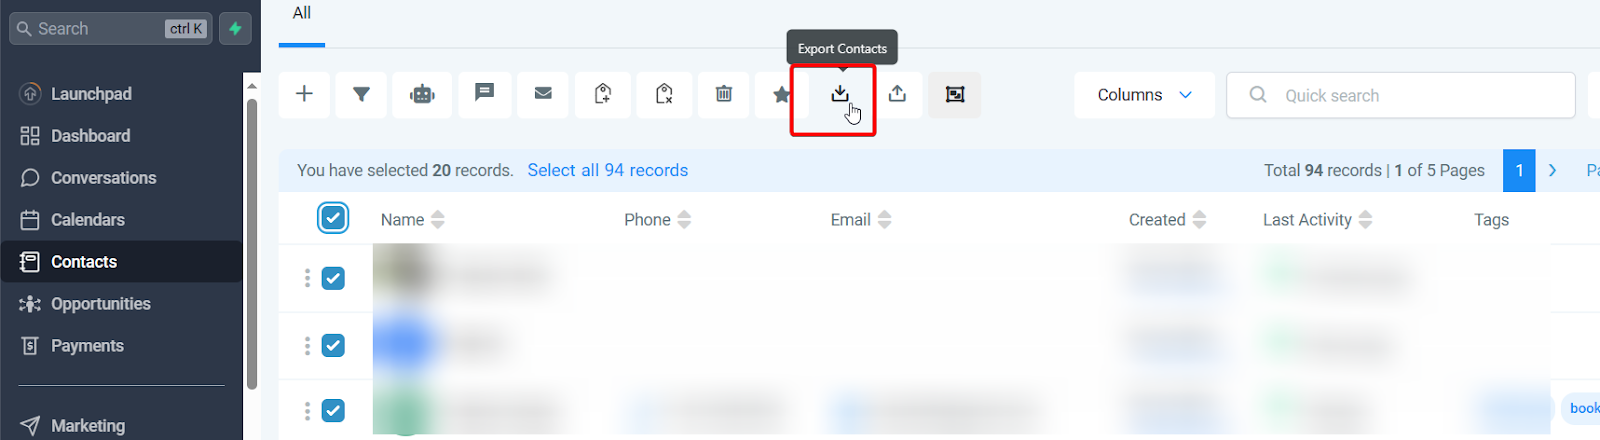
Step 4: Exporting Contacts
Action: Click the "Export Contacts" button and confirm the export.
Step 5: Downloading the .csv File
Process: Once the export is complete, download the .csv file.
Q1: Can I Export Specific Data Fields?
Answer: Yes, you can customize the data fields in the exported .csv file.
Q2: What About Notes Exceeding 255 Characters?
Answer: Only the most recent note, up to 255 characters, is included. More extended notes are truncated.
Q3: Can I Export from Multiple Accounts Simultaneously?
Answer: Exports are done separately for each account, but you can combine .csv files later.
Q4: Is Automatic Export Possible?
Answer: Currently, this feature is not available.
Q5: How do you Import the .csv File into Another Platform?
Answer: Follow the import instructions of the new platform, typically involving column mapping.